


Straight Set vs On Point Quilts: Which Suits Your Blocks?
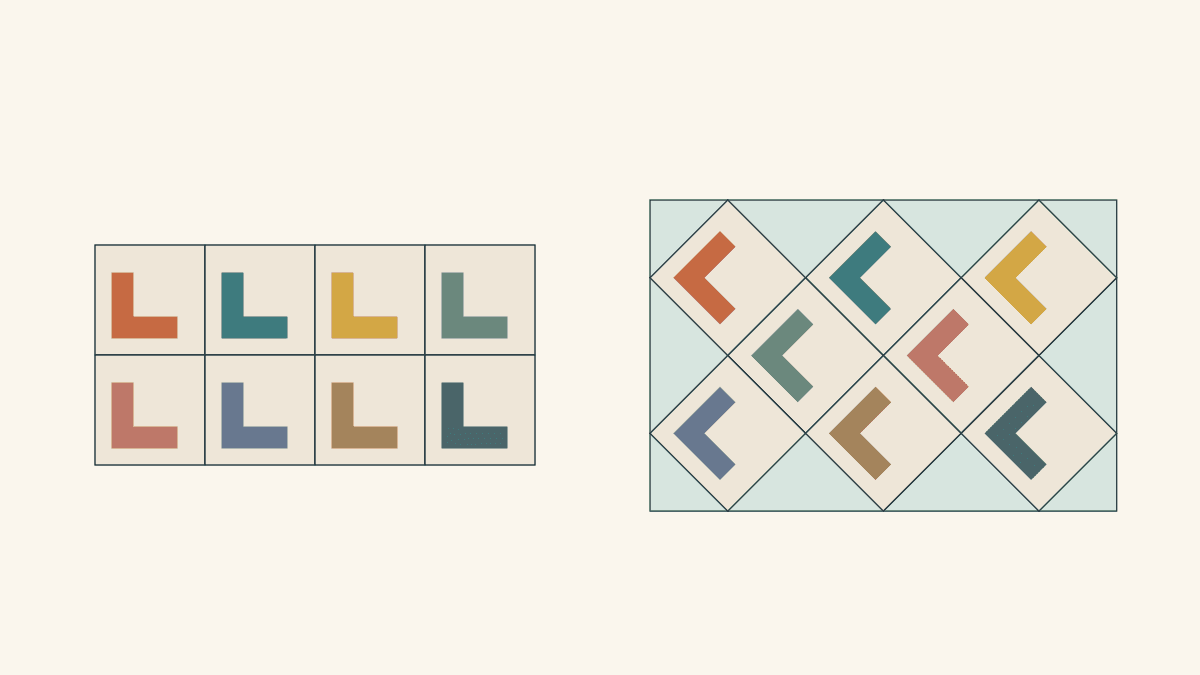
Choose a straight setting for the simplest rows and a footprint you can count directly from the blocks. Choose on point when turning the blocks improves the motif's direction and you want the proportions created by added edge triangles. Compare both with the same blocks at the same scale before deciding.
Straight-set blocks sit square to the quilt's outside edges. On-point blocks turn 45 degrees and look like diamonds. Taryn at Repro Quilt Lover shows this distinction in her on-point setting guide, including the triangles needed to finish a rectangular edge.
The useful question is what happens to your particular set of blocks. Below, we'll use eight 10-inch finished blocks twice, keeping the blocks themselves unchanged.
Start with the direction inside the block
Lay one block upright, then turn it 45 degrees. Look at the design inside it before looking at the outside square. Does a stripe become a diagonal? Does a diagonal through the center become horizontal? Does a directional print still face the way you want?
In her comparison of block settings, designer Deanne Eisenman shows how a turned block can change the design you notice. She also recommends straight rows as the simplest setting: join blocks into rows, then join those rows.
A directional picture block may make the choice for you. A pieced block with no clear top can work either way. Melanie McNeil makes that distinction in her discussion of straight and on-point medallion centers. Her examples concern a center block; the same direction check is useful before repeating blocks across a top.
Try both with your actual blocks or photos. The L-shaped motif in our diagrams makes the turn easy to see. A star or four-patch with more rotational symmetry may change less dramatically.
Keep the block set fixed for a fair comparison
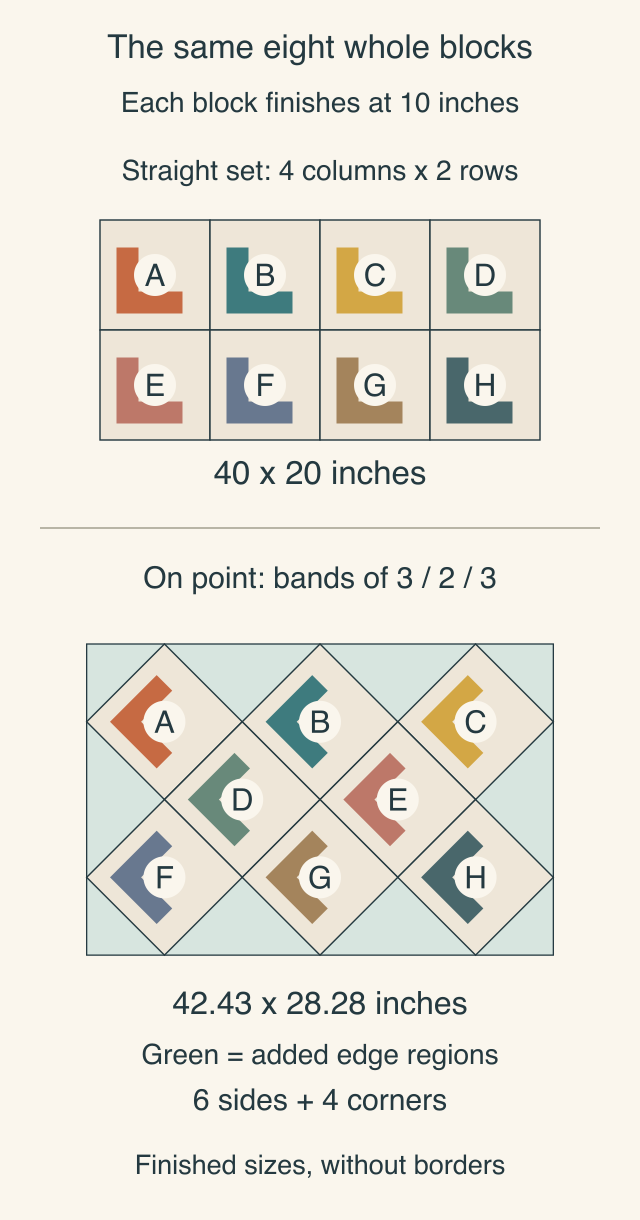
Give the eight loose blocks labels A through H. Each block finishes at 10 x 10 inches. Keep its colors and internal motif unchanged in both layouts.
For the straight setting, arrange them in four columns and two rows:
- Top row: A, B, C, D.
- Bottom row: E, F, G, H.
Without sashing or borders, the finished center is:
- Width: 4 x 10 = 40 inches.
- Height: 2 x 10 = 20 inches.
- Area: 40 x 20 = 800 square inches.
We drew these diagrams for this article and haven't sewn them; the measurements describe finished geometry, not cutting sizes or sewing templates.
Now rearrange the same loose blocks into an on-point rectangle. Read the horizontal bands from top to bottom:
- Three blocks: A, B, C.
- Two blocks centered below them: D, E.
- Three blocks: F, G, H.
Every label appears once. Each square block has turned 45 degrees, and the middle band fills the spaces between the upper and lower blocks. The remaining spaces along the outside need setting triangles.
Work out the finished footprint
A 10-inch square measures 10 x square root of 2, or about 14.142 inches, from one corner to the opposite corner. That's the full width and height of one block when it is on point.
Call that diagonal D. The three-block bands span 3D across. The middle band sits half a diagonal lower, and the bottom band sits another half diagonal lower. Including the half-diagonal above the first centers and below the last centers, the whole rectangle is 2D tall.
- Width: 3 x 14.142 = about 42.43 inches.
- Height: 2 x 14.142 = about 28.28 inches.
Keep the unrounded diagonal while calculating; round the final measurements for your comparison. This layout has a 3:2 width-to-height ratio, while the straight set has a 2:1 ratio. The on-point version is closer to a square.
| Choice | Straight set | On-point example |
|---|---|---|
| Whole blocks | 8 | The same 8 |
| Finished footprint | 40 x 20 inches | About 42.43 x 28.28 inches |
| Added edge regions | None | 6 sides and 4 corners |
| Width-to-height ratio | 2:1 | 3:2 |
The extra width is only about 2.43 inches, while the extra height is about 8.28 inches. That difference matters more than saying the setting is simply "bigger." If you're working toward a bed or wall measurement, compare both dimensions with the space you need to fill.
Count what fills the outside edge
In this particular on-point rectangle, count the green regions around the whole blocks:
- Two side triangles across the top and two across the bottom.
- One side triangle at the left and one at the right.
- Four corner triangles, one at each corner.
That's six side regions and four corner regions. Each side region occupies half the finished area of one block: 50 square inches. Each corner region occupies a quarter: 25 square inches.
The area check is:
- Eight whole blocks: 8 x 100 = 800 square inches.
- Six side regions: 6 x 50 = 300 square inches.
- Four corner regions: 4 x 25 = 100 square inches.
- Total finished rectangle: 800 + 300 + 100 = 1,200 square inches.
The rectangle's width times height gives the same total: (3 x 10 x square root of 2) x (2 x 10 x square root of 2) = 1,200. The added setting area is 400 square inches, or 50% of the straight setting's 800 square inches.
That percentage belongs to this eight-block arrangement. A different number of blocks or different band lengths needs its own map and count. Finished area also doesn't give fabric yardage: cutting sizes, grain direction, usable fabric width and waste affect what you need to buy.
For that construction step, use our on-point setting guide, which explains side and corner triangles, grain direction and cutting calculations. Keep your finished layout sketch beside the construction plan so each triangle has a clear destination.
Treat the edge fabric as part of the design
Try the setting triangles in the block background color first. Then try a different value. Matching the background can make the blocks seem to extend into a larger field. A contrasting edge makes the boundary of each diamond more visible.
Keep the triangle shapes unchanged while changing color. Otherwise you won't know whether you prefer the color, the geometry or both. Our background fabric guide can help you compare contrast with the prints already in your blocks.
Sashing and borders are later decisions. Adding them during only one version changes the comparison. If you want sashing, sketch it in both versions and recalculate the footprint. If you want alternate whole blocks, use the separate sampler alternate-block comparison to plan their count and effect.
Choose the setting before planning the cuts
For a first attempt with a stack of square blocks, start with straight rows unless the turned motif gives you a reason to choose on point. On point asks you to plan more edge pieces and assemble diagonal rows, but it may give your blocks the direction and proportions you prefer.
Make two small sketches using every block label once. Keep the scale fixed, mark the top of directional motifs, and write the finished width and height beneath each. Choose the layout that suits both the picture and the space.
This comparison rearranges loose blocks. Rotating an already joined 40 x 20-inch rectangle would produce a different outline; it wouldn't create our three/two/three arrangement.
You can keep the two layout images and your decision notes together in the Canvas Editor. Once you've chosen, take the labeled sketch to the setting-triangle guide and work out the cutting plan for that exact arrangement.
Related posts

How to Design a Bargello Quilt: Plan the Wave on Paper
A bargello wave is a staircase of stepped columns. Number your strips, write one row per column, and see how column width turns a zigzag into a curve.
How to Design a Medallion Quilt So Every Border Fits
Plan a medallion ring by ring: check that each pieced border divides its side, add a plain spacer when it doesn't, and grow a 12 in star to a 48 in quilt.
English vs Foundation Paper Piecing: Which Should You Try?
Compare what the paper does, where stitching happens and which project brief suits EPP or sew-through FPP before choosing a pattern.