


Joining Quilt Binding Ends: Overlap by the Strip Width
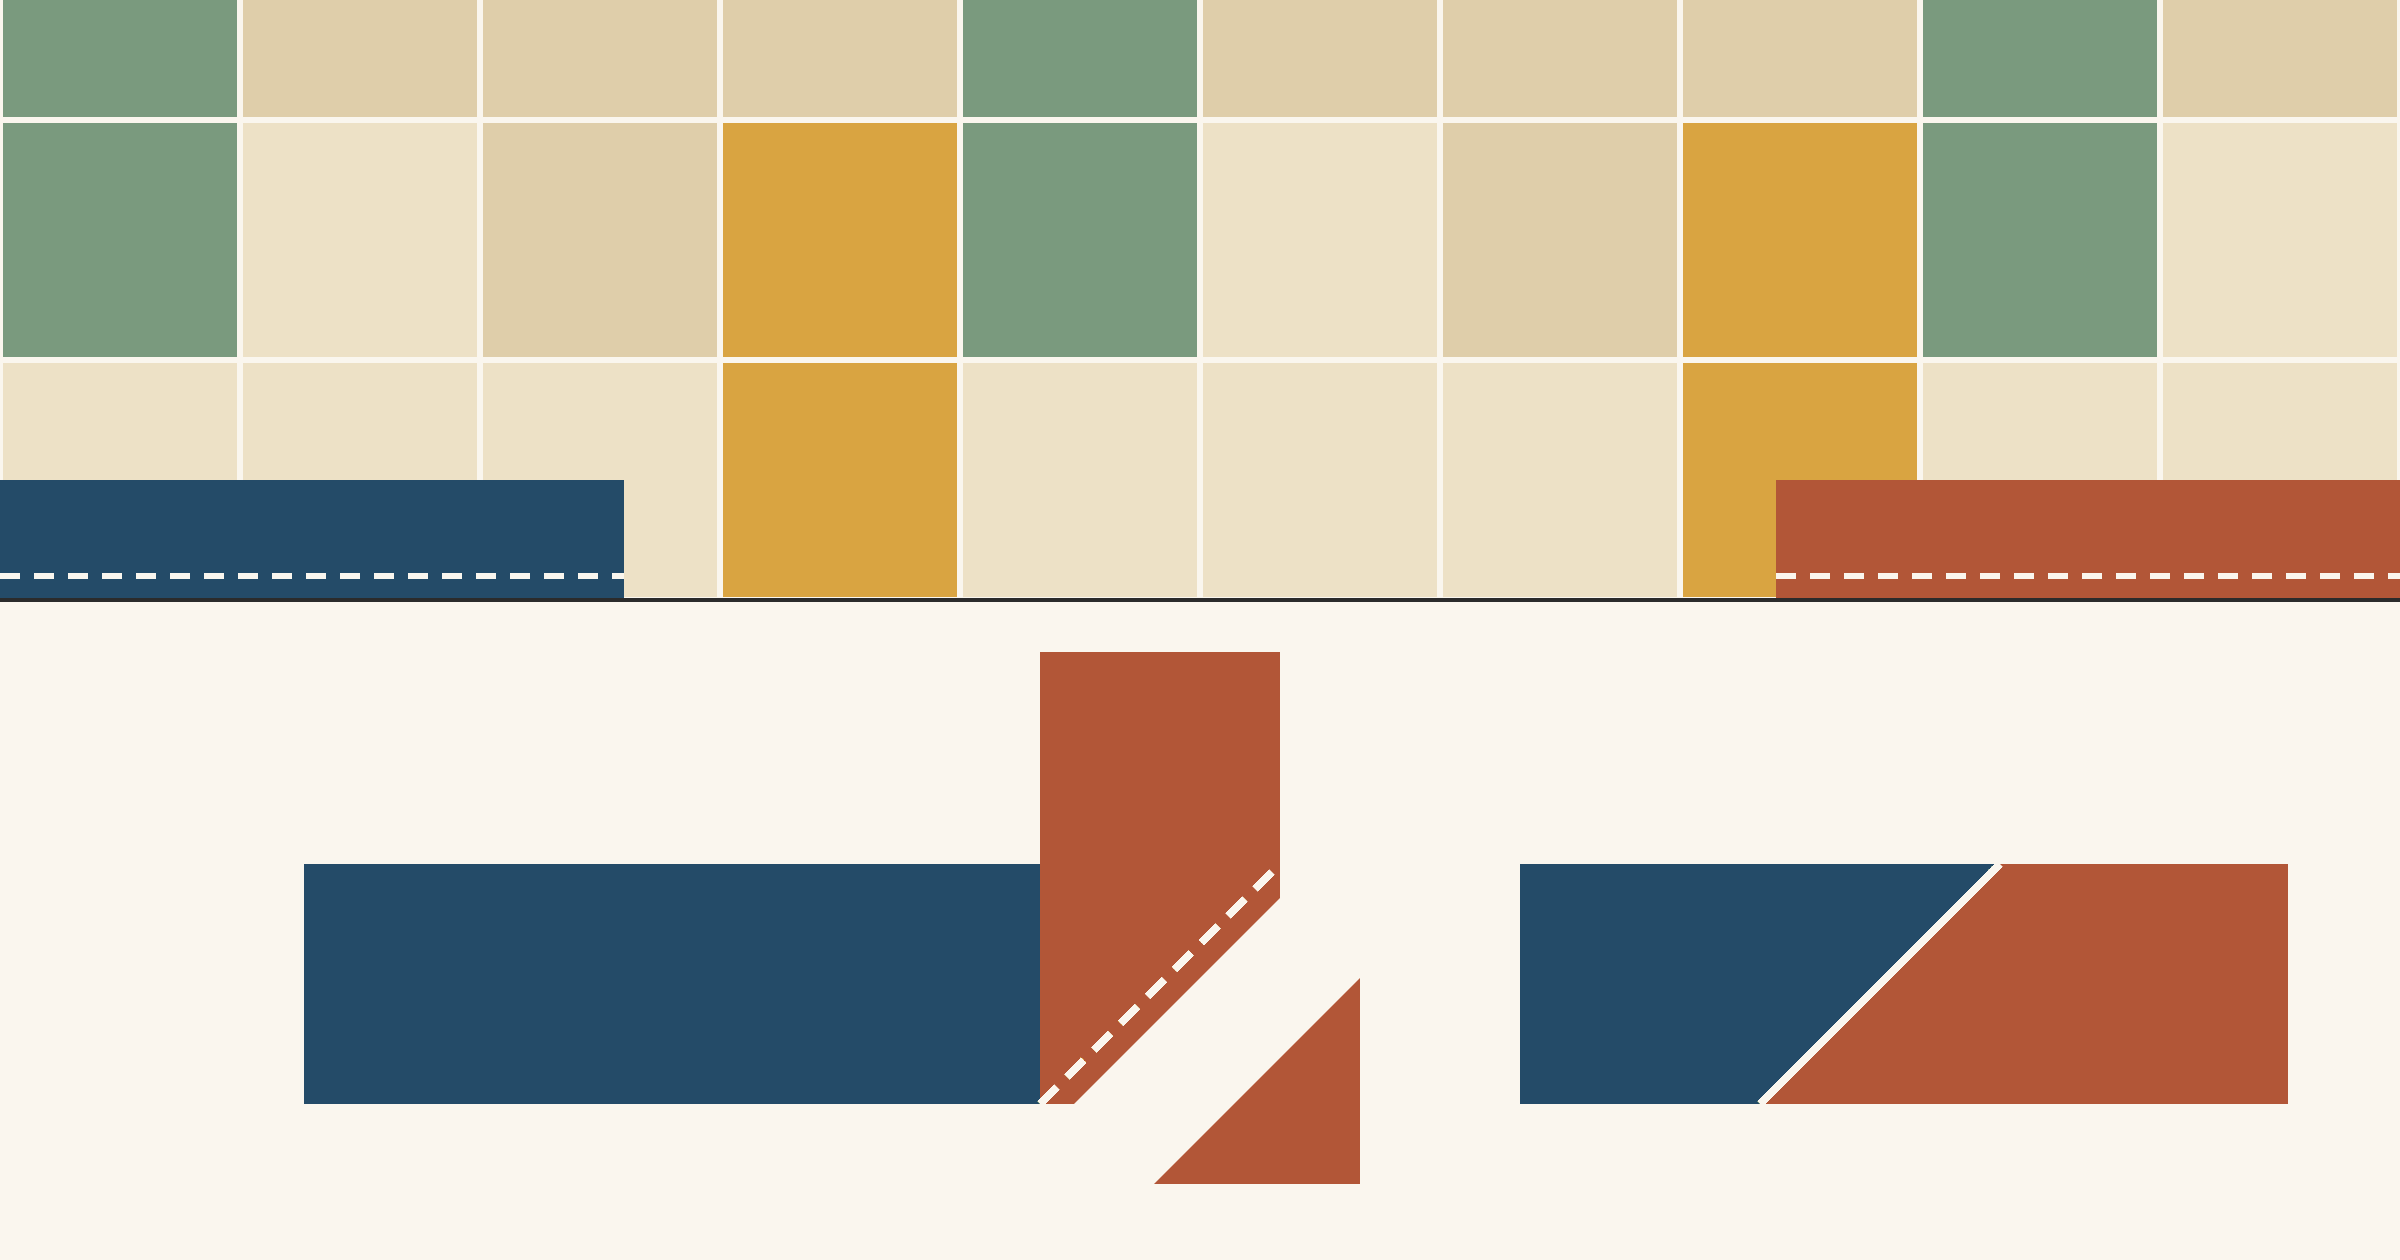
When you're joining quilt binding ends, overlap the two loose tails by the cut width of your strip, then sew them together on a 45-degree diagonal. For 2 1/2-inch strips the overlap is 2 1/2 inches; for 2 1/4-inch strips it's 2 1/4. Ann Johnson gives that rule in her binding lessons for Connecting Threads, and Tricia Mathis measures it with a scrap of the binding itself in her binding guide for Utah State University Extension. Sewn that way, the last join looks like every other seam in the binding, with no lump where the ends meet.
The rule makes sense once you see where those 2 1/2 inches go. Everything here assumes straight-grain, double-fold binding that you've machine-stitched to the front of the quilt. If you're still choosing a strip width, see how wide to cut binding strips.
Why the overlap equals the strip width
A 45-degree seam crosses the strip on a diagonal, so it runs as far along the strip as the strip is wide. On a 2 1/2-inch strip, the seam runs 2 1/2 inches along the strip, and the two tails give up that much length between them.
Look at the edges of the joined strip and you can see it happen. Tail 1 keeps its full length along one edge and stops 2 1/2 inches short on the other. Tail 2 does the opposite. Either way, the pair loses 2 1/2 inches. Overlap the tails by exactly that much and the joined binding comes out the same length as the gap: no slack and no pull. In the worked example below, tails of 6 and 8 1/2 inches, 14 1/2 inches in all, join into exactly 12.
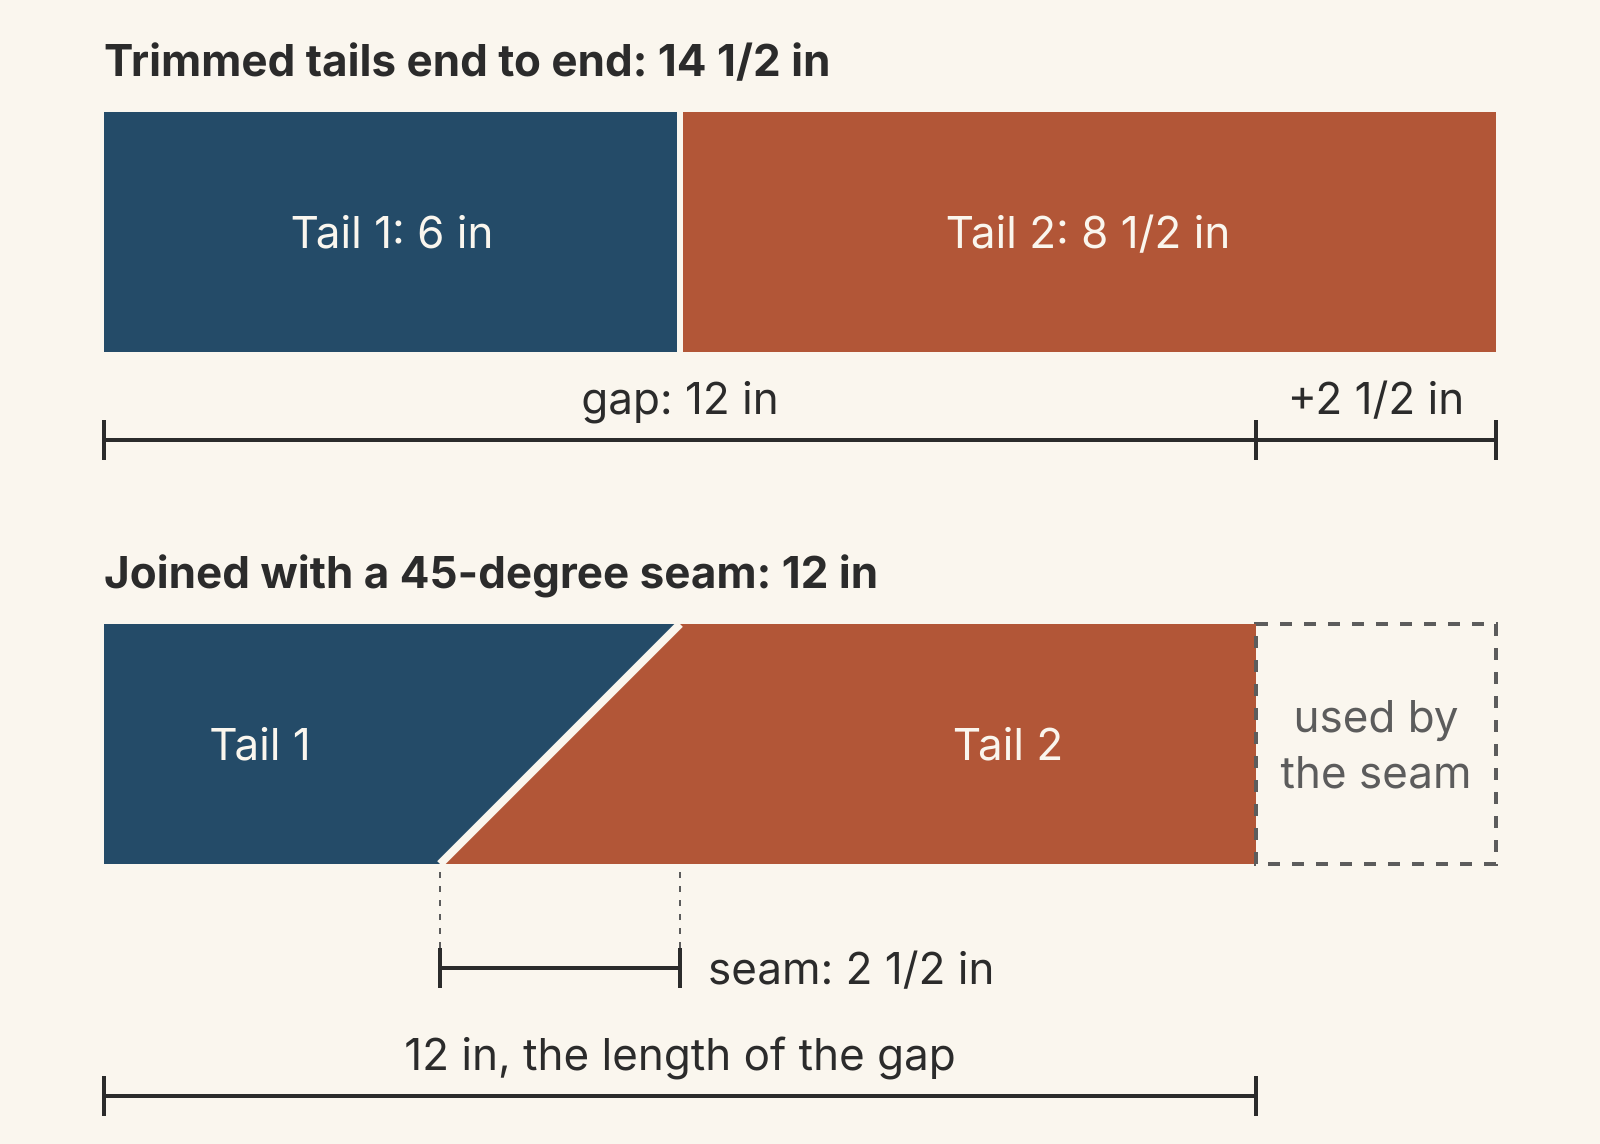
The one number to get right is the cut width, the width before you pressed the strip in half. A 2 1/2-inch strip is 1 1/4 inches wide folded, and it's easy to measure that by mistake while the tails lie on the quilt. Overlap 1 1/4 inches and the joined binding comes out 1 1/4 inches short: 10 3/4 inches of binding for a 12-inch gap. Every 1/4 inch you're off makes the join 1/4 inch tight or 1/4 inch loose.
What the angle and the seam allowance do
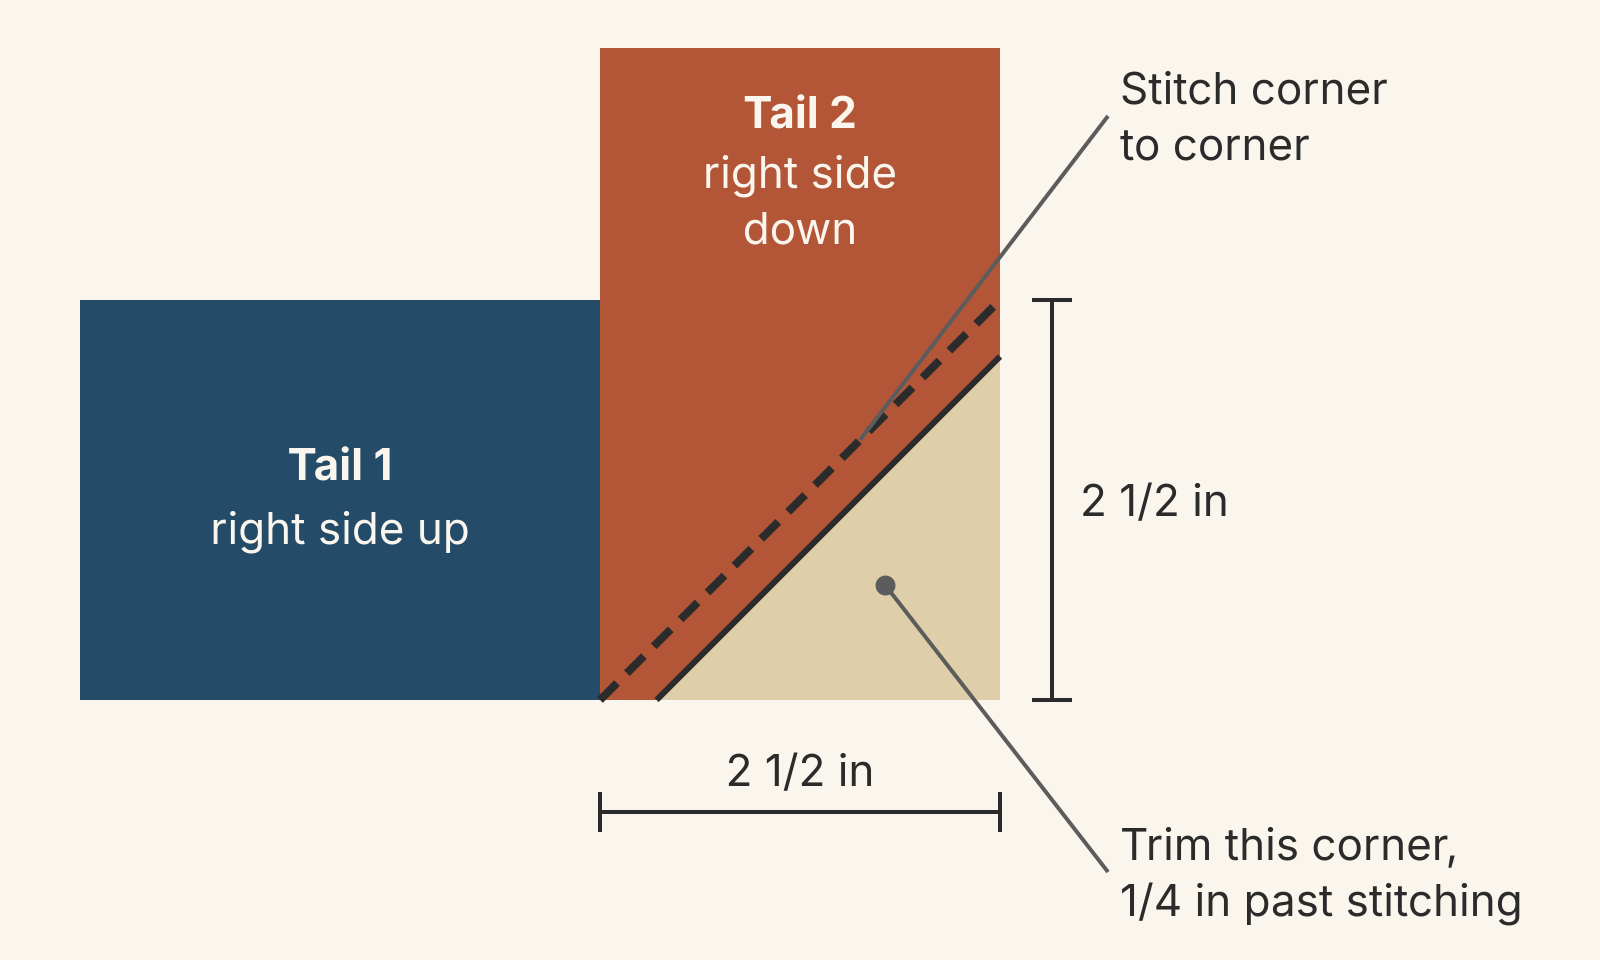
The 1/4-inch seam allowance doesn't change the overlap. When you open the tails and cross them at a right angle, they overlap in a square as wide as the strip, 2 1/2 by 2 1/2 inches. You stitch corner to corner across that square, then trim the outside corner 1/4 inch past the stitching. That corner was already part of the overlap, so cutting it off takes no length out of the binding.
The angle is what decides how much to overlap, and how much bulk you get:
| Join | Overlap to cut | Where the bulk sits |
|---|---|---|
| 45-degree diagonal seam | The cut width | Spread over 2 1/2 inches; the seam's two halves meet only at the fold |
| Straight seam, 1/4 inch | 1/2 inch | The whole seam, folded in half, stacks in one spot |
| Tucked end (no seam) | Nothing measured | Folded layers stack where one end sits inside the other |
A straight seam needs only the two seam allowances, 1/4 inch from each tail. It comes out the right length, but when you fold the binding in half, both halves of the seam land on top of each other. That's the lump. Rita Hodge of Red Pepper Quilts gives the reason for the diagonal in her binding tutorial: it avoids "having too much bulk in the one spot along your binding." When you fold a diagonally joined binding, the two halves of the seam angle away from each other, 1 1/4 inches each, and meet only at the fold.
Worked example: a 12-inch gap with 2 1/2-inch strips
Plan where the gap will fall before you sew. Mathis starts the binding in the middle of one side, and Johnson notes that many quilters start about a third of the way down the right side. Both suggest laying the binding around the quilt first so no seam in the strip lands on a corner. Leave a starting tail long enough to reach the middle of the gap, at least 6 inches here; Johnson leaves 6 to 8 inches. That starting tail is tail 1 below. Tail 2, the finishing end, needs at least 8 1/2 inches.
- Stop 12 inches short. Sew around the quilt and stop about 12 inches before your starting stitches, then backstitch. Mathis and Hodge both use about 12 inches; Johnson stops 8 to 10 inches away. A wider gap leaves more room to lift the tails for the right-angle step.
- Trim tail 1 at the center. Lay the starting tail flat along the edge and cut it straight across in the middle of the gap, 6 inches from your first stitches.
- Cut tail 2 one strip width past it. Lay the finishing tail over tail 1. Measure 2 1/2 inches past the end of tail 1 and cut tail 2 straight across there. Tail 2 is now 8 1/2 inches long. A ruler works, or use the piece you just trimmed off, unfolded, as a 2 1/2-inch gauge.
Check the arithmetic before you sew: 6 + 8 1/2 = 14 1/2 inches of tail for a 12-inch gap, and the seam will use 2 1/2 of them.
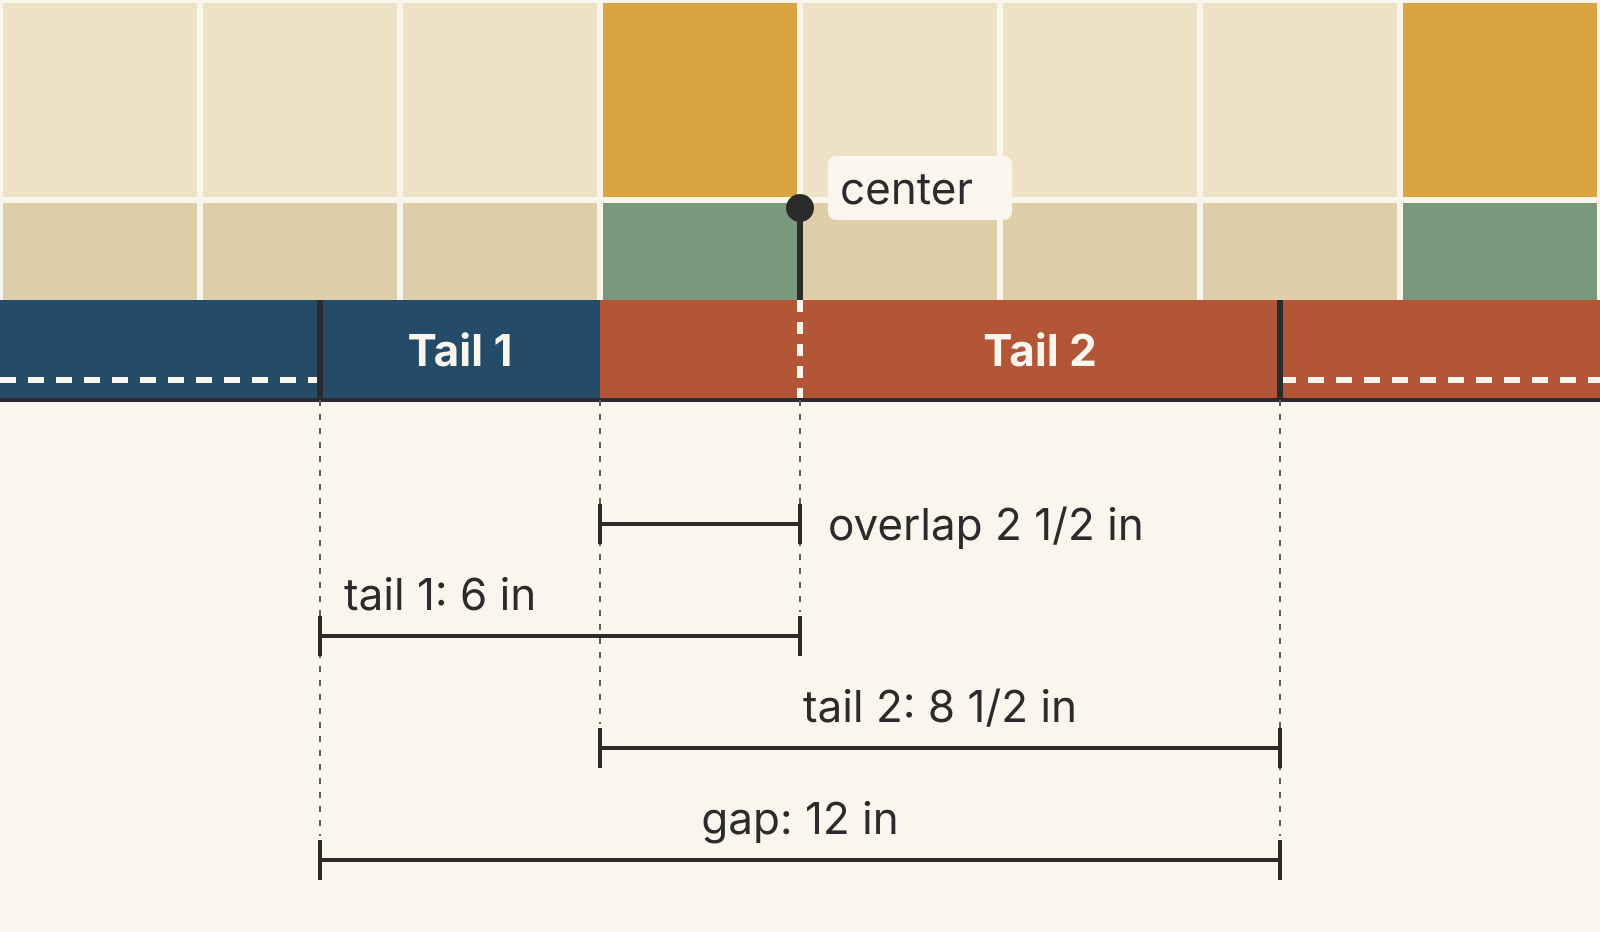
The center of the gap is only a convenient place to cut. If your starting tail is shorter, cut it where it is and measure tail 2 from that point. What counts is the overlap; where it sits doesn't matter.
Sew the diagonal
- Open both tails. Unfold them flat. Lay tail 1 right side up.
- Cross them at a right angle. Bring tail 2 across the end of tail 1, right side down, so the cut ends and edges line up in a 2 1/2-inch square. Tail 2 will look twisted. Johnson calls it "awkwardly twisted, which can be counter-intuitive," and says these last steps keep some quilters from using the method.
- Mark the diagonal. Draw a line corner to corner across the square, choosing the diagonal that leaves the corner where both cut ends meet on the outside. That corner gets trimmed off.
- Pin and test. Johnson pins exactly on the line, then folds the binding back in half and lays it along the edge to confirm the direction before sewing. If you've marked the other diagonal, the tails end up pointing the same way and the binding folds back on itself instead of lying along the gap.
- Sew, then test again. Stitch on the line. Hodge checks the fit along the quilt edge at this point, before she trims anything.
- Trim and finish. Cut the corner off 1/4 inch past the stitching, press the seam open, refold the binding and sew the rest of the gap to the quilt, overlapping your first stitches.
If the test shows a loose join, you don't have to recut. Unpick the seam and cross the tails again, this time with the cut end of tail 1 sticking out past the edge of tail 2 by the amount of slack. Sew corner to corner across the square where the edges cross, as before. Each 1/8 inch of overhang takes up 1/8 inch. Don't just sew a second line beside the first: a line that misses the corners of the square pulls the edges of the two tails out of line. A tight join is harder to rescue, because you can't add length back, so measure the overlap twice before you cut tail 2.
Three ways to mark the overlap
Teachers mark the cut differently, but all three land within 1/8 inch of each other:
| Teacher | How they mark | Overlap you end up with |
|---|---|---|
| Ann Johnson | Cut tail 1 midway across the gap, lay tail 2 over it and cut one strip width past it | The cut width |
| Tricia Mathis | Fold both tails back to meet with about 1/8 inch between the folds, cut on one fold, then cut the other tail one strip width past its fold | The cut width less 1/8 inch |
| Rita Hodge | Overlap the tails by the strip width plus 1/4 inch, then let the ends stick out "a generous 1/8th of an inch" when you cross them | The cut width; the extra 1/4 inch becomes the two overhangs |
The 1/8 inch between Mathis's folds makes her overlap 1/8 inch less than the strip width, so by our arithmetic her join finishes a hair snug rather than loose. Hodge's extra 1/4 inch covers the two 1/8-inch overhangs, which land beyond the stitching line.
For a first try, use Johnson's version with the trimmed scrap as your gauge. There's nothing to add or subtract, and the scrap is always exactly as wide as your strip.
When a tucked join makes sense
The tucked join skips the measuring. Becky Jorgensen of Patchwork Posse walks through it in her tutorial on joining binding ends: cut the starting end at 45 degrees, fold and press it, start sewing about 4 inches from the end, and stop about 4 inches short of that starting end. Then trim the other end, tuck it inside the angled start and sew the rest down. She calls it a "no sew, no measure and no mess up option."
Johnson describes it as the older method and "fairly easy to learn." Its drawback is the one in the table: the folded layers make the join thicker, so it won't match the other seams in the binding. Use it when the right-angle twist is what's standing between you and a finished quilt. Switch to the seamed join when you want the last join to disappear.
Your next binding
Before you bind the quilt, practice the seamed join on two leftover lengths of binding pinned along a scrap of batting. Mark a 12-inch gap, cut the tails 6 and 8 1/2 inches, and sew one join. Once the right-angle step makes sense, the real one goes quickly. Then choose whether to finish the binding by machine or by hand.
If you designed the quilt in QuiltLab, the Layout heading in the Quilt Editor's Properties shows its finished dimensions, which is where binding planning starts. QuiltLab doesn't calculate binding, so do the strip count yourself; our guide to backing and binding yardage shows the arithmetic, with extra length allowed for the corners and the final join. Writing a pattern of your own? The Diagram Editor lets you draw diagram pieces, add lines and labels, and reuse the diagrams in your pattern.
Quilt Editor: arrange blocks and fabric →Where a layout's finished dimensions appearRelated posts
How to Read a Foundation Paper Piecing Pattern: Which Line Is Which?
Numbers set the sewing order, the lines inside a section are where you stitch, and the outer pair of lines marks the finished edge and the trim line.

How to Design a Bargello Quilt: Plan the Wave on Paper
A bargello wave is a staircase of stepped columns. Number your strips, write one row per column, and see how column width turns a zigzag into a curve.

Borderless Quilt Design: Plan an Edge That Looks Finished
With no border, the outer blocks and the binding make the edge. Compare whole and halved motifs on one 48 x 60 inch quilt, then pick the binding color.