


Machine Binding vs Hand Binding: Which Finish Fits Your Quilt?
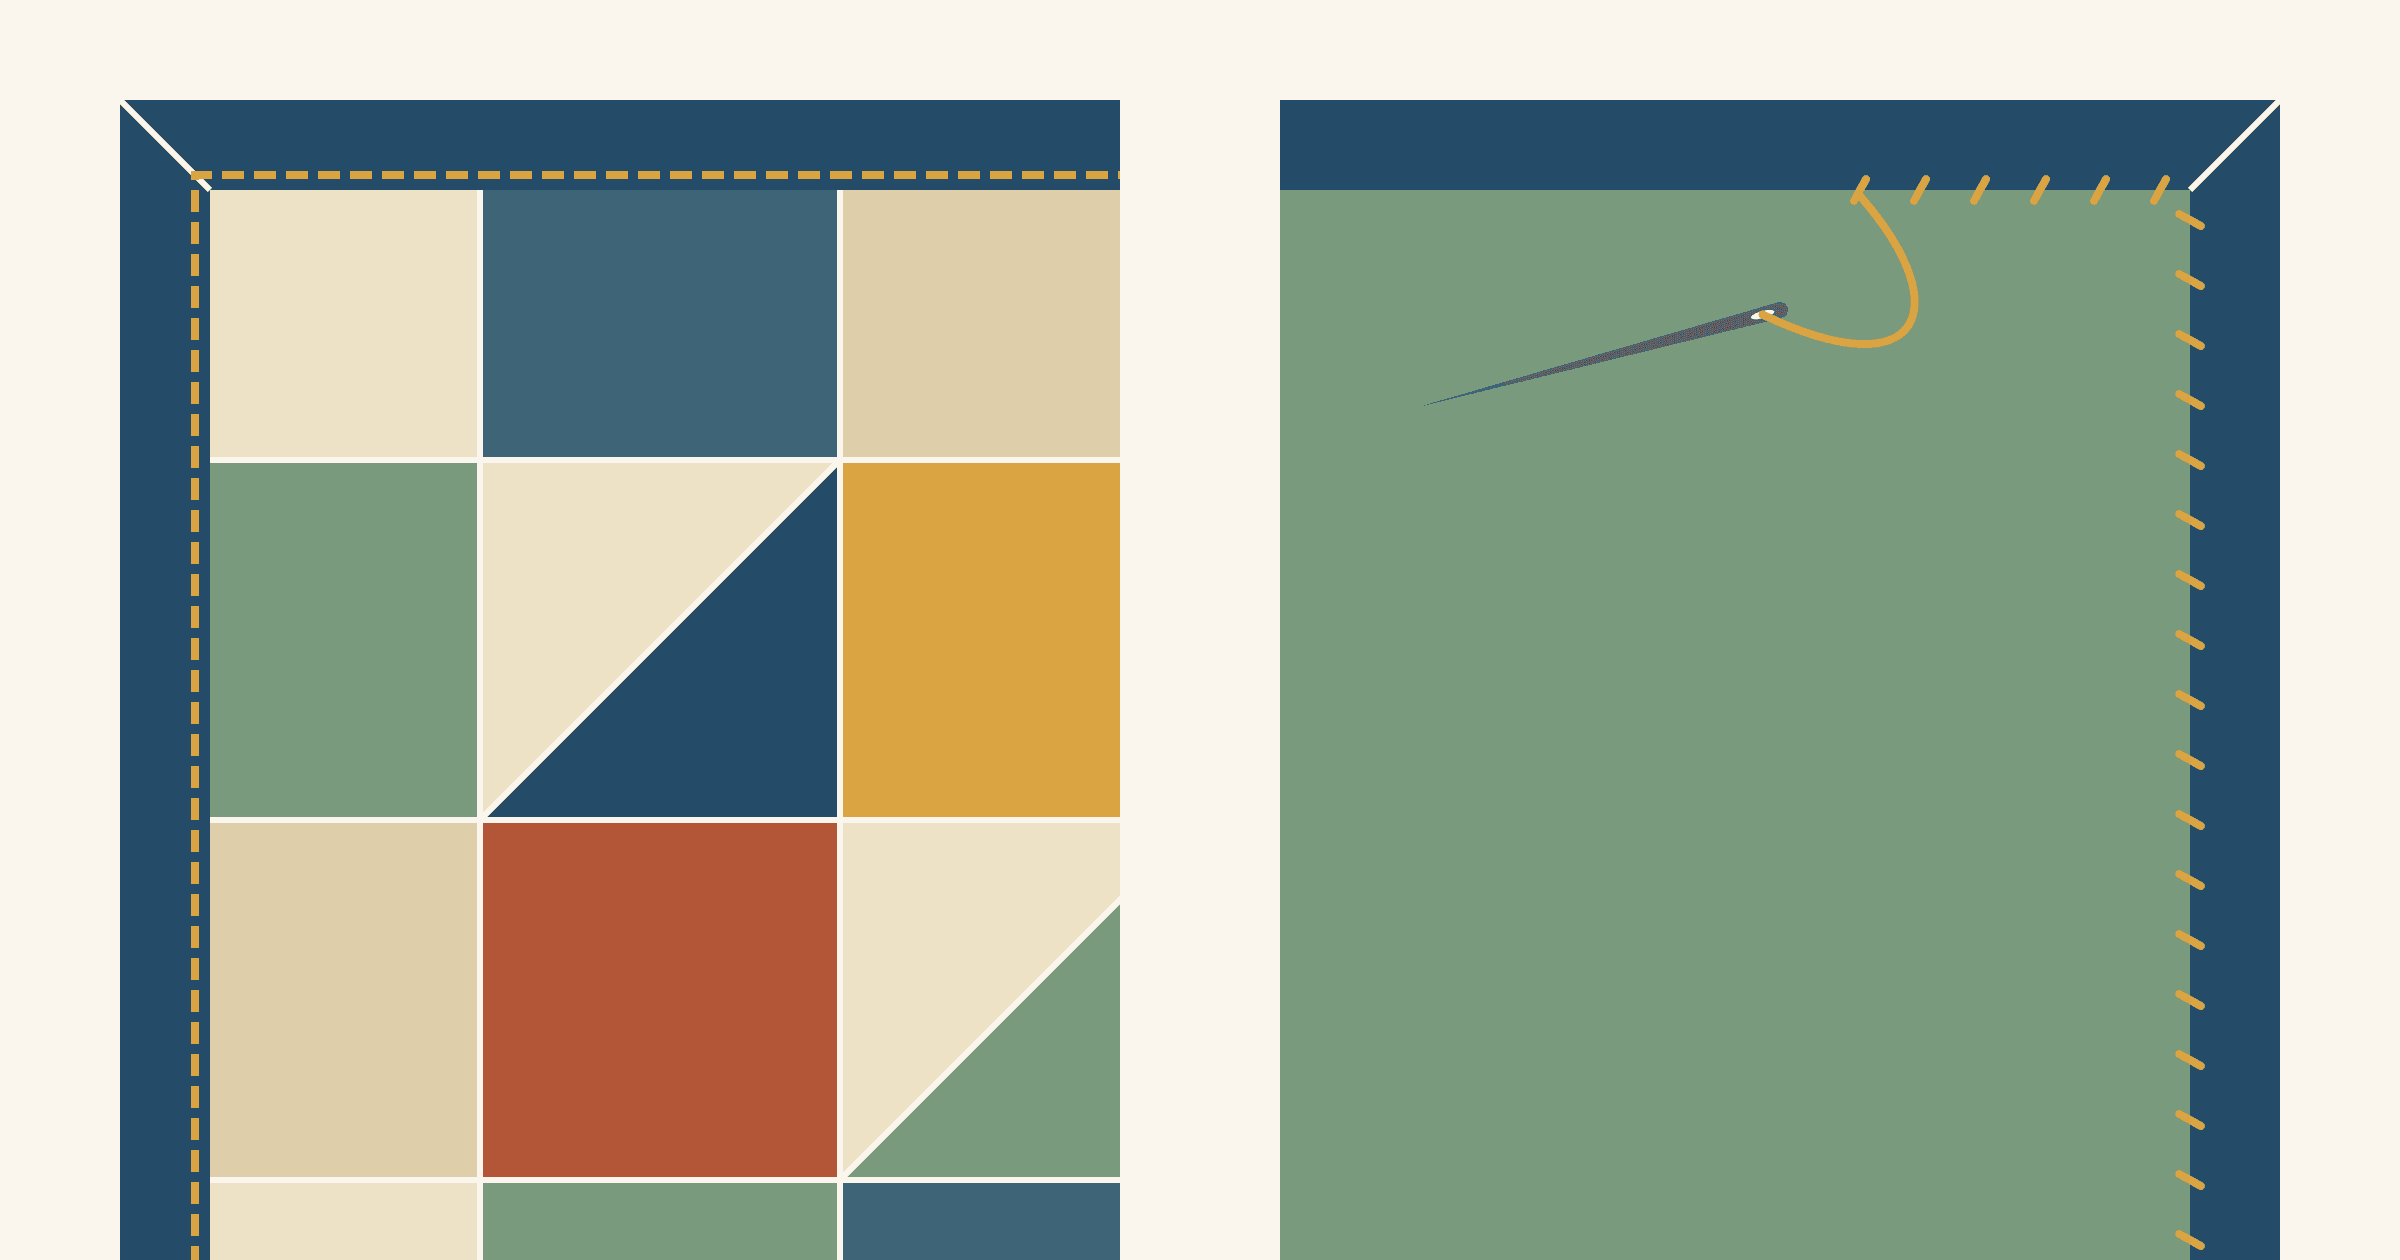
Machine binding is faster, and hand binding hides the stitching. Pattern designer Carolina Moore puts hand binding at four hours or more per quilt, and machine binding at a quarter of that time or less. For an everyday quilt or a gift with a deadline, finish by machine and stitch in the ditch from the front, so the front looks close to a hand finish. Finish by hand when the back should look as clean as the front, or when you'd enjoy a few evenings of hand sewing.
In every method below, the binding goes on by machine first. The choice is how you stitch down the folded edge. Here's where each finish leaves a visible line, what the time difference looks like on a 60 x 72 in throw, and what should decide it for your quilt.
Both finishes start with the same machine seam
A double-fold binding goes on in two passes. In the first, you sew the folded strip to one side of the quilt with a 1/4 in seam and miter the corners. In the second, you wrap the folded edge around to the other side and stitch it down.
The first pass is a machine job either way. "Hand binding" means you do the second pass with a needle, and "machine binding" means you do it at the machine. So the whole time difference sits in the second pass: one more trip around the edge of the quilt.
Which side you sew to first depends on the finish:
- Hand finish: sew the binding to the front, fold it to the back, and stitch the fold to the backing with small stitches hidden in the fold. Sherri McConnell of A Quilting Life presses the binding away from the front before folding it over, then clips the whole edge before she starts (her hand-binding tips).
- Machine finish: sew to the front or the back first, depending on where you want the line to show. There are three common ways, covered next.
Where the stitching shows with each finish
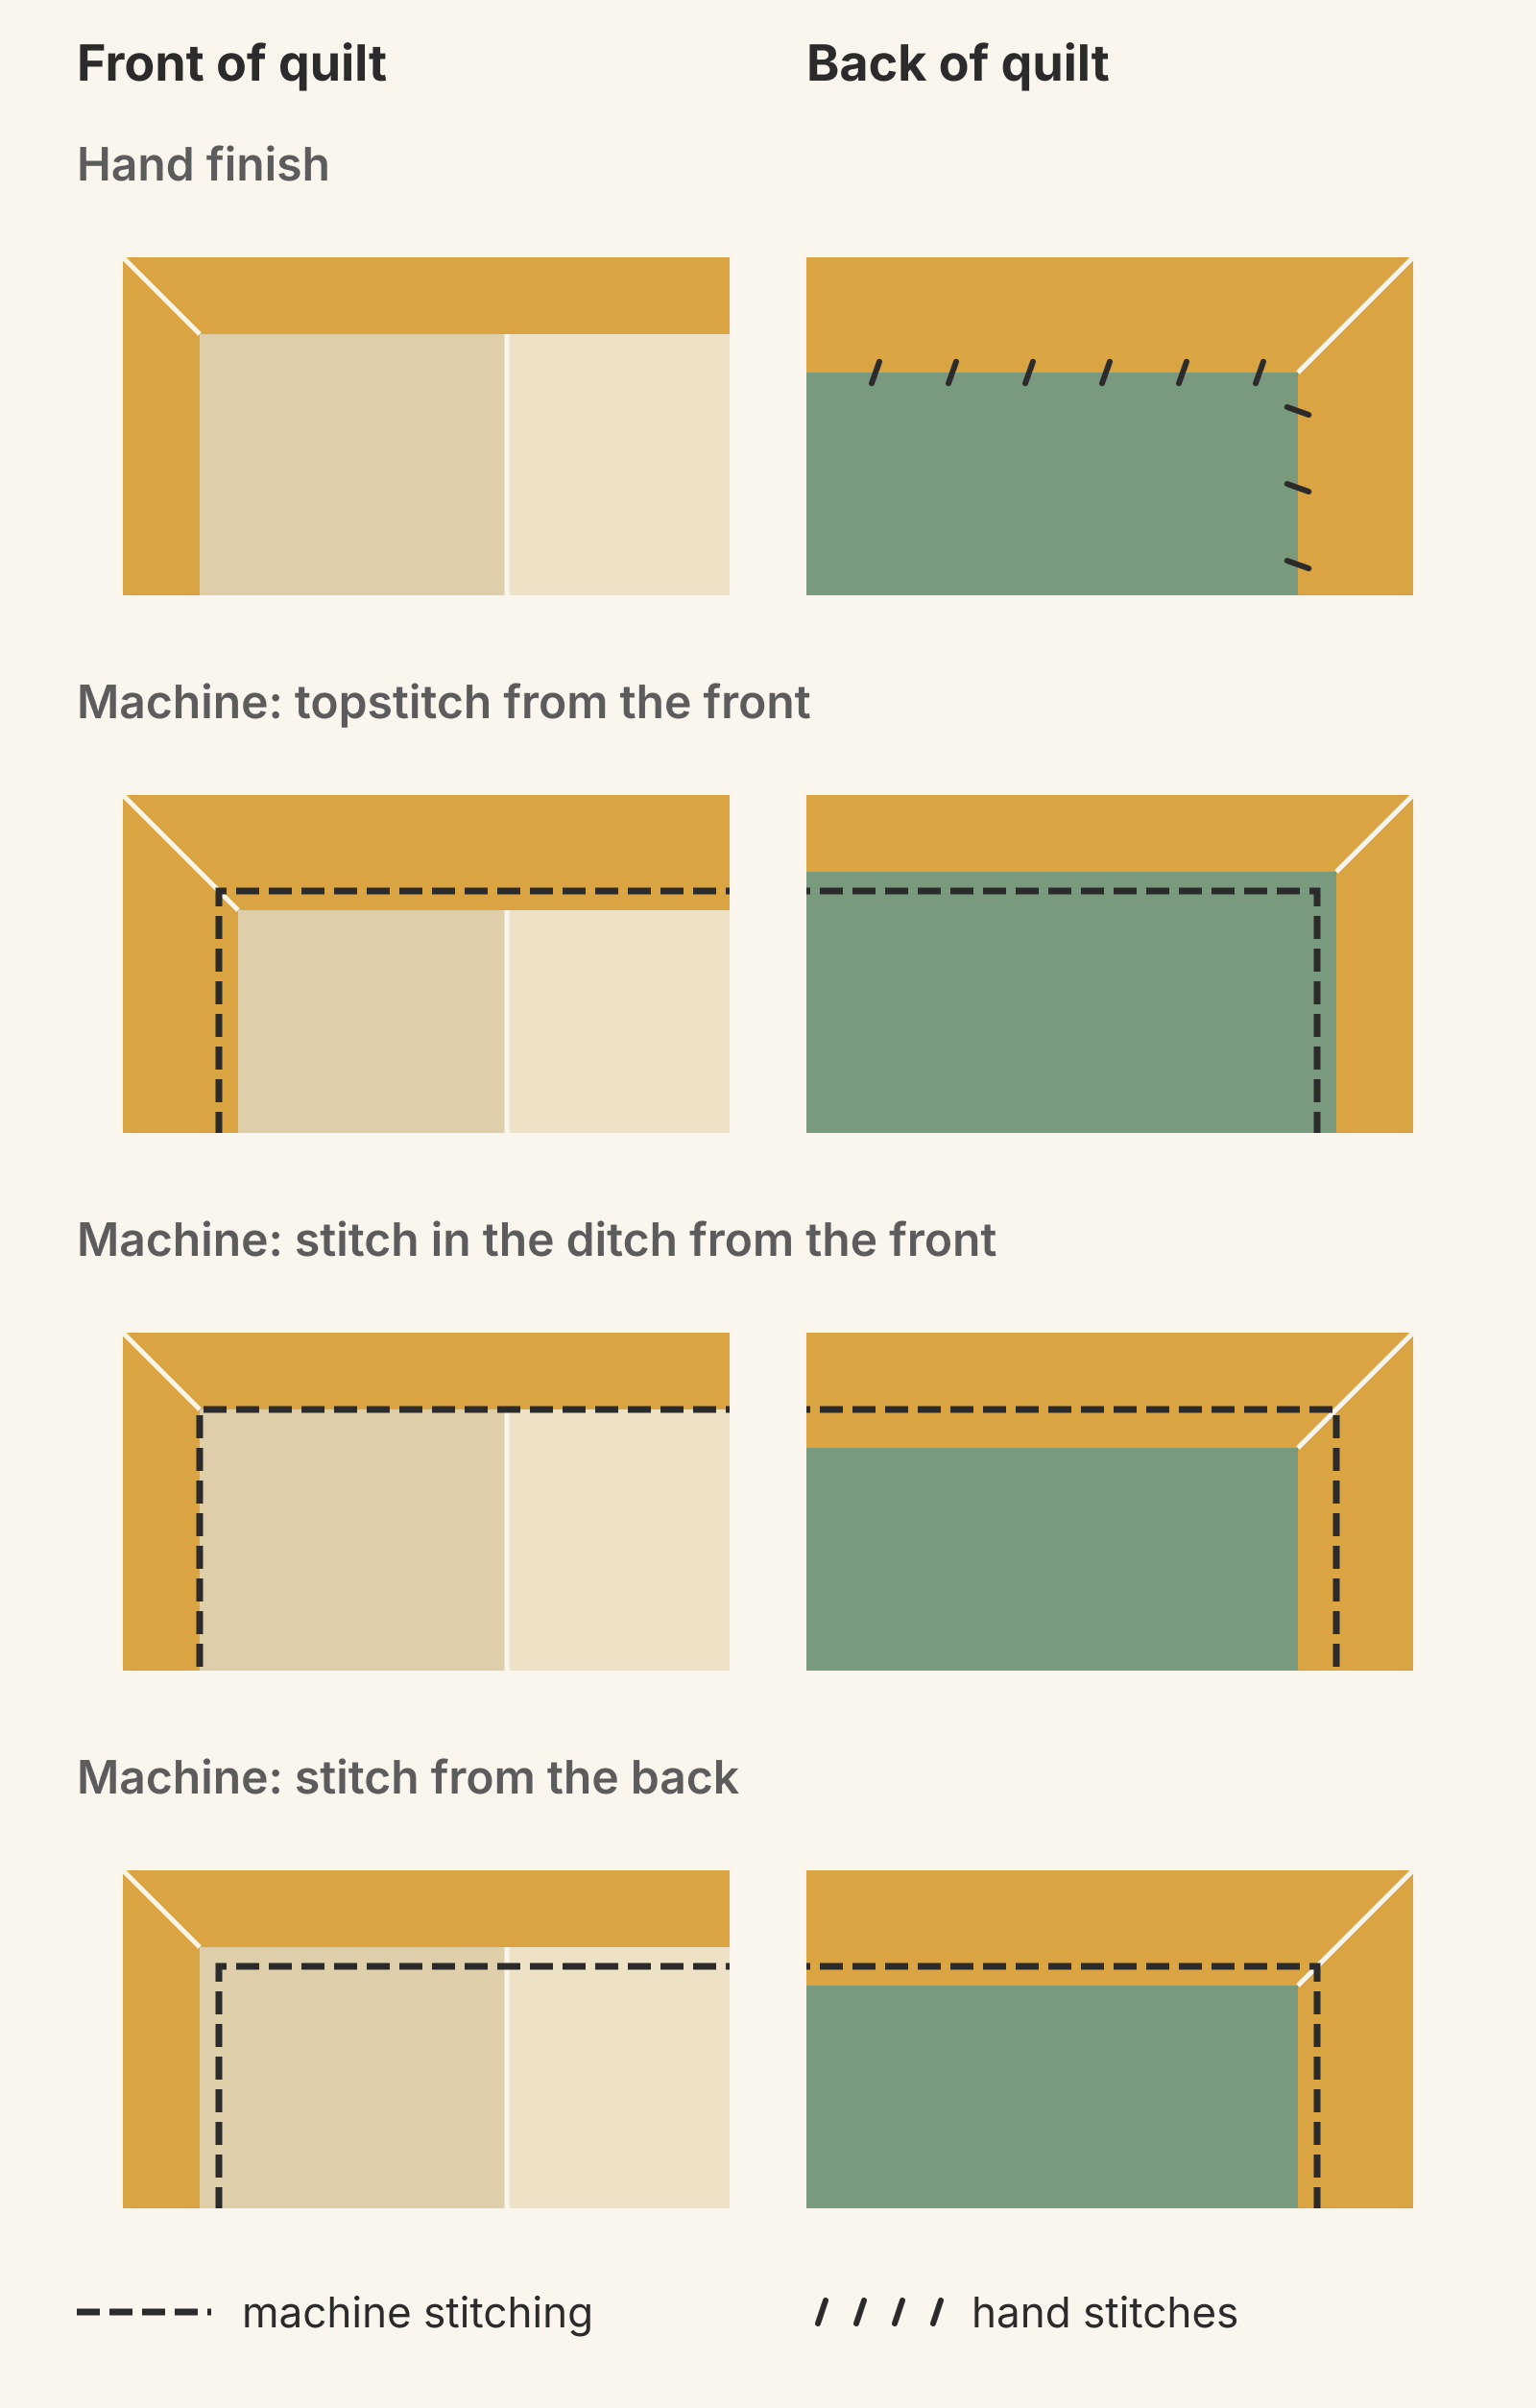
A machine line goes through every layer, so it shows on both sides of the quilt. What you choose is where it lands.
| Finish | Front of quilt | Back of quilt |
|---|---|---|
| Hand finish | No second line | Small stitches tucked into the fold |
| Machine: topstitch from the front | A line on the binding, near its fold | A line on the backing, beside the binding |
| Machine: stitch in the ditch from the front | A line sunk in the seam beside the binding | A line on the binding, near its fold |
| Machine: stitch from the back | A line on the quilt top, beside the binding | A line on the binding, near its fold |
Topstitch from the front
Amy Smart's machine binding tutorial sews 2 1/2 in strips to the back of the quilt first, folds them to the front and stitches them down from the front. You see exactly where each stitch goes on the side people look at most.
The tradeoff is the back. Smart writes that "it's difficult to control what the stitching looks like on the back," and suggests a busy backing print or invisible thread to hide it.
Stitch in the ditch from the front
Jen Belnap's walking-foot method at WeAllSew sews 2 1/2 in strips to the front, then glues and clips the fold to the back. She stitches in the ditch beside the binding from the front. The line hides in the seam, so the front looks much like a hand finish.
On the back, the line lands on the binding, and it only holds where the fold reaches past the seam. In our drawing the fold covers the seam by 1/8 in, which is all the room the needle has. If the fold slips short anywhere, the line misses it, which is why the glue and clips matter. A slightly wider strip gives the needle more room, and our guide to cutting binding strips to the right width shows how far the fold will reach. If you're new to the walking foot itself, our walking foot vs free motion guide covers how it feeds the layers.
Stitch from the back
Carolina Moore's machine binding steps sew the binding to the front with a 1/4 in seam. Then she turns the quilt over, wraps the binding to the back and stitches right at its folded edge, just beside the first seam line. That keeps the line off the front binding. On the front it lands on the quilt top just beside the binding, where thread that matches your quilting blends in. The closer you stay to the first seam, the neater the front looks.
Christa Watson also stitches this pass from the back, with a serpentine stitch and a bobbin thread that matches the front. In her machine binding demo she says the serpentine "hides mistakes," and still works if you wander a little off the edge.
How long each finish takes on a 60 x 72 in throw
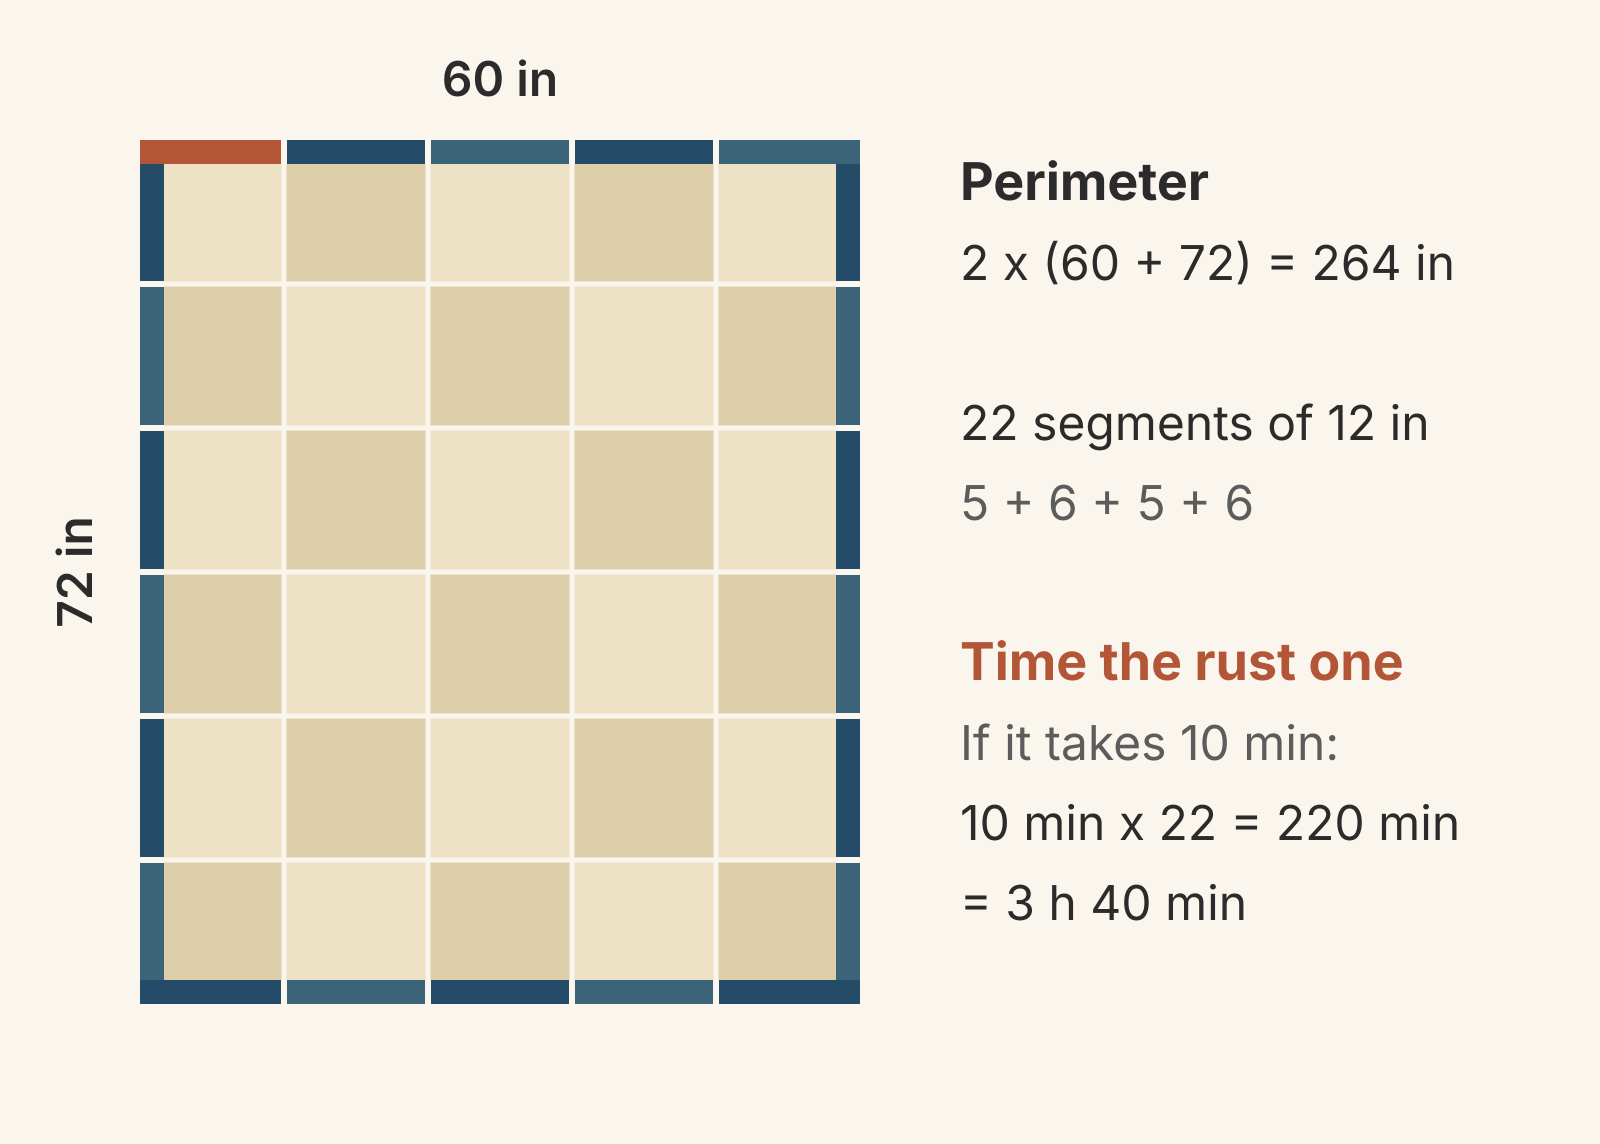
Take a 60 x 72 in throw. Its perimeter is 2 x (60 + 72) = 264 in, and each pass covers all of it.
By hand. Christa Watson logged her time on Hugs 'n Kisses, a 48 x 64 in quilt. She spent 1 hour preparing and attaching the binding, then 2 1/2 hours finishing it by hand. That edge is 2 x (48 + 64) = 224 in, so she stitched about 90 inches an hour. At that pace, the throw's 264 in takes about 3 hours of hand sewing. Add about an hour to prepare and attach the binding, as she did, and the throw's binding comes to about 4 hours. That matches Moore's four hours or more.
Stitch count shows the same work another way. McConnell keeps her stitches 1/4 to 3/8 in apart on quilts that will get a lot of use. Along 264 in, that's 704 to 1,056 stitches.
By machine. The second pass is another 264 in at the machine, with a pivot at each of the 4 corners. Moore finishes a whole machine binding in a quarter of her hand time or less. On this throw, that saves roughly 3 of the 4 hours.
At your own pace. Other quilters' numbers only get you close. Twelve inches is enough to measure your own. Sew a 12 in stretch with the finish you're considering and time it. The throw's edge is 22 stretches of 12 in, so multiply by 22. If 12 in takes you 10 minutes by hand, the whole edge takes 220 minutes, or 3 hours 40 minutes.
Does one finish last longer?
Quilters argue about this. None of the sources here tests the two finishes against each other, so we won't rank them. What the teachers do describe is how a binding comes loose, and with both finishes it comes down to the stitching:
- Hand stitches spaced too far apart can let go. McConnell writes that when she was a new quilter, she had to re-stitch bindings on quilts her family used because her stitches were too far apart. She now keeps them 1/4 to 3/8 in apart on quilts that get handled, and sometimes 3/8 to 1/2 in on a wall hanging. She also takes 2 or 3 stitches to close each mitered corner, which she calls "almost a necessity" on kids' quilts.
- A machine line holds only where it catches the fold. When you finish, run your fingers along the side you couldn't see while sewing. Restitch any stretch the needle missed.
Smart credits the double-fold strip itself with extra durability. That strip is the same whichever way you stitch it down.
Which finish to choose
Decide by the look you want first, then by the time you have:
- The front matters most and time is short: machine, stitched in the ditch from the front.
- People will see the back, or the quilt is reversible: hand. Every machine finish leaves a line on the back.
- You want to watch every stitch land: machine, topstitched from the front. Pick a busy backing so the line on the back blends in.
- A wobbly line worries you: machine from the back with a serpentine stitch, which hides small wanders.
- Hand sewing hurts your hands: machine, any of the three.
- You like the slow part: hand. McConnell calls hand binding one of her favorite parts of quilting.
Next step: bind a test edge
Make a test piece before you decide, especially if you've never finished a binding by machine. Layer a 12 in square of your real top fabric, batting and backing, and bind it with your real binding fabric. It's a good place to practice joining the binding ends without a lump, too. Do the second pass with the finish you're leaning toward, and time one side and one corner. Then turn it over and look at the back. Multiply the side time by the number of 12 in stretches in your quilt's edge, and add the corner time four times.
If you designed the quilt in QuiltLab, the Quilt Editor shows its finished dimensions beside the Layout heading in Properties. Add the width and length and double it for the edge you'll be timing. QuiltLab doesn't plan binding, so count your strips by hand; our backing and binding guide shows the arithmetic. To fit the binding into the whole project, see how long it takes to make a quilt.
Quilt Editor: arrange blocks and fabric →Where a layout's finished dimensions appearRelated posts

How to Design a Bargello Quilt: Plan the Wave on Paper
A bargello wave is a staircase of stepped columns. Number your strips, write one row per column, and see how column width turns a zigzag into a curve.

Borderless Quilt Design: Plan an Edge That Looks Finished
With no border, the outer blocks and the binding make the edge. Compare whole and halved motifs on one 48 x 60 inch quilt, then pick the binding color.

Crosshatch Quilting: How to Make the Lines Meet at the Edges
Space a 45-degree crosshatch so the lines meet in a V at every edge and corner. Choose the edge step first, mark dots around the quilt, then connect them.