


Raw Edge vs Turned Edge Applique: Which Should You Choose?
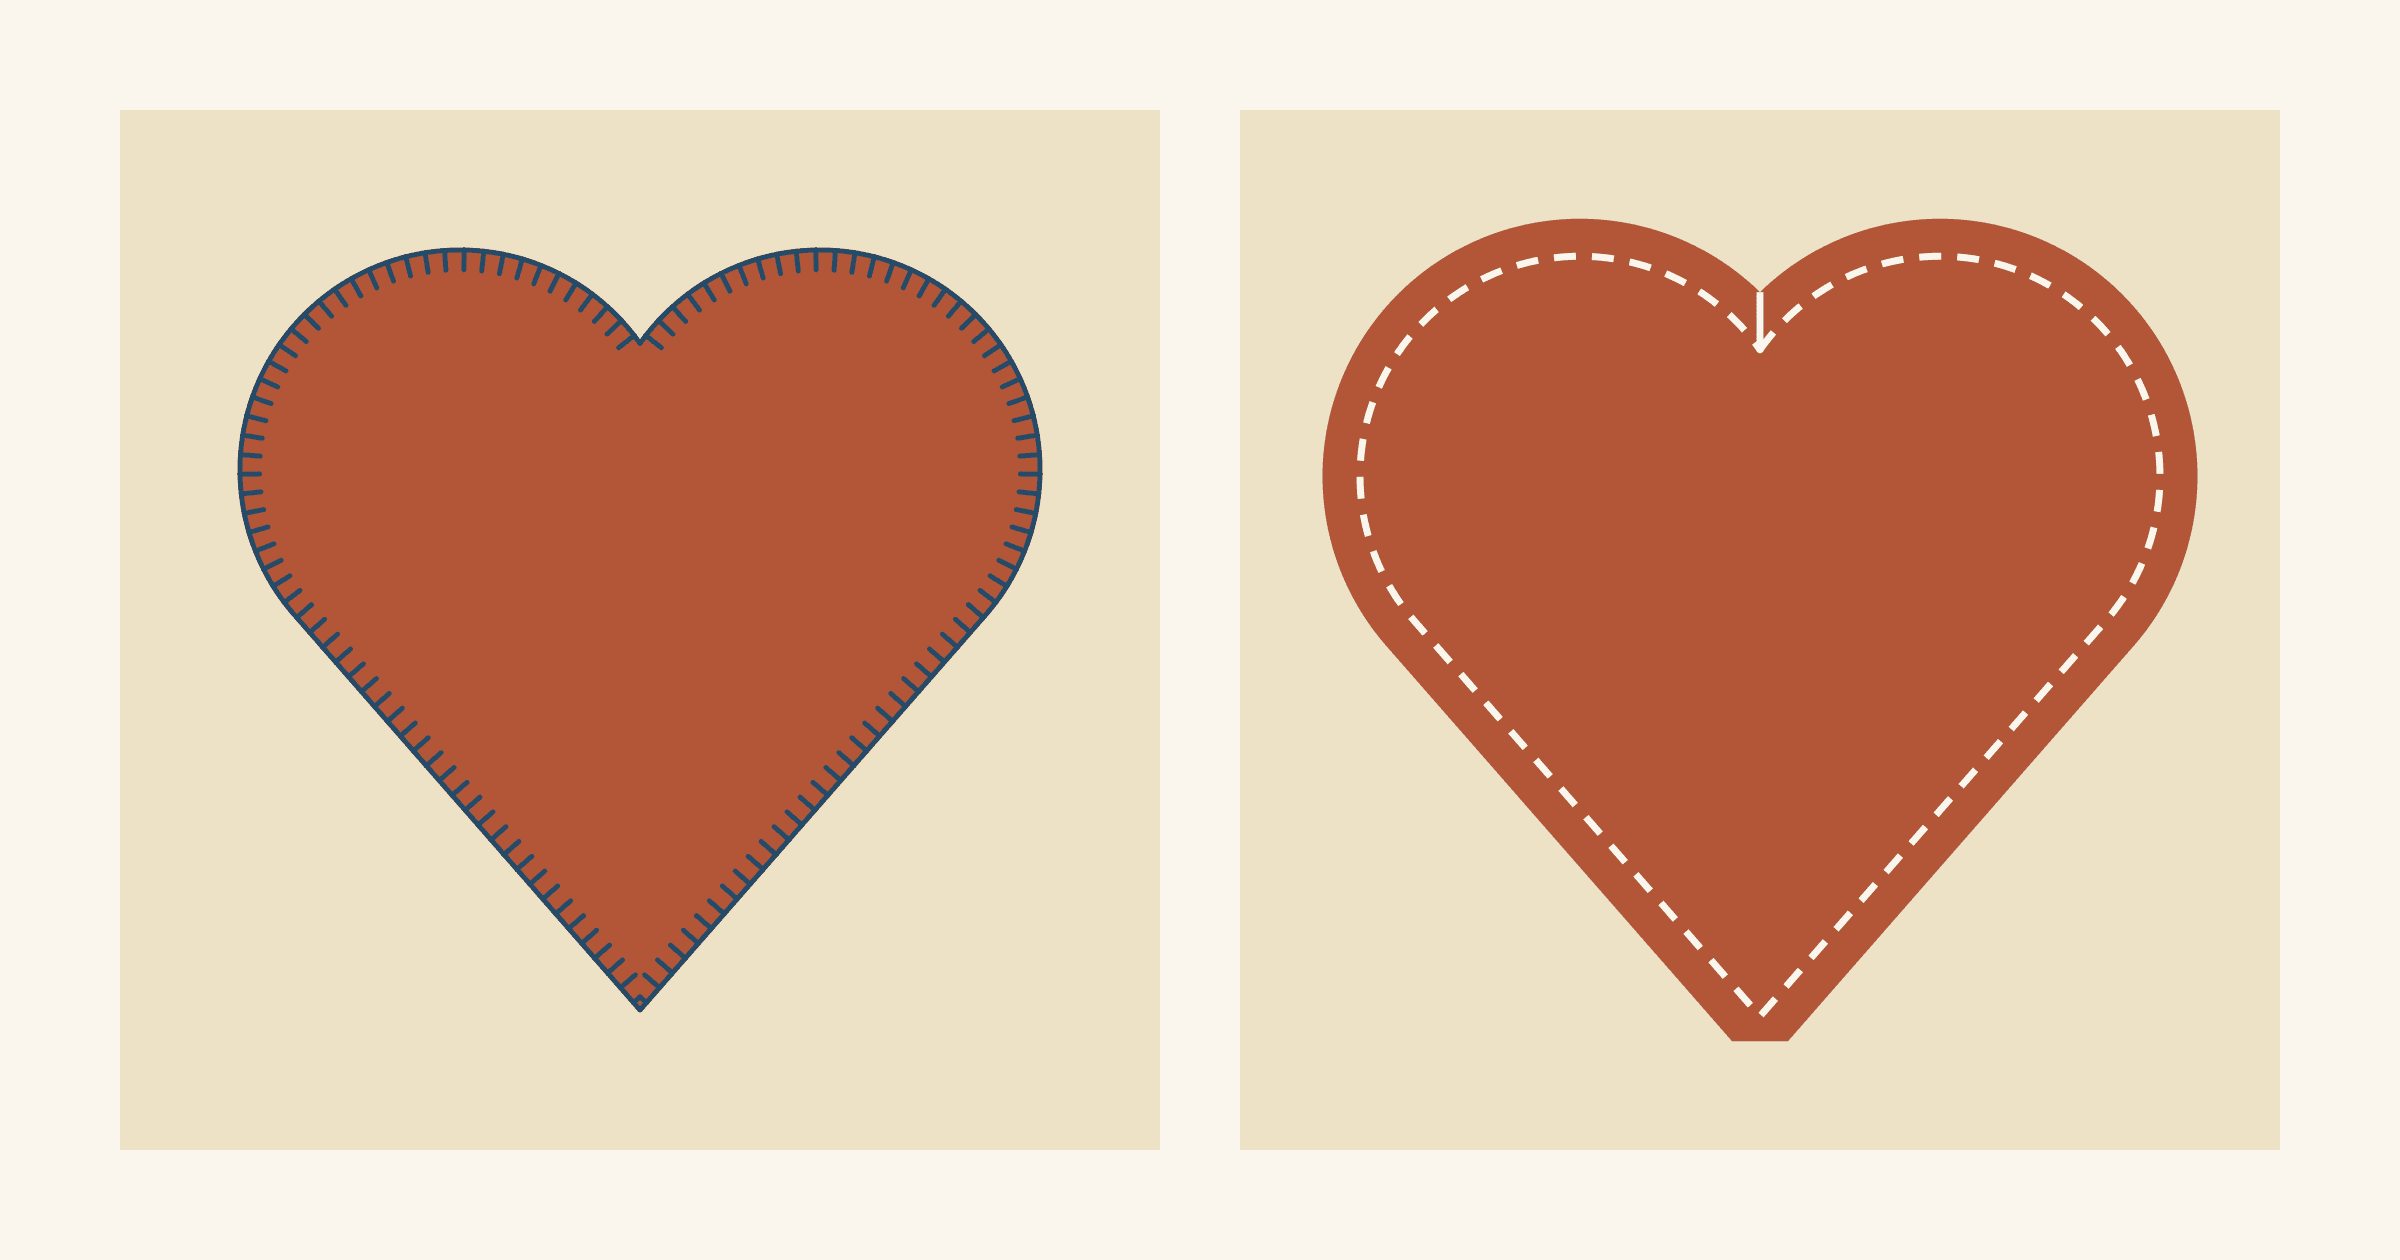
Raw-edge applique cuts each shape at its finished size and stitches along the cut edge. Turned-edge applique adds a narrow allowance and folds it under, so no cut edge shows. Marcia Hohn's applique lesson at Quilter's Cache gives that allowance as 1/8 to 3/16 inch. That small strip of fabric is the whole difference. It changes how the edge looks, how small a shape can be and how the piece holds up in the wash.
For a first applique quilt, or a design with tiny pieces and sharp points, choose raw edge. Fuse the shapes with a sewable fusible web and machine blanket stitch around them. Choose turned edge when you want a soft folded edge, stitches that barely show and no cut edge to fray. Check first that every shape is at least twice as wide as your allowance at its narrowest point.
Below, one motif gets both treatments: a 4-inch heart, two 2-inch leaves, a 1/4-inch stem and three 1/2-inch berries. We drew these diagrams for this article and haven't sewn them.
How the two edges look
On a raw-edge piece, the cut edge is the outline you see. The Quilt Show's Quiltipedia describes raw-edge applique as motifs "cut the exact size needed" and calls it "faster to prepare than other applique methods" for that reason. It adds that raw edges "can create a more realistic look in Art Quilts for designs like trees, fences, clouds, water and other shapes."
The stitching is part of that look. Nancy Scott's raw-edge fusible lesson on WeAllSew lists three ways to secure the edge: "a reduced straight stitch, a satin stitch or a machine blanket stitch." Her favorite is the blanket stitch, set at 2.5 x 2.5 mm, with thread matched to each fabric "for a subtle look." A contrasting thread turns the same stitch into a drawn outline.
Fusible web also changes how the shape feels. A fused piece is a little firmer than the fabric around it, and the more fused area a quilt has, the more you notice. Wendi Gratz's favorite method is fusible applique. In her post on how fused applique holds up, she links a tutorial on window-cutting the fusible for anyone worried about stiffness. If you usually starch fabric before cutting, read your fusible's directions first; our guide to starch vs sizing for quilting covers fabric you plan to fuse.
On a turned-edge piece, the outline is a fold. The edge rolls softly, and the allowance tucked behind it doubles the fabric right at the edge. Sewn by hand, Hohn's blind stitch "should barely show," with stitches about 1/16 inch apart. Needle-turn applique is the hand version that skips pressing ahead of time. Hohn turns the allowance under with the tip of the needle, just ahead of each stitch.
Turned edge doesn't have to be handwork. Jennifer Pate's machine applique handout for Utah State University Extension turns the edges over freezer paper. She stitches them down with invisible nylon thread and a narrow blind hem stitch, and calls it mock hand applique. Pate cuts 1/4 inch outside the paper, a little wider than Hohn's range. The cut sizes below use Hohn's 1/8 to 3/16 inch, because the berries and stem need the narrow end.
How the cut line changes
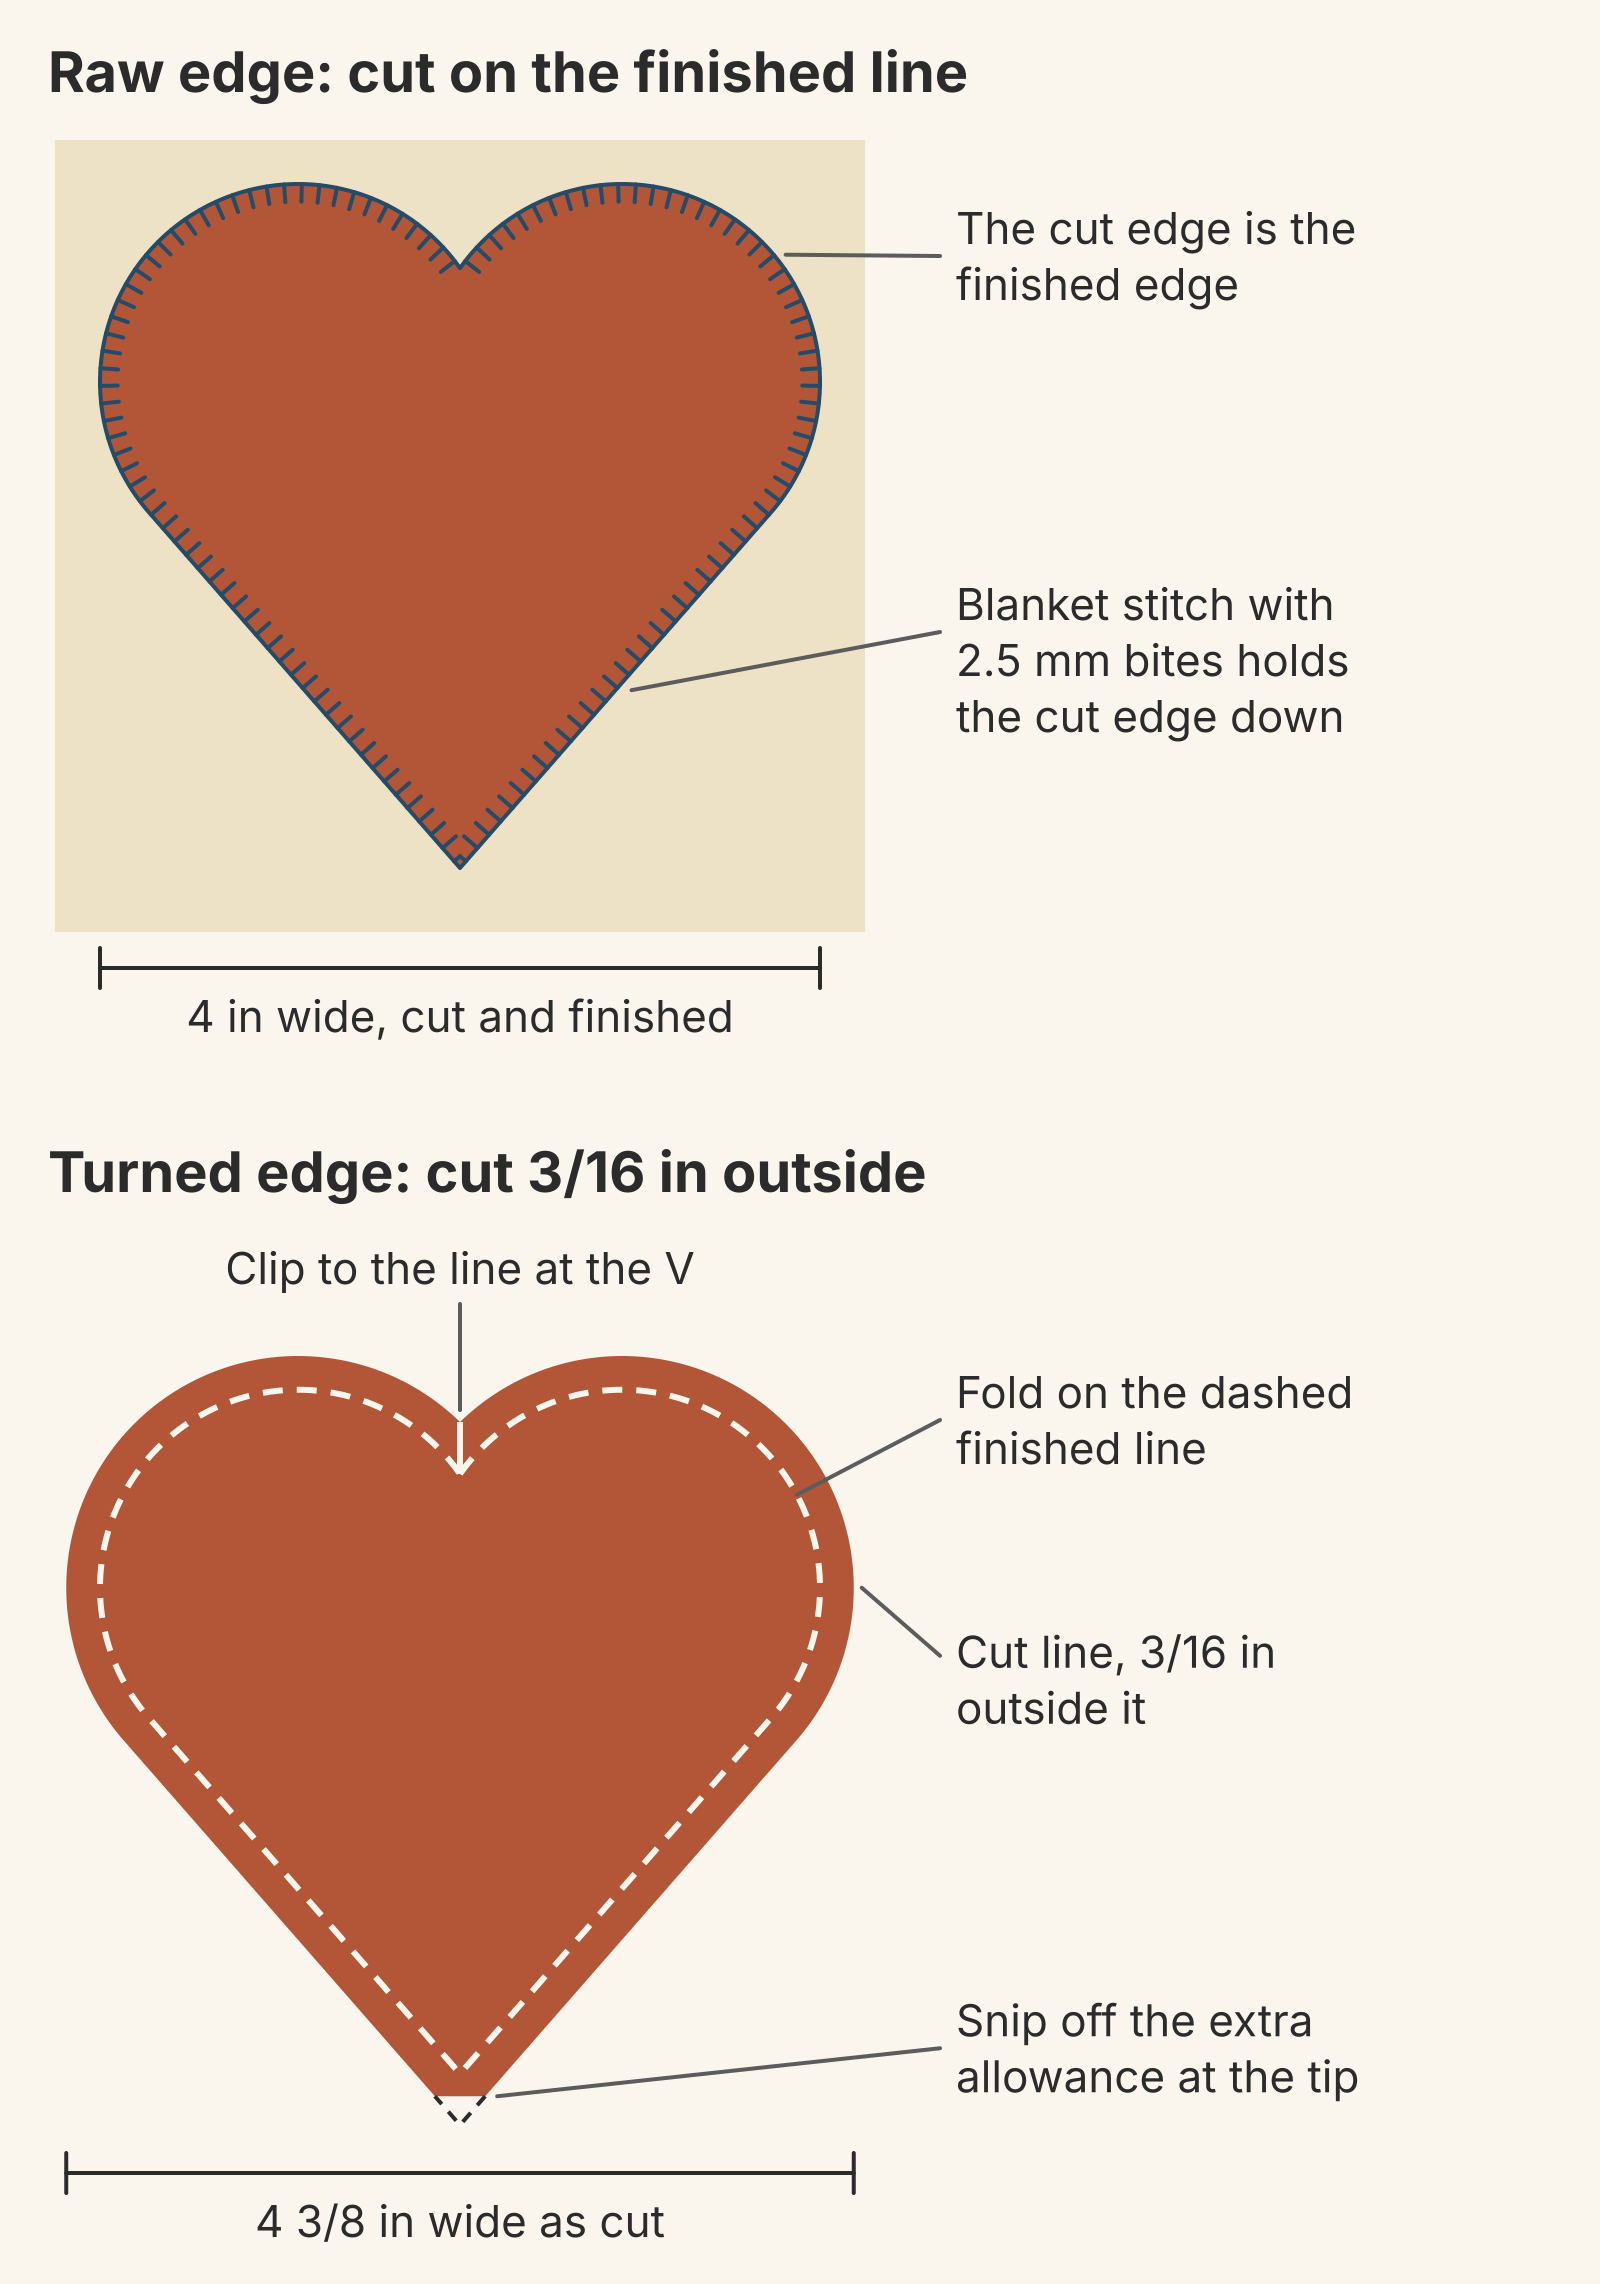
For the raw-edge heart, trace the shape and cut on the line: 4 inches wide, cut and finished. A 2.5 mm blanket stitch takes about 126 stitches to get around it.
For the turned-edge heart, add 3/16 inch all around, so the piece is cut 4 3/8 inches wide. On most of the outline that's all you do, but two spots need more fabric handling than the allowance suggests.
- The V at the top. The cut edge sits nearly 5/16 inch above the finished point, so the clip is longer than the allowance. Hohn says to "clip the seam allowance to the seam line" before sewing past an inside corner, then take "a slightly deeper stitch at the very inside point, to keep this from raveling."
- The tip at the bottom. The allowances from the two sides run more than 1/4 inch past the point. Hohn snips off that extra at the tip "to reduce bulk in that seam."
The curves need a little work too. The heart's lobes have a 1.1-inch radius, and their cut edge has to shrink to about 7/10 of its length when it folds back. A few notches take care of that; Hohn notches outside curves and clips inside ones. The raw-edge heart skips all of this; the V and the tip are just places to pivot.
Small shapes: check the narrowest part
Here's the check that settles most tiny pieces. A turned shape needs its narrowest part to be at least twice the allowance, or the two folded allowances cross behind it. That's 3/8 inch with a 3/16-inch allowance, or 1/4 inch with a 1/8-inch allowance.
Raw edge has a limit too, set by the stitch. Two 2.5 mm blanket stitch bites take up 5 mm, a hair over 3/16 inch. On a narrower part, shorten the bite, or the stitching will cover most of it. Scott notes that you can adjust "both the width and the height of the stitch."
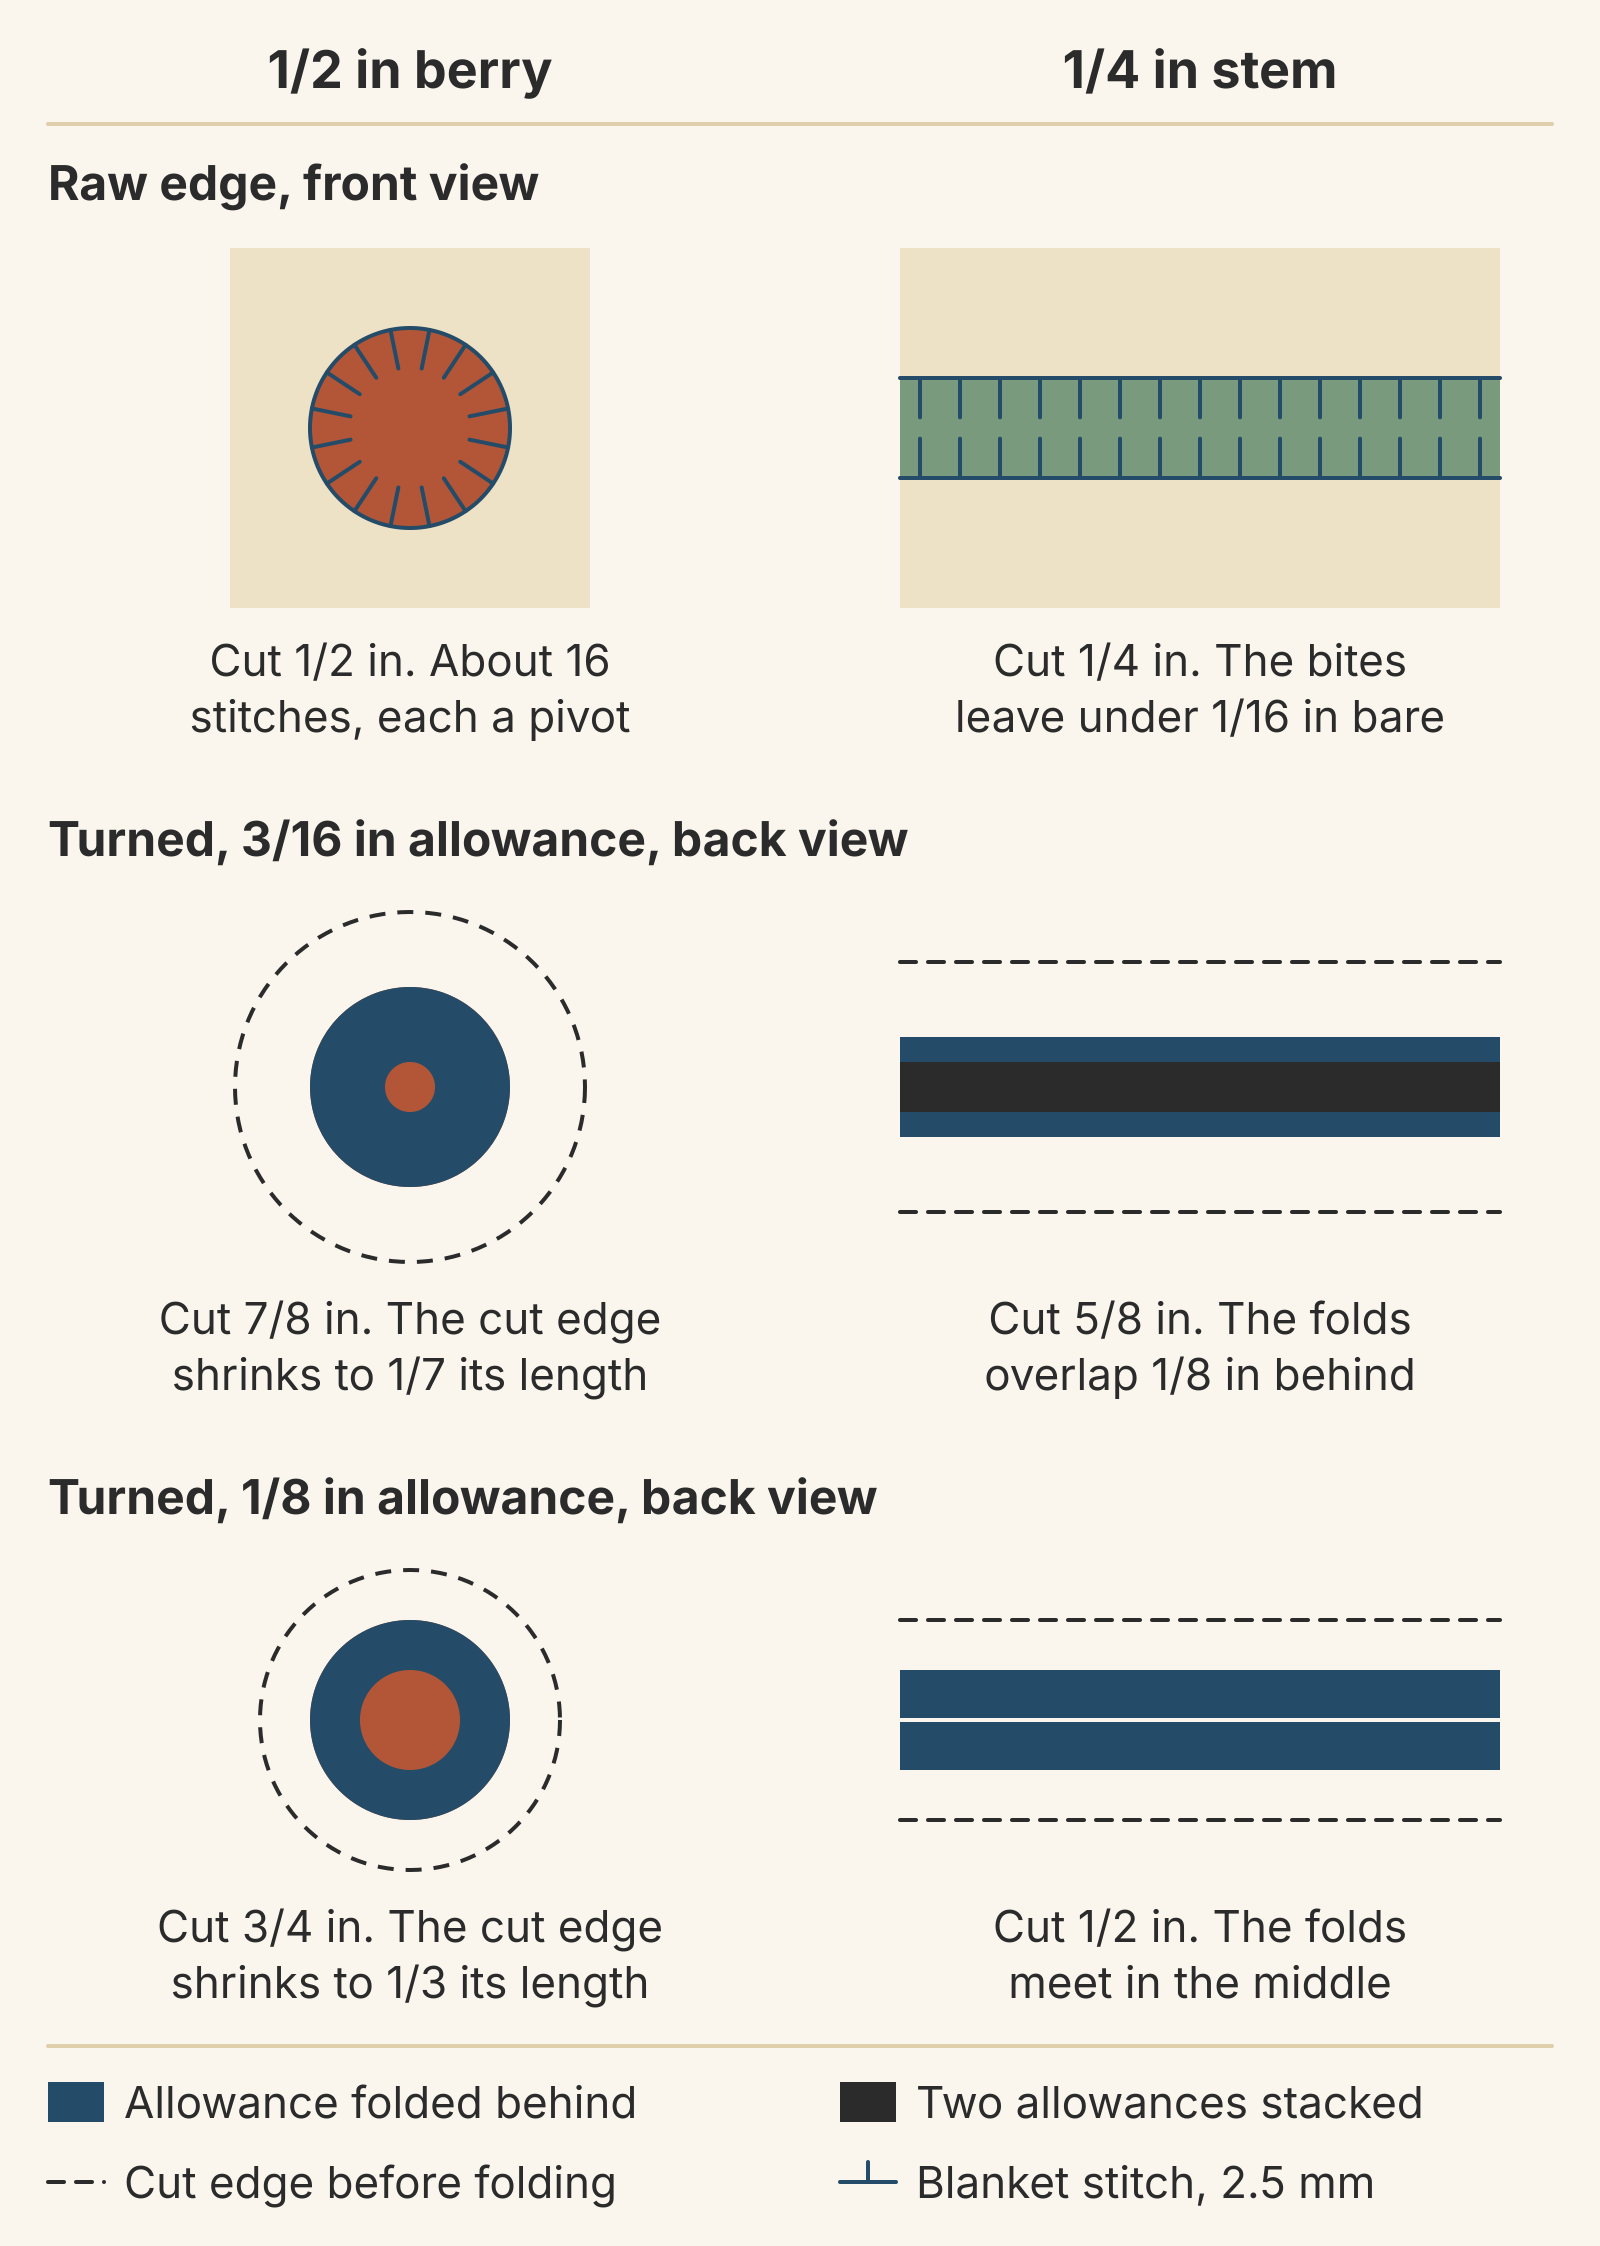
The berry and stem show both limits.
- Raw-edge berry. Cut at 1/2 inch, it takes about 16 blanket stitches to circle, and each bite reaches 2/5 of the way to the center. You'll turn the fabric between nearly every stitch.
- Turned berry, 3/16-inch allowance. It's cut 7/8 inch across. When the allowance folds back, it covers all but a 1/8-inch spot in the middle, and the cut edge has to shrink to 1/7 of its length.
- Turned berry, 1/8-inch allowance. Cut 3/4 inch across, the edge shrinks to 1/3 of its length and leaves a 1/4-inch center clear. That's why the narrow end of Hohn's range suits small pieces.
- Stem. Raw edge, cut 1/4 inch wide, the two rows of bites leave less than 1/16 inch bare between them. Turned with 3/16-inch allowances, the strip is cut 5/8 inch and the folds overlap by 1/8 inch behind the stem. With 1/8-inch allowances it's cut 1/2 inch and the folds meet in the middle.
If a piece fails the check for both methods at your size, the shape needs simplifying or enlarging before you choose an edge.
How the quilt will be used
Washing is where the two methods part ways. On a raw-edge piece, the fusible holds the shape while you stitch, and the stitching holds it after that. ThermoWeb's directions for HeatnBond Lite say fused pieces "must be sewn for permanent bond" and "must be sewn or otherwise attached before washing." For projects with no stitching, ThermoWeb points you to its no-sew UltraHold instead. For a quilt you'll wash, buy a fusible labeled sewable and stitch every edge.
Expect a little fraying at a raw edge, and less with good fabric. Gratz straight-stitched the fused cats on a bed quilt she made for her daughter. Almost two years later, it had been washed "a LOT" and showed "just a tiny bit of fraying on the edges." She credits the fabric, "A higher thread count and tighter weave makes for less fraying," and she uses HeatnBond Lite for her quilts. On flannel, where the fray shows white, she suggests a zigzag over the edges.
A turned edge has no cut edge on the surface, so there's nothing to fray. What it costs you is time and the narrow-part limit above.
| Project | Raw edge | Turned edge |
|---|---|---|
| Wall quilt, rarely washed | Any stitch works; tiny details are easy | Works when you want the soft edge |
| Bed or baby quilt, washed often | Sewable fusible, every edge stitched | No cut edge to fray |
| Many pieces under 3/8 inch | Nothing to fold | 1/8-inch allowance, down to 1/4 inch wide |
| Stitches that barely show | Stitching is part of the look | Blind stitch or invisible thread |
Worked example: the heart-and-berries motif
Here's every piece of the motif, cut both ways. The turned column uses 3/16 inch on the heart and leaves and 1/8 inch on the stem and berries.
| Shape | Finished | Raw-edge cut | Turned-edge cut |
|---|---|---|---|
| Heart | 4 in wide | 4 in wide | 4 3/8 in wide |
| Leaves (2) | 2 x 3/4 in | 2 x 3/4 in | 3/16 in all around (1 1/8 in wide), points snipped |
| Stem | 1/4 in wide | 1/4 in strip | 1/2 in strip |
| Berries (3) | 1/2 in circles | 1/2 in circles | 3/4 in circles |
The leaves are 3/4 inch at their widest, twice the 3/8-inch minimum for a 3/16-inch allowance, so they turn without crowding except at the points. The stem is too narrow for 3/16 inch, and a 3/16-inch allowance would make each berry's edge shrink to 1/7. Both drop to 1/8 inch.
For a baby quilt that will go through the wash every week, we'd make the whole motif raw edge. It's quicker, and a stitched-down sewable fusible holds up to washing, as Gratz's cats show. Fuse it with a sewable web and blanket stitch it at 2.5 mm: about 126 stitches around the heart and 16 around each berry.
For a wall quilt where you want soft edges and enjoy handwork, turn the heart and leaves with 3/16 inch. Drop to 1/8 inch for the stem and berries. You can mix the two methods in one block, but the edges will read differently side by side. Try both on your background fabric before committing.
Make your smallest shape both ways
Before you cut the whole motif, test the piece that worries you most. For this design that's a berry. Fuse and blanket stitch one 1/2-inch circle, then turn a 3/4-inch circle into a second one. Lay both on your background fabric and see which edge you like at arm's length. Time each one, too; our guide to estimating how long a quilt takes shows how to turn a timed sample into a project total.
You can check how the small pieces will read before cutting anything. In QuiltLab's Block Editor, draw the block at its finished size. Rough in the heart with the Polygon tool and add 1/2-inch Ellipse pieces for the berries. Then assign fabrics you've saved in the Swatch Editor. If the berries disappear against the background at that size, they'll be hard to see in either technique. Our color theory guide explains the value contrast that fixes it. Your templates and allowances still come from your pattern and the numbers above. If your motif started as a photo, our photo quilt ideas compare applique with the other ways to put a picture in a quilt.
Related posts

How to Design a Bargello Quilt: Plan the Wave on Paper
A bargello wave is a staircase of stepped columns. Number your strips, write one row per column, and see how column width turns a zigzag into a curve.

Borderless Quilt Design: Plan an Edge That Looks Finished
With no border, the outer blocks and the binding make the edge. Compare whole and halved motifs on one 48 x 60 inch quilt, then pick the binding color.

Crosshatch Quilting: How to Make the Lines Meet at the Edges
Space a 45-degree crosshatch so the lines meet in a V at every edge and corner. Choose the edge step first, mark dots around the quilt, then connect them.