


How to Plan a Piano Key Quilt Border with Mixed Strip Widths
Most piano key quilt borders use keys of one width, chosen so a whole number of keys fits each side. Ula at Designed to Quilt notes that the keys are usually all one size, though they don't have to be. Sara Fernandez's panel quilt for Riley Blake Designs shows the usual math: 3-inch finished keys, 12 across the 36-inch top border and 14 down each 42-inch side.
Scraps rarely come in one width, so apply the same rule to a repeat instead of a single key. Sort your strips into three width groups, arrange those widths into a short repeat that adds up to your block size, and count keys against the strips you have. Then cut the end keys of each side a little wide and trim the border to fit the quilt you actually sewed. For most scrappy borders, start with keys that finish 1, 1 1/2 and 2 inches, a repeat as long as one block, and corner squares.
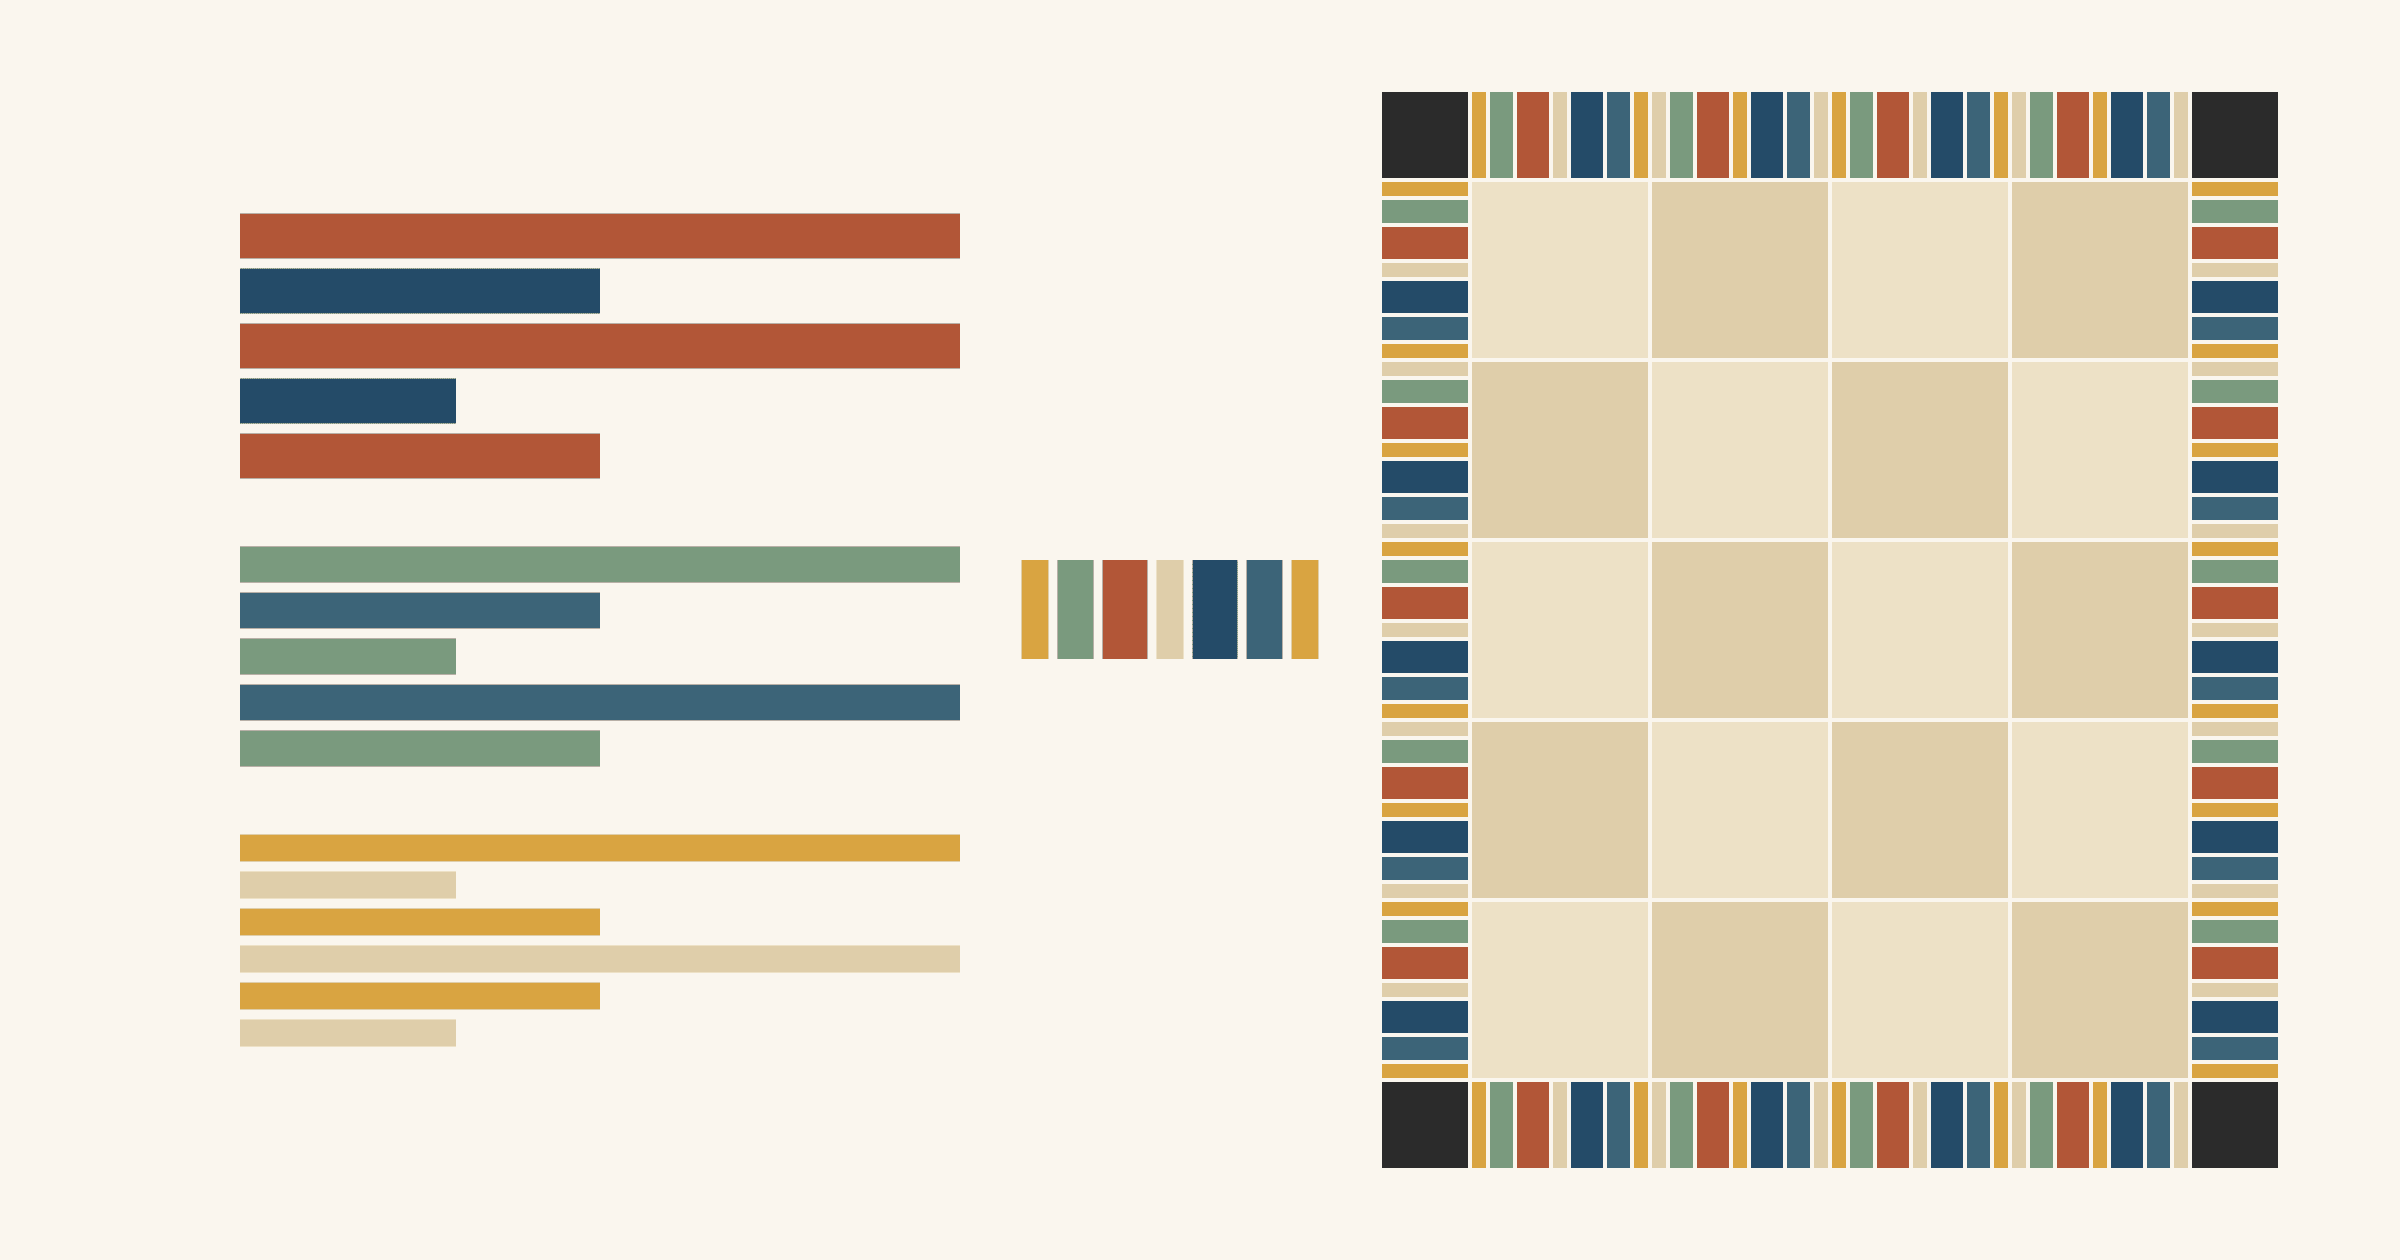
The worked example below follows one quilt from strip inventory to trimmed border. We drew these diagrams for this article and haven't sewn them.
Set the border depth and side lengths first
Two numbers drive the whole plan: how deep the border is and how long each side is. Decide them from the quilt, before you look at a single scrap.
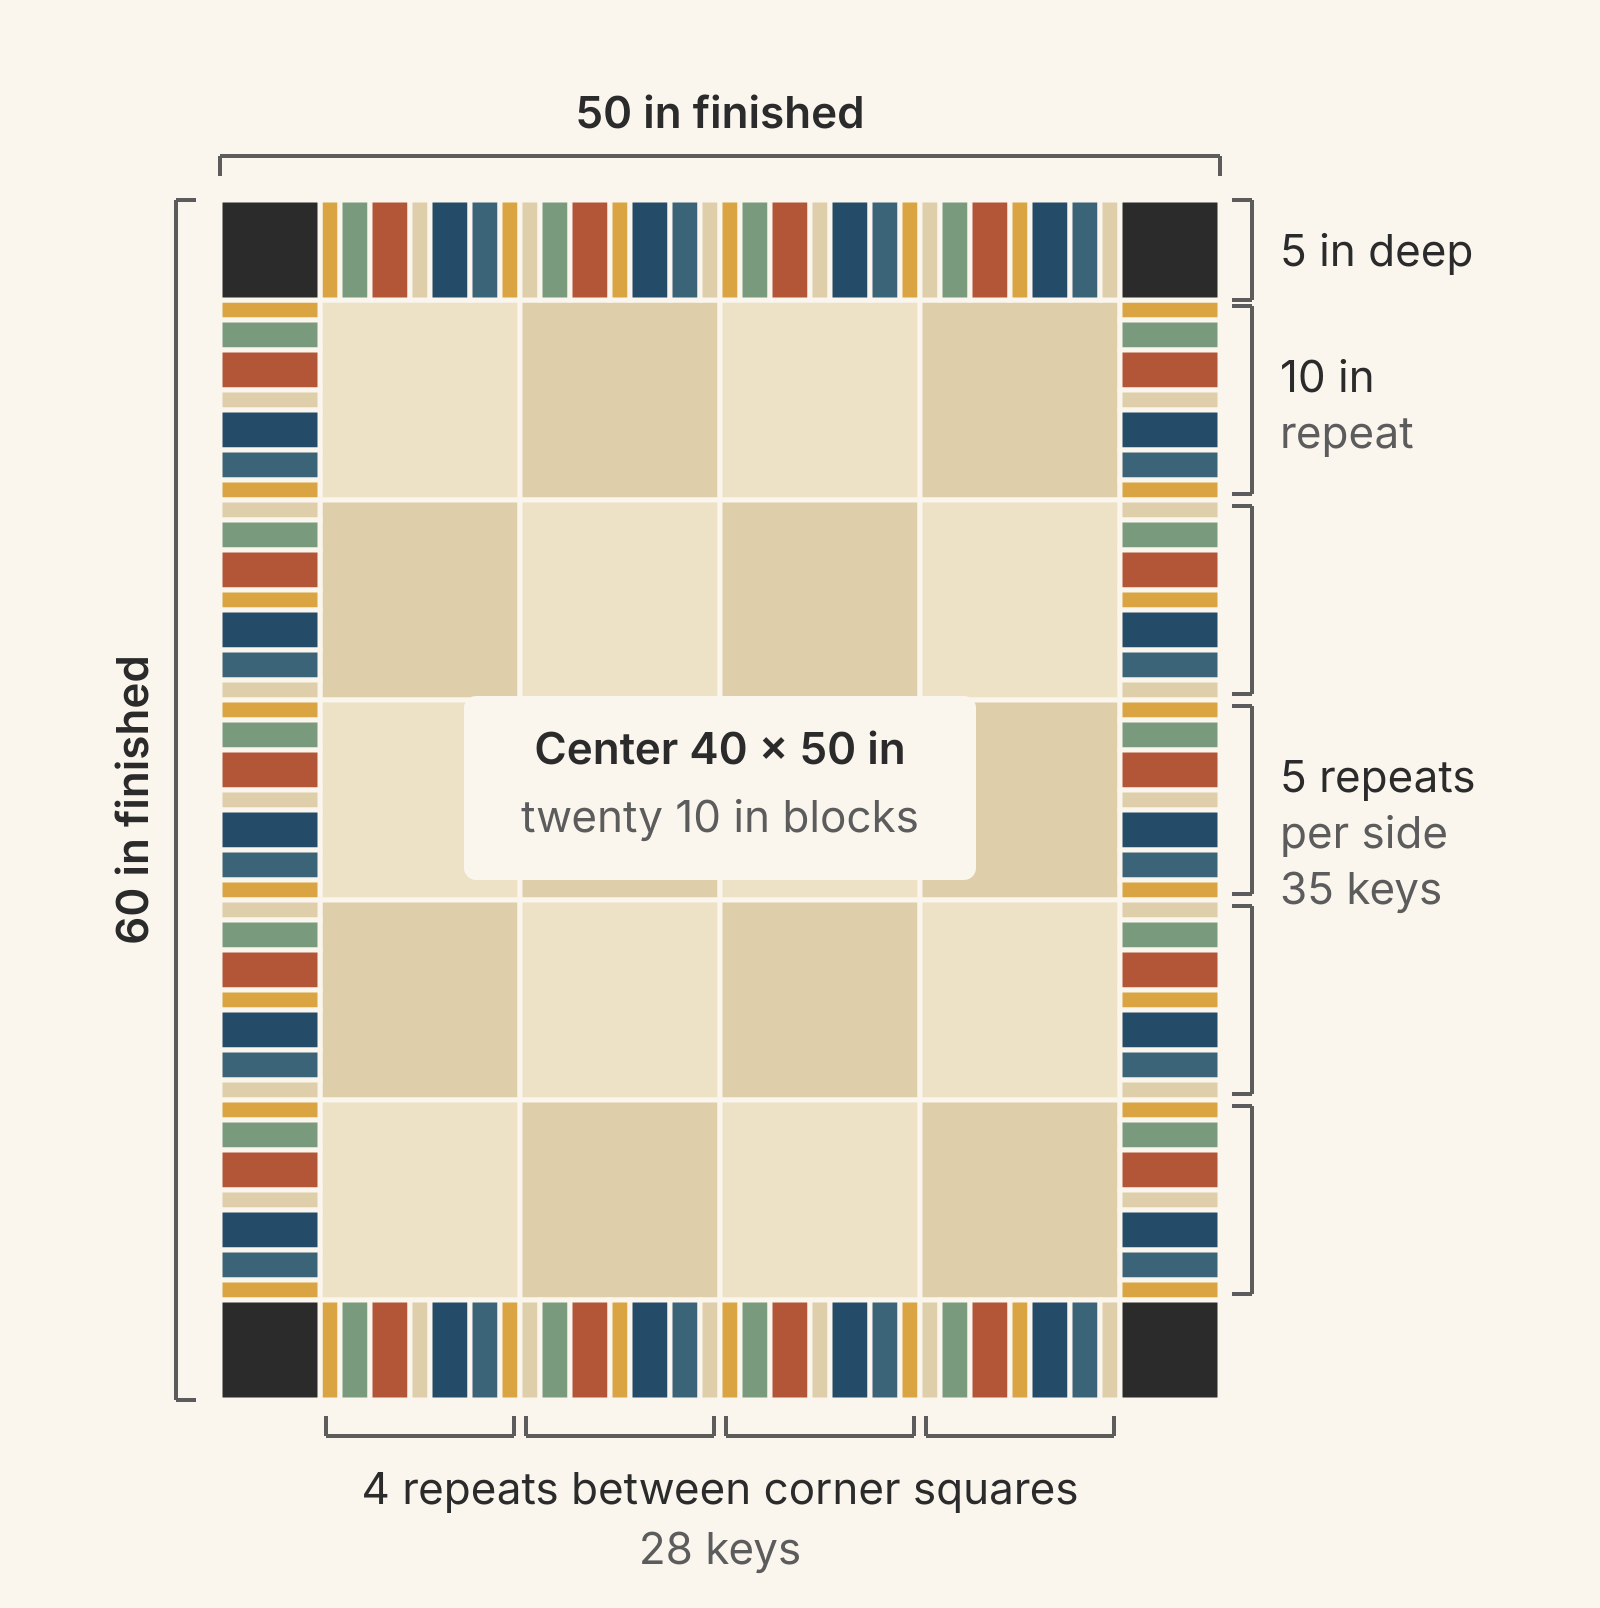
Our example center is twenty 10-inch blocks, 4 across and 5 down, so it finishes at 40 x 50 inches. GE Designs' border guide gives the classic rule of thumb of a third to a half of the finished block size for border width. For 10-inch blocks that's about 3 1/3 to 5 inches. We chose 5 inches, the top of the range. Deeper keys look more like keys: even a 2-inch key is two and a half times as long as it is wide.
That sets two cut sizes. Every key is cut 5 1/2 inches long (5 inches plus two 1/4-inch seam allowances), and every corner square is cut 5 1/2 inches square. The finished top is 50 x 60 inches.
With corner squares, each border strip only has to match the center. The two sides run 50 inches, and the top and bottom run 40 inches between their corner squares.
Sort your strips into three width groups
Measure each strip's clean width and its usable length, leaving out frayed ends and fold lines. Our guide to sorting quilt scraps by size covers that measuring step in more detail.
Then trim each strip down to the next group width below it: 1 1/2, 2 or 2 1/2 inches cut, which finish at 1, 1 1/2 and 2 inches. A 1 3/4-inch strip joins the 1 1/2-inch group; a 2 1/4-inch strip joins the 2-inch group. Anything narrower than 1 1/2 inches stays in the scrap bin. Half-inch steps keep the sums easy, because any combination of keys adds up in half inches. Three groups give enough variety to look scrappy and few enough numbers to count. Two groups give a calmer rhythm.
Plan in finished widths. A key's finished width is its cut width minus 1/2 inch, and the keys along a side must add up to that side's finished length. That's the whole piano key border calculator; the rest of the plan is choosing which widths go where.
Next, count how many keys each strip will give you. Divide its usable length by 5 1/2 inches and round down. A 40-inch strip gives 7 keys, a 20-inch strip gives 3, and a 12-inch strip gives 2.
Here's our sample bin, with long strips at 40 inches, medium at 20 and short at 12:
| Width group | Strips on hand | Keys on hand | Keys needed |
|---|---|---|---|
| 1 1/2 in cut (1 in finished) | 4 long, 5 medium, 4 short | 51 | 46 |
| 2 in cut (1 1/2 in finished) | 4 long, 4 medium, 3 short | 46 | 44 |
| 2 1/2 in cut (2 in finished) | 3 long, 4 medium, 2 short | 37 | 36 |
The last column comes from the repeat, which is the next step.
Build a repeat as long as one block
A repeat is a short, fixed order of widths that you use again and again while the fabrics change. It's what turns a pile of mixed keys into a border that looks planned.
Make the repeat's finished length match your block size. In a straight-set quilt without sashing, the block size divides both sides of the center evenly. The repeat then fits every side with nothing left over, and its ends line up with the block seams. Our 10-inch blocks call for a 10-inch repeat: five down each side and four across the top and bottom.
We used Repeat A: 1, 1 1/2, 2, 1, 2, 1 1/2, 1 inches. It reads the same from either end, so every side starts and finishes with a 1-inch key next to its corner squares.
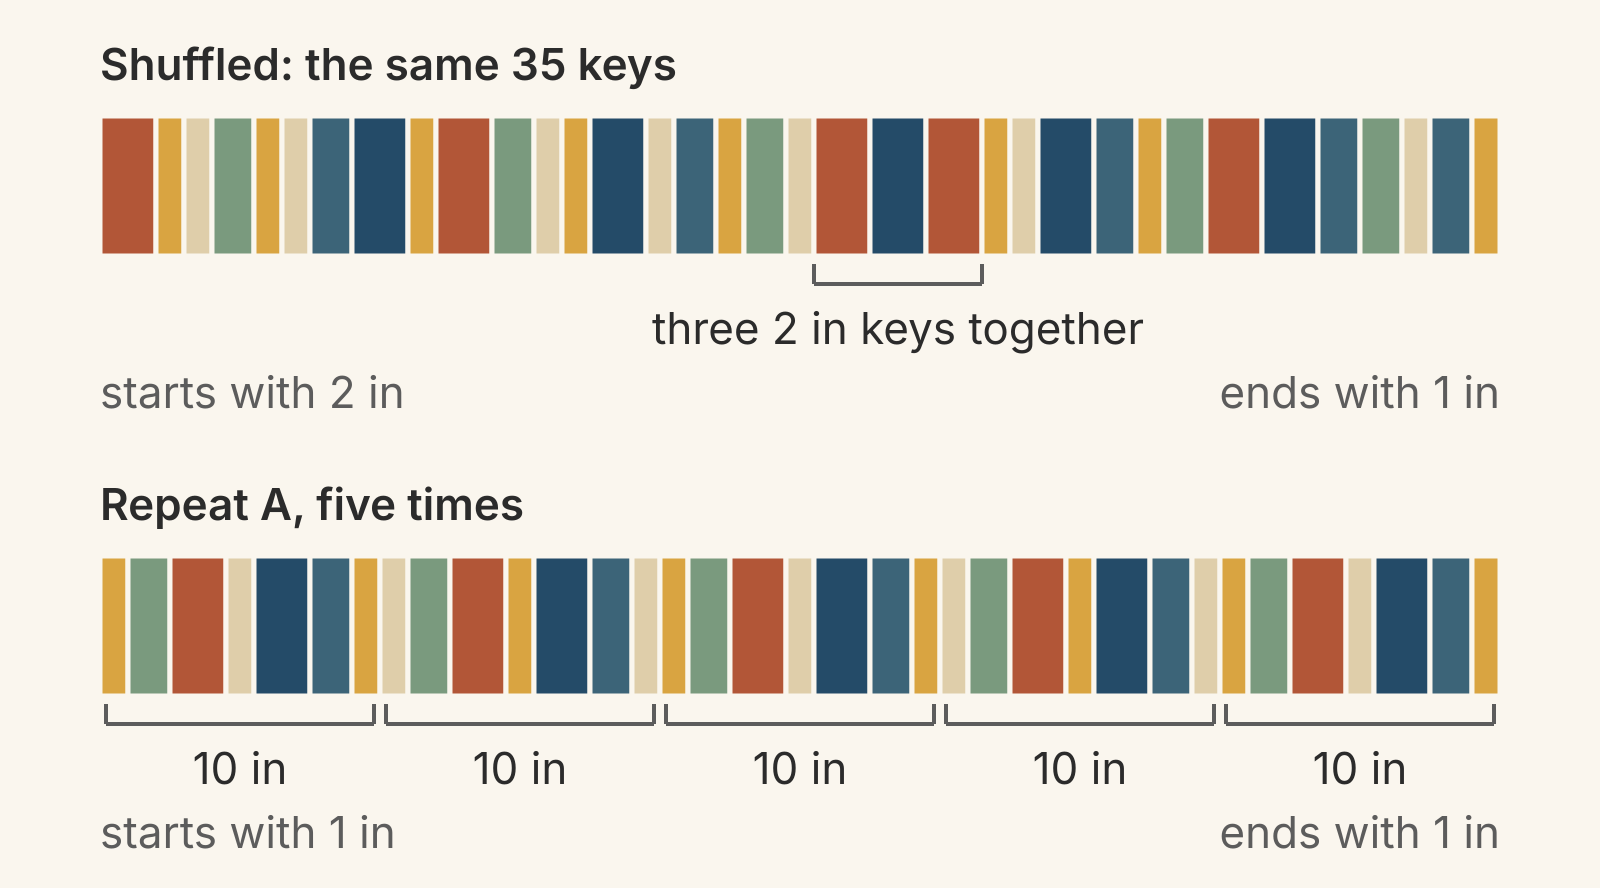
The shuffled strip uses exactly the same 35 keys and still measures 50 inches. But three 2-inch keys land side by side, and the two ends don't match. Repeat that across four sides and the edge looks random rather than scrappy on purpose.
In our diagrams, each width has its own pair of colors so you can see the rhythm. With real scraps, give your 2-inch keys the darkest or strongest prints and your 1-inch keys the lightest. The beat then shows even when every fabric is different.
If sashing or an inner border leaves a side at an odd length, fill it with whole repeats and split what's left between the two ends. A 57-inch side takes five 10-inch repeats with 7 inches over, so each end gets 3 1/2 inches: one 2-inch key and one 1 1/2-inch key. Or add a plain spacer border first so that whole repeats fill the side; our medallion guide shows how to size a spacer border.
Count the keys and check them against your strips
Our quilt has 18 repeats in all: 5 on each side and 4 on the top and bottom. Multiply each repeat's counts by 18 to get the keys you need.
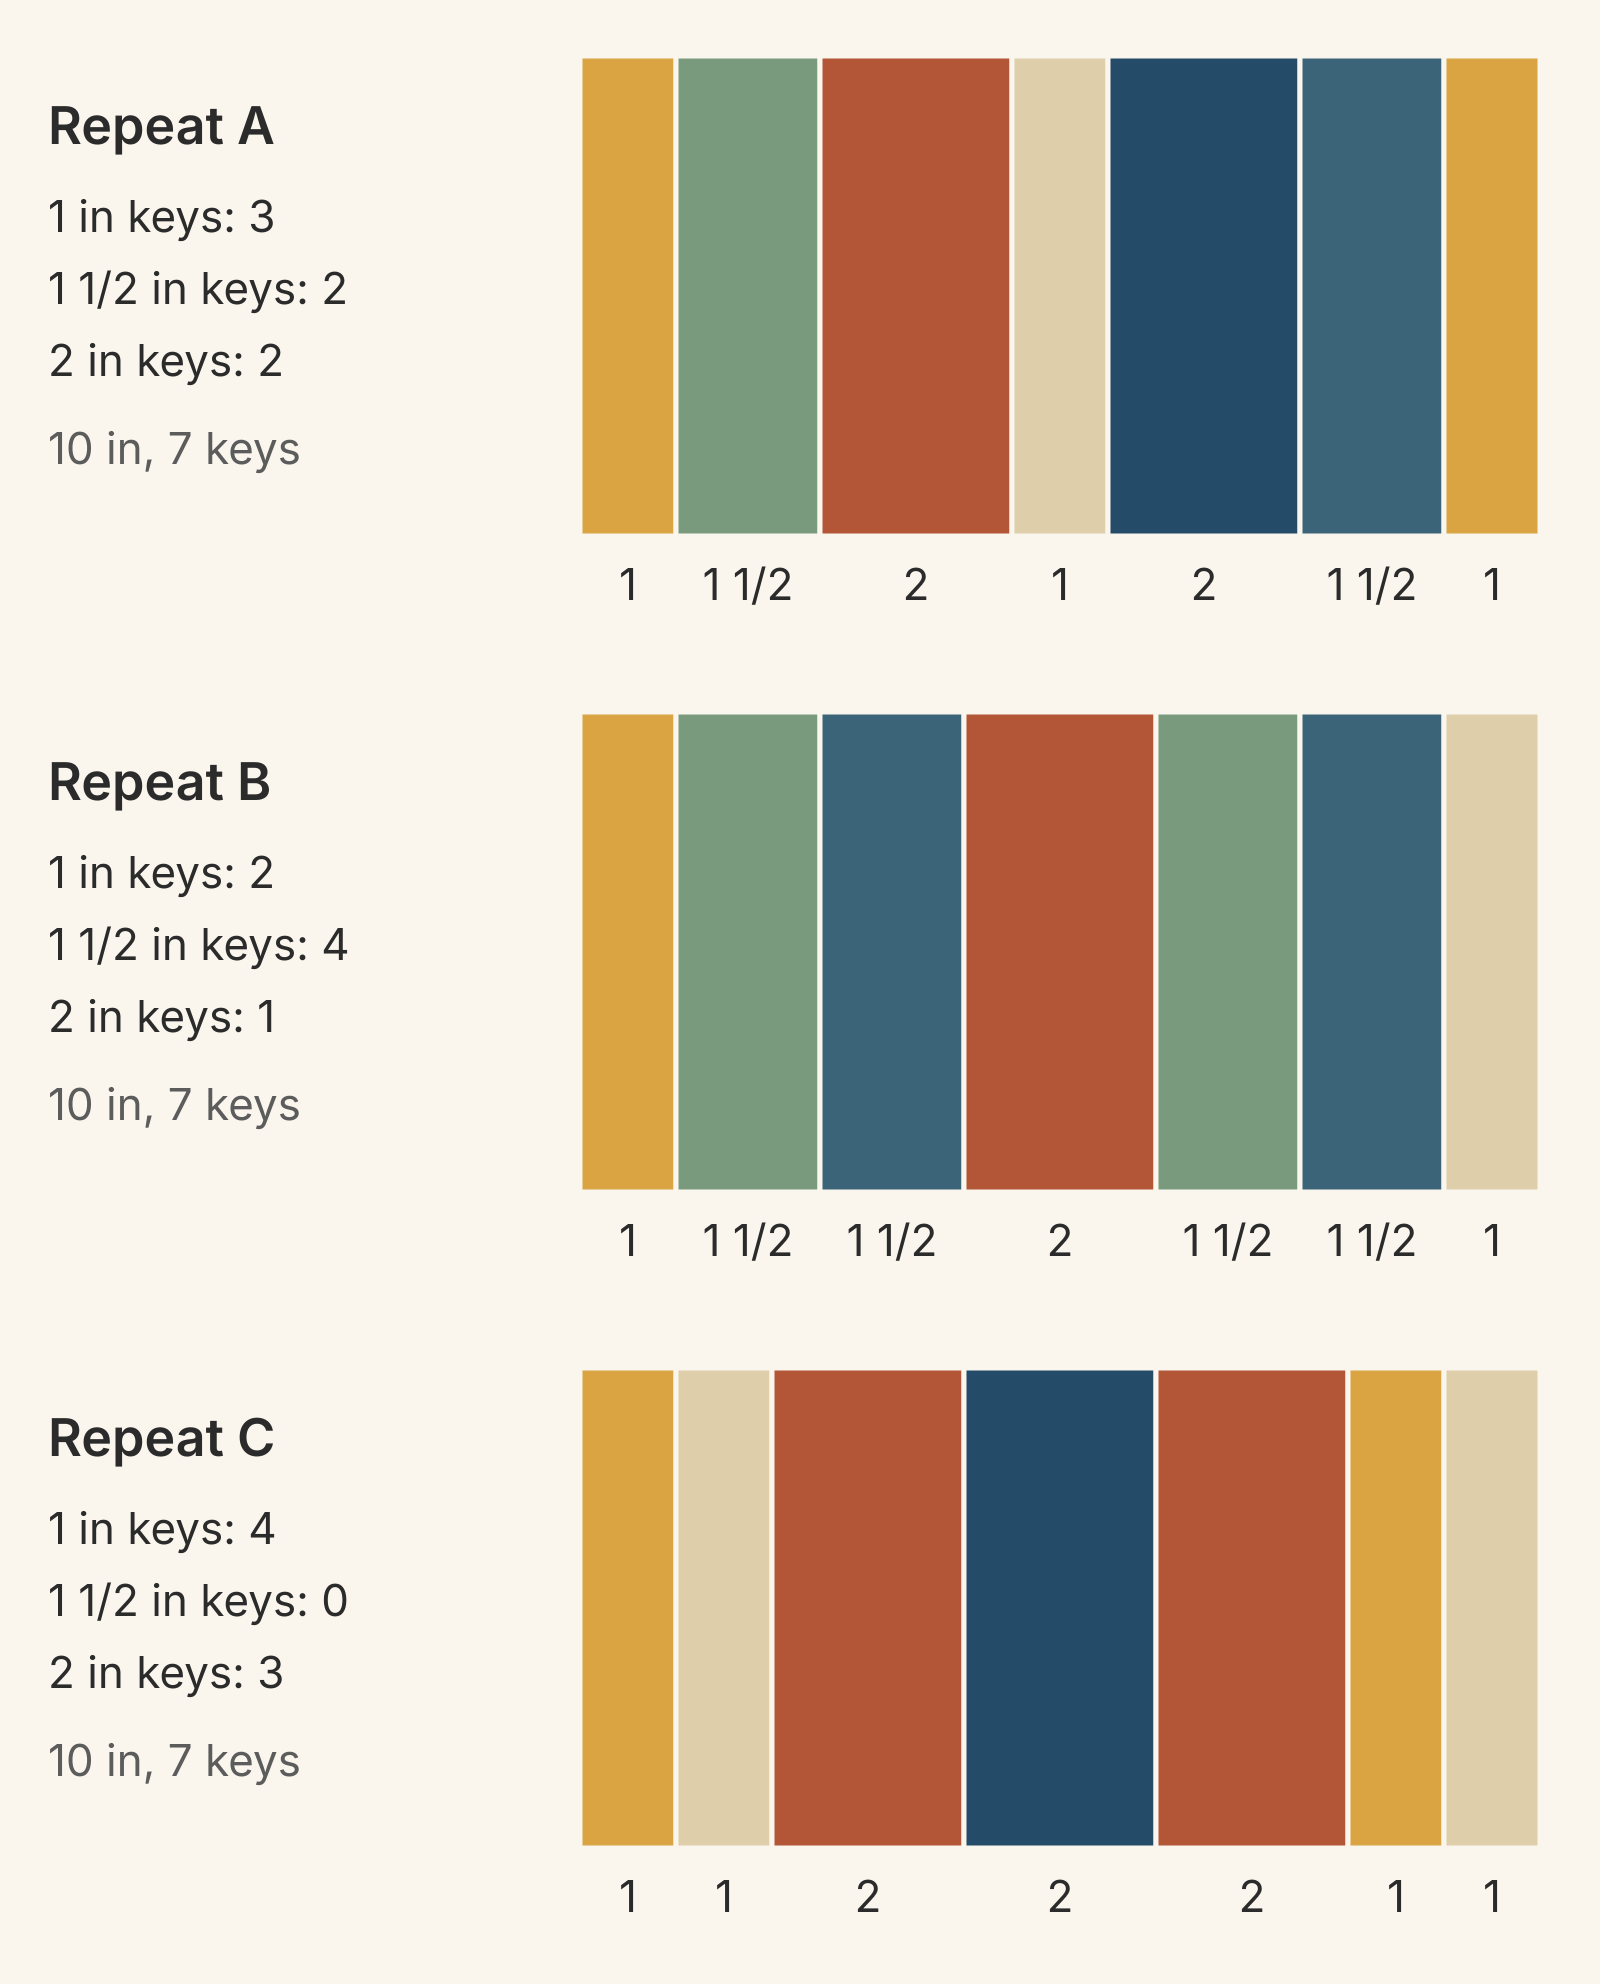
Different mixes of seven keys can add up to the same 10 inches. Here are three:
| Repeat (finished widths, in) | 1 in keys | 1 1/2 in keys | 2 in keys |
|---|---|---|---|
| A: 1, 1 1/2, 2, 1, 2, 1 1/2, 1 | 54 | 36 | 36 |
| B: 1, 1 1/2, 1 1/2, 2, 1 1/2, 1 1/2, 1 | 36 | 72 | 18 |
| C: 1, 1, 2, 2, 2, 1, 1 | 72 | 0 | 54 |
All three need 126 keys; they differ in which strips they use up. We cut the 8 end keys (two per side) from 2-inch strips instead of 1 1/2-inch strips, for the trimming step below. That moves 8 keys from the narrow group to the middle group, so Repeat A needs 46, 44 and 36 keys from our bin. The bin covers every group, with 5, 2 and 1 to spare.
The other two don't fit this bin. Repeat B needs 80 keys from 2-inch strips (72 plus the 8 end keys), and we have 46. Repeat C needs 54 wide keys and 64 narrow ones, and we have 37 and 51. If none of your options fits, write your own: keep the total at 10 inches and lean the mix toward the group you have most of. Leave a spare or two in each group so you can swap out a fabric that looks wrong.
With long strips, strip sets are faster, as Ula describes. Sew seven strips in repeat order and cut 5 1/2-inch segments; each segment is a whole repeat. A 23-inch strip set gives four segments, with an inch to square up. Every segment from one set repeats the same seven fabrics, so mix segments from several sets. Make the first and last repeat of each side from single keys so their outer keys can be cut wide.
Cut the end keys wide, then trim to fit
Your sewn center won't be exactly 40 x 50 inches, and the border has a lot of seams to drift. Build in some room to adjust.
Sew one repeat first and measure it. On its own, Repeat A should measure 10 1/2 inches raw. Check this before sewing the rest, because each side has 34 seams. If every seam takes an extra 1/32 inch from each piece, the side comes up 2 1/8 inches short.
Cut each side's two end keys 1/2 inch wider than planned. For Repeat A, that means 2-inch cut end keys instead of 1 1/2-inch ones. Each side strip then measures 51 1/2 inches raw instead of 50 1/2, and each top or bottom strip 41 1/2 instead of 40 1/2.
Measure the center, then trim both ends equally. Measure through the middle and near both edges, as in our guide to preventing wavy quilt borders. Suppose the center's sides measure 50 1/4 inches raw instead of 50 1/2, and your sewn key strip measures the planned 51 1/2. The strip is 1 1/4 inches too long, so trim half of that, 5/8 inch, from each end. The end keys then finish at 7/8 inch instead of 1 inch, and the repeat stays centered on the side.
Whatever your strip and center measure, the rule is the same: subtract, halve, and trim that much from each end. The extra half inch at each end gives you about an inch of play either way. A center that finishes anywhere from 49 to 51 inches leaves end keys between 1/2 and 1 1/2 inches wide. Trim the top and bottom strips to the center's measured width the same way, then sew on the corner squares.
Even a published pattern runs into this. Dawn Piasta designed an optional piano key border for the Canadian Quilters' Association's Sea You in Nova Scotia sew-along. Every key is cut 2 x 6 1/2 inches and finishes 1 1/2 inches wide. The bordered center they surround finishes 44 x 58 inches, and neither number divides evenly by 1 1/2. Her notes suggest a generous 1/4-inch seam where needed and say her design software resized some keys to between 1.34 and 1 1/2 inches finished.
Decide how the keys turn the corners
Corner squares are the easiest choice for a scrappy border, and the one we'd recommend. Each side is planned, sewn and trimmed on its own, and the square sits where the keys change direction. Cut them 5 1/2 inches square, the same as the key length.
Without corner squares, sew the side borders on first. The top and bottom strips then run the full 50 inches, across the ends of the side borders, so they need five repeats instead of four. Those repeats start at the quilt's outer edge, so their ends fall halfway across the blocks instead of on the block seams. Ula's post shows this simple version and an offset corner.
Mitered corners carry the keys around the turn on a diagonal seam, and each strip has to run past the corner before it's trimmed. Our border corner guide works out how much longer mitered strips must be. Jen at Shabby Fabrics demonstrates a mitered piano key border in a free video. For the bigger picture on corner styles and border widths, see our quilt border ideas.
Write the plan on one card, then sew a test repeat
Put the whole plan on one index card: your three cut widths, keys on hand per group, the repeat order, keys needed per group and which keys are the wide end keys. Cut and sew one repeat, measure it against 10 1/2 inches, and only then cut the rest.
To check the border's depth and finished size before you cut, set up the quilt in QuiltLab's Quilt Editor. Make a Grid quilt of 10-inch blocks, 4 columns by 5 rows, then choose Add border under Borders and set Finished width to 5. The top grows to 50 by 60 inches. The border fills with one solid color or fabric, so it shows depth and size, not the keys or corner squares. To try fabrics in the repeat itself, set a 10-by-5-inch block in the Block Editor and draw seven rectangles at the repeat's widths. QuiltLab doesn't count keys or write cutting lists, so the inventory and repeat math stay on your card.
Quilt Editor guide →Set up a Grid layout and add finished-width bordersRelated posts

How to Design a Bargello Quilt: Plan the Wave on Paper
A bargello wave is a staircase of stepped columns. Number your strips, write one row per column, and see how column width turns a zigzag into a curve.

Borderless Quilt Design: Plan an Edge That Looks Finished
With no border, the outer blocks and the binding make the edge. Compare whole and halved motifs on one 48 x 60 inch quilt, then pick the binding color.

Crosshatch Quilting: How to Make the Lines Meet at the Edges
Space a 45-degree crosshatch so the lines meet in a V at every edge and corner. Choose the edge step first, mark dots around the quilt, then connect them.