


How to Cut Layer Cake Squares and What Size Quilt You'll Get
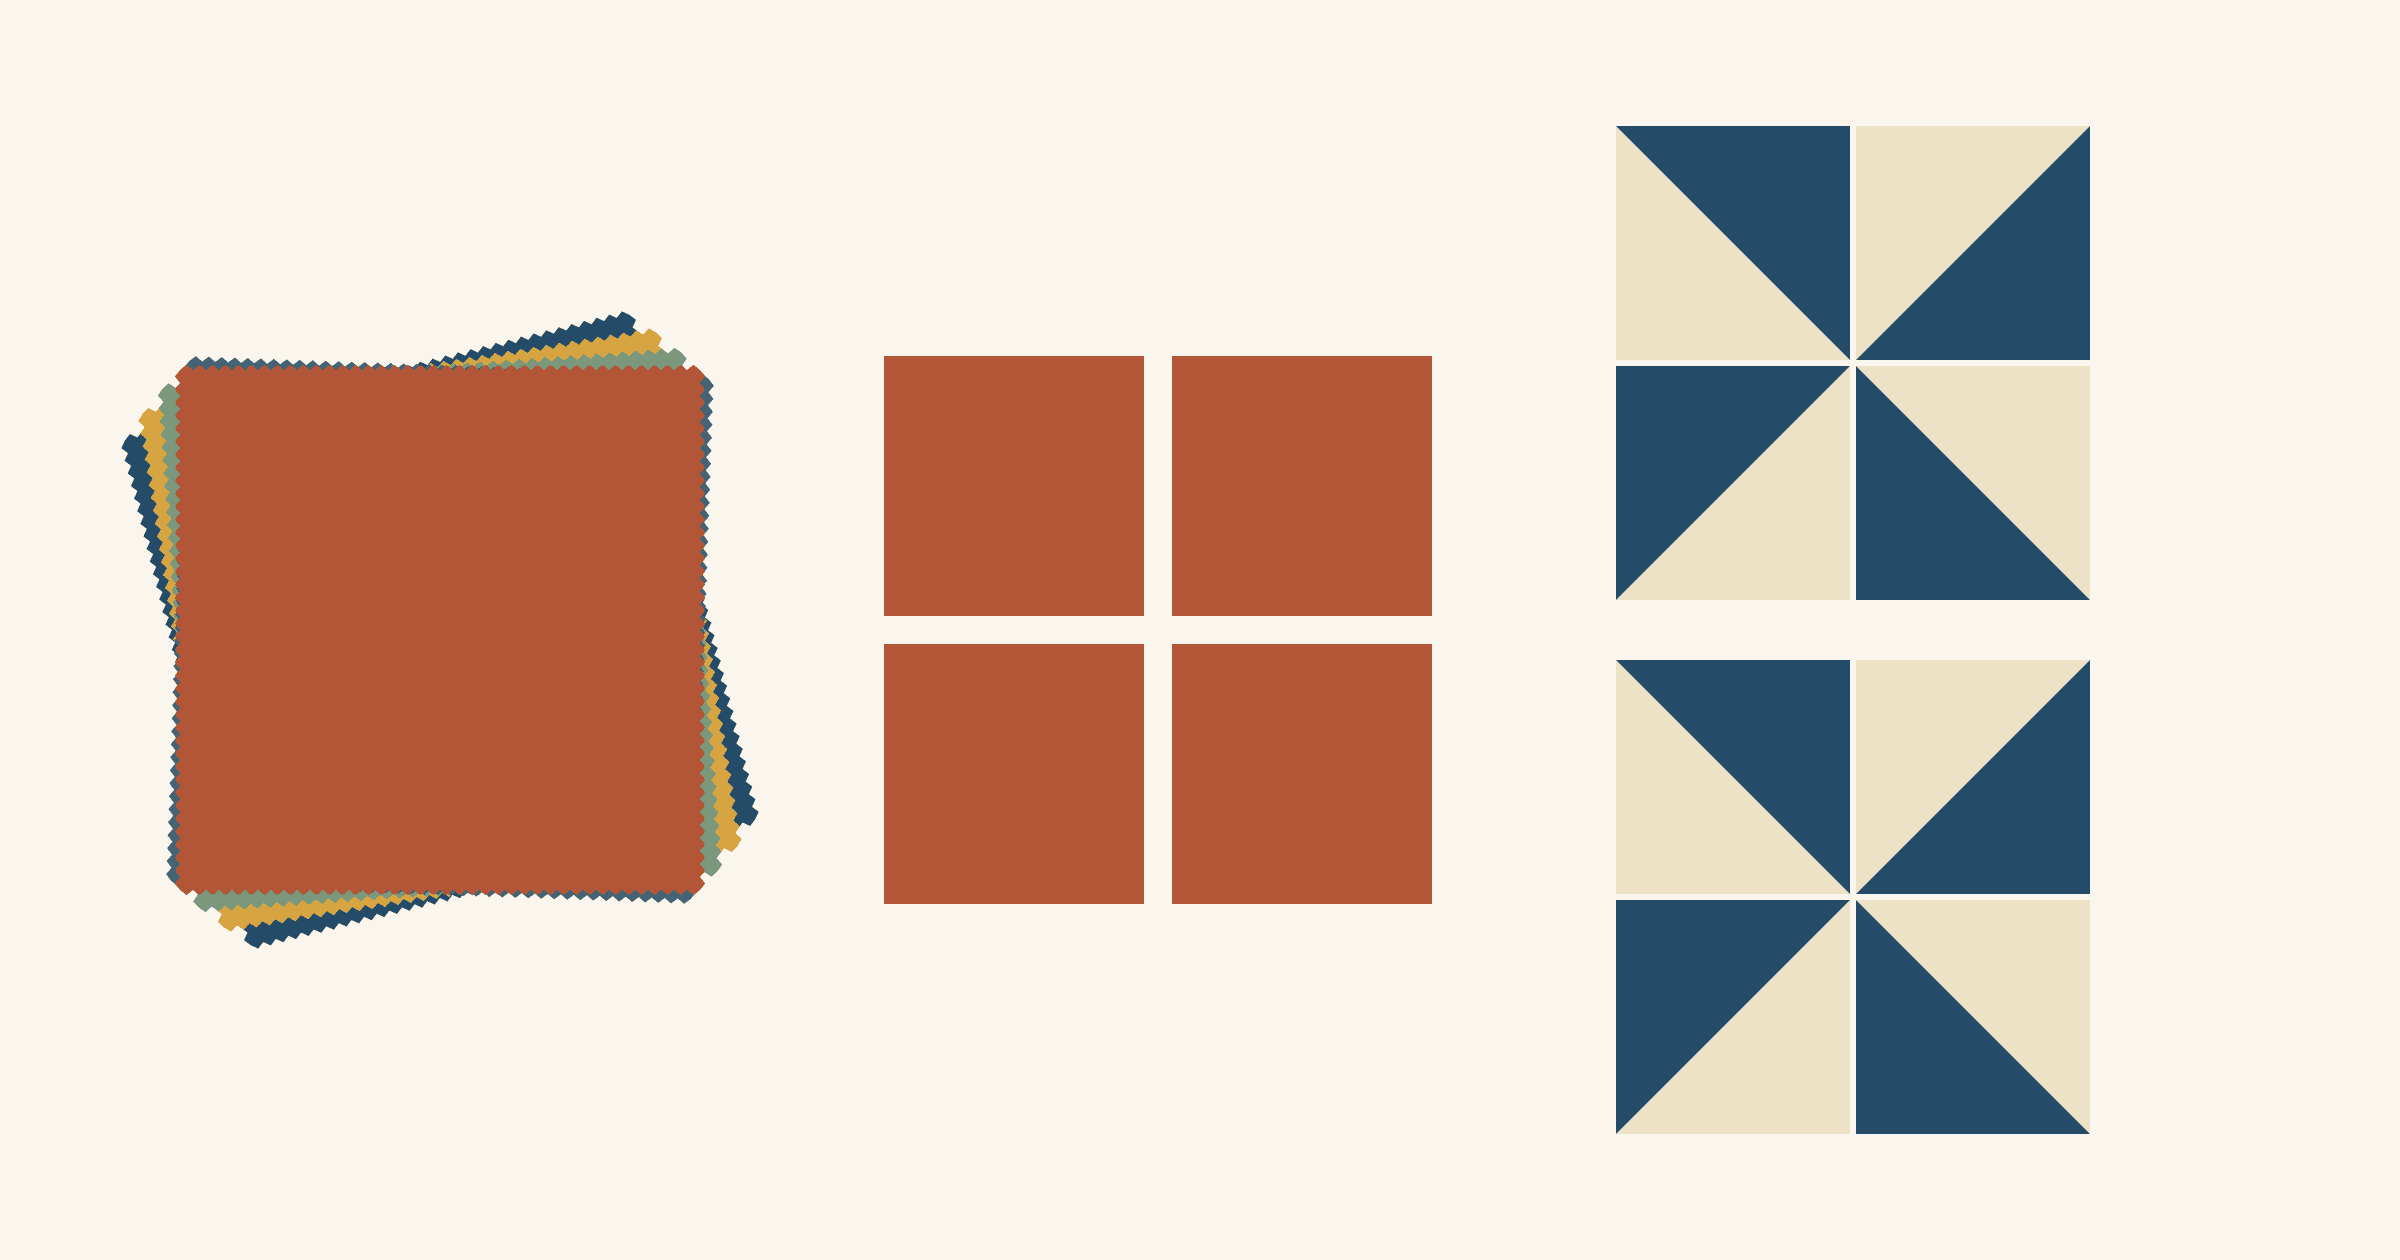
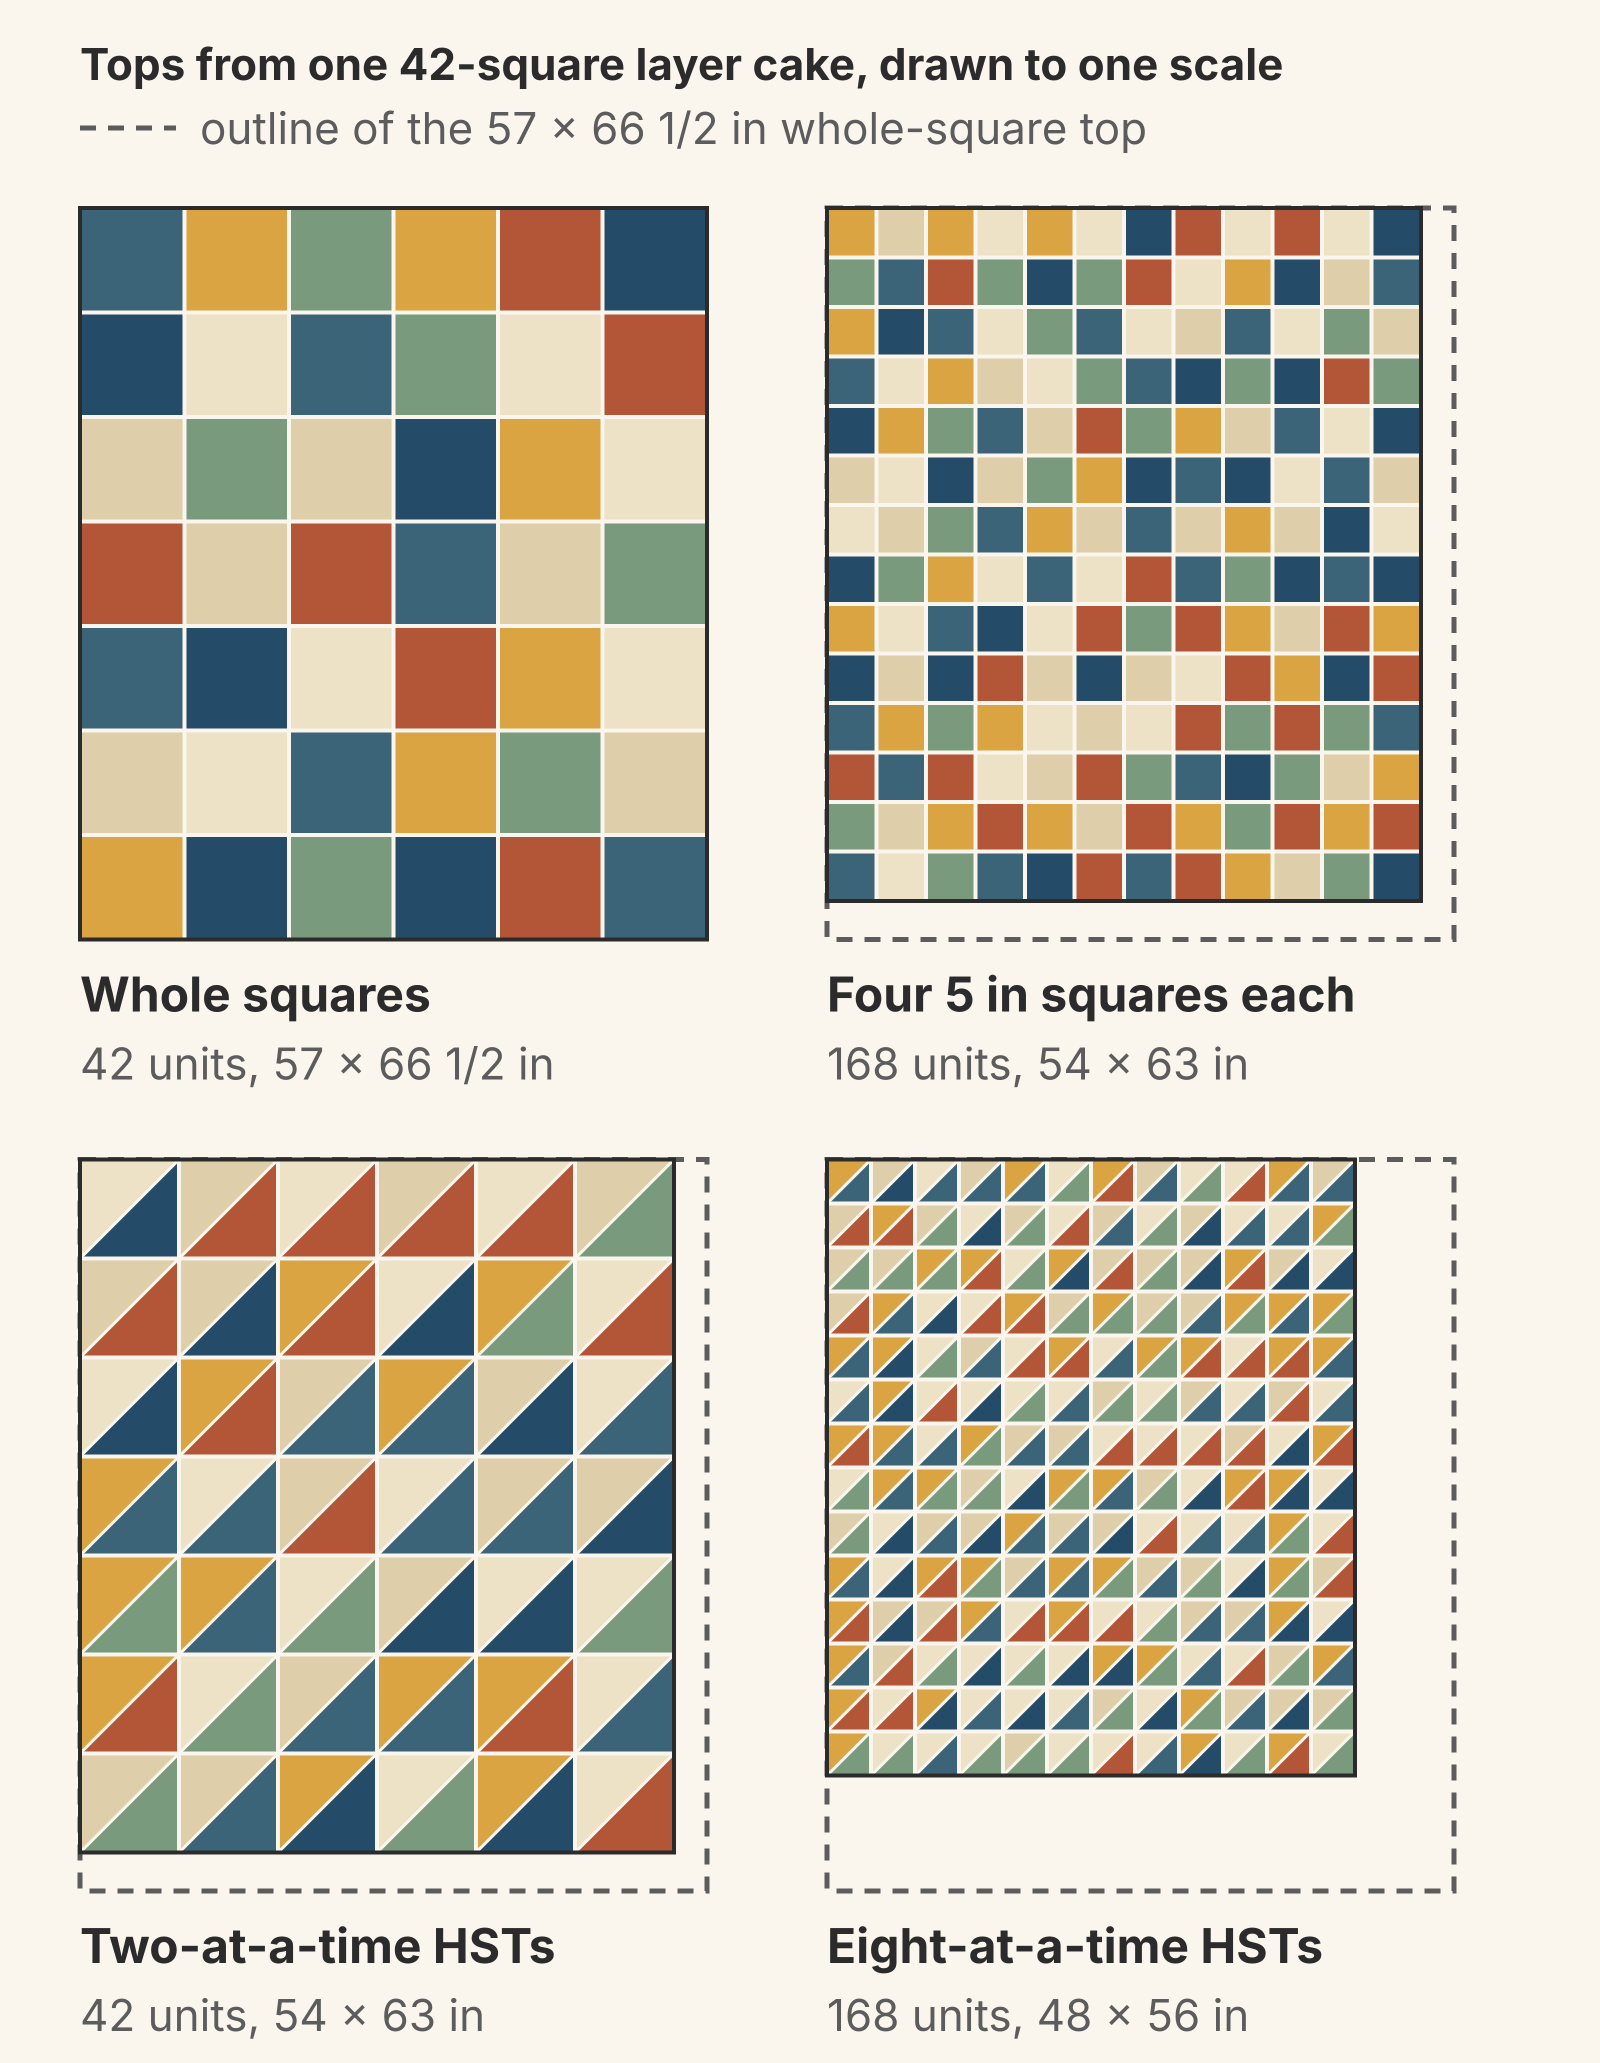
A standard layer cake holds 42 squares of 10 x 10 inches. Sewn together whole in a 6 x 7 grid, they make a 57 x 66 1/2-inch throw. Fat Quarter Shop's layer cake page says one pack in a 6 x 7 grid makes a throw. Becky Jorgensen at Patchwork Posse works out the same 57 x 66 1/2-inch size. Cut the squares smaller and you get more pieces but a smaller quilt. Cutting each square into four 5-inch quarters gives you 168 squares and a 54 x 63-inch top. Eight-at-a-time half-square triangles (HSTs) give you 168 units and a 48 x 56-inch top.
For most layer cakes, keep the squares whole or cut them into quarters. Both still make a throw from one pack with no extra fabric. Cut smaller only when the design needs small units, and plan background fabric or a border to win the size back.
Below, we work through five common cuts for one package and show why each one costs the size it does.
The package in this example
Every number in this article assumes:
- 42 squares, each 10 x 10 inches.
- Quarter-inch seams, so each piece loses 1/4 inch on every edge you sew.
- Nothing added: no background, sashing or borders until the section that adds them.
Fat Quarter Shop notes that Moda layer cakes normally have 42 squares, about 2 3/4 yards of fabric. Other makers' 10-inch packs may have more or fewer, so count yours before you plan. If your pack has 40 squares, a 5 x 8 grid replaces the 6 x 7, and every total below changes with it. Measure a couple of squares too; a pack that runs a little small shrinks every finished size.
Why every cut costs half an inch
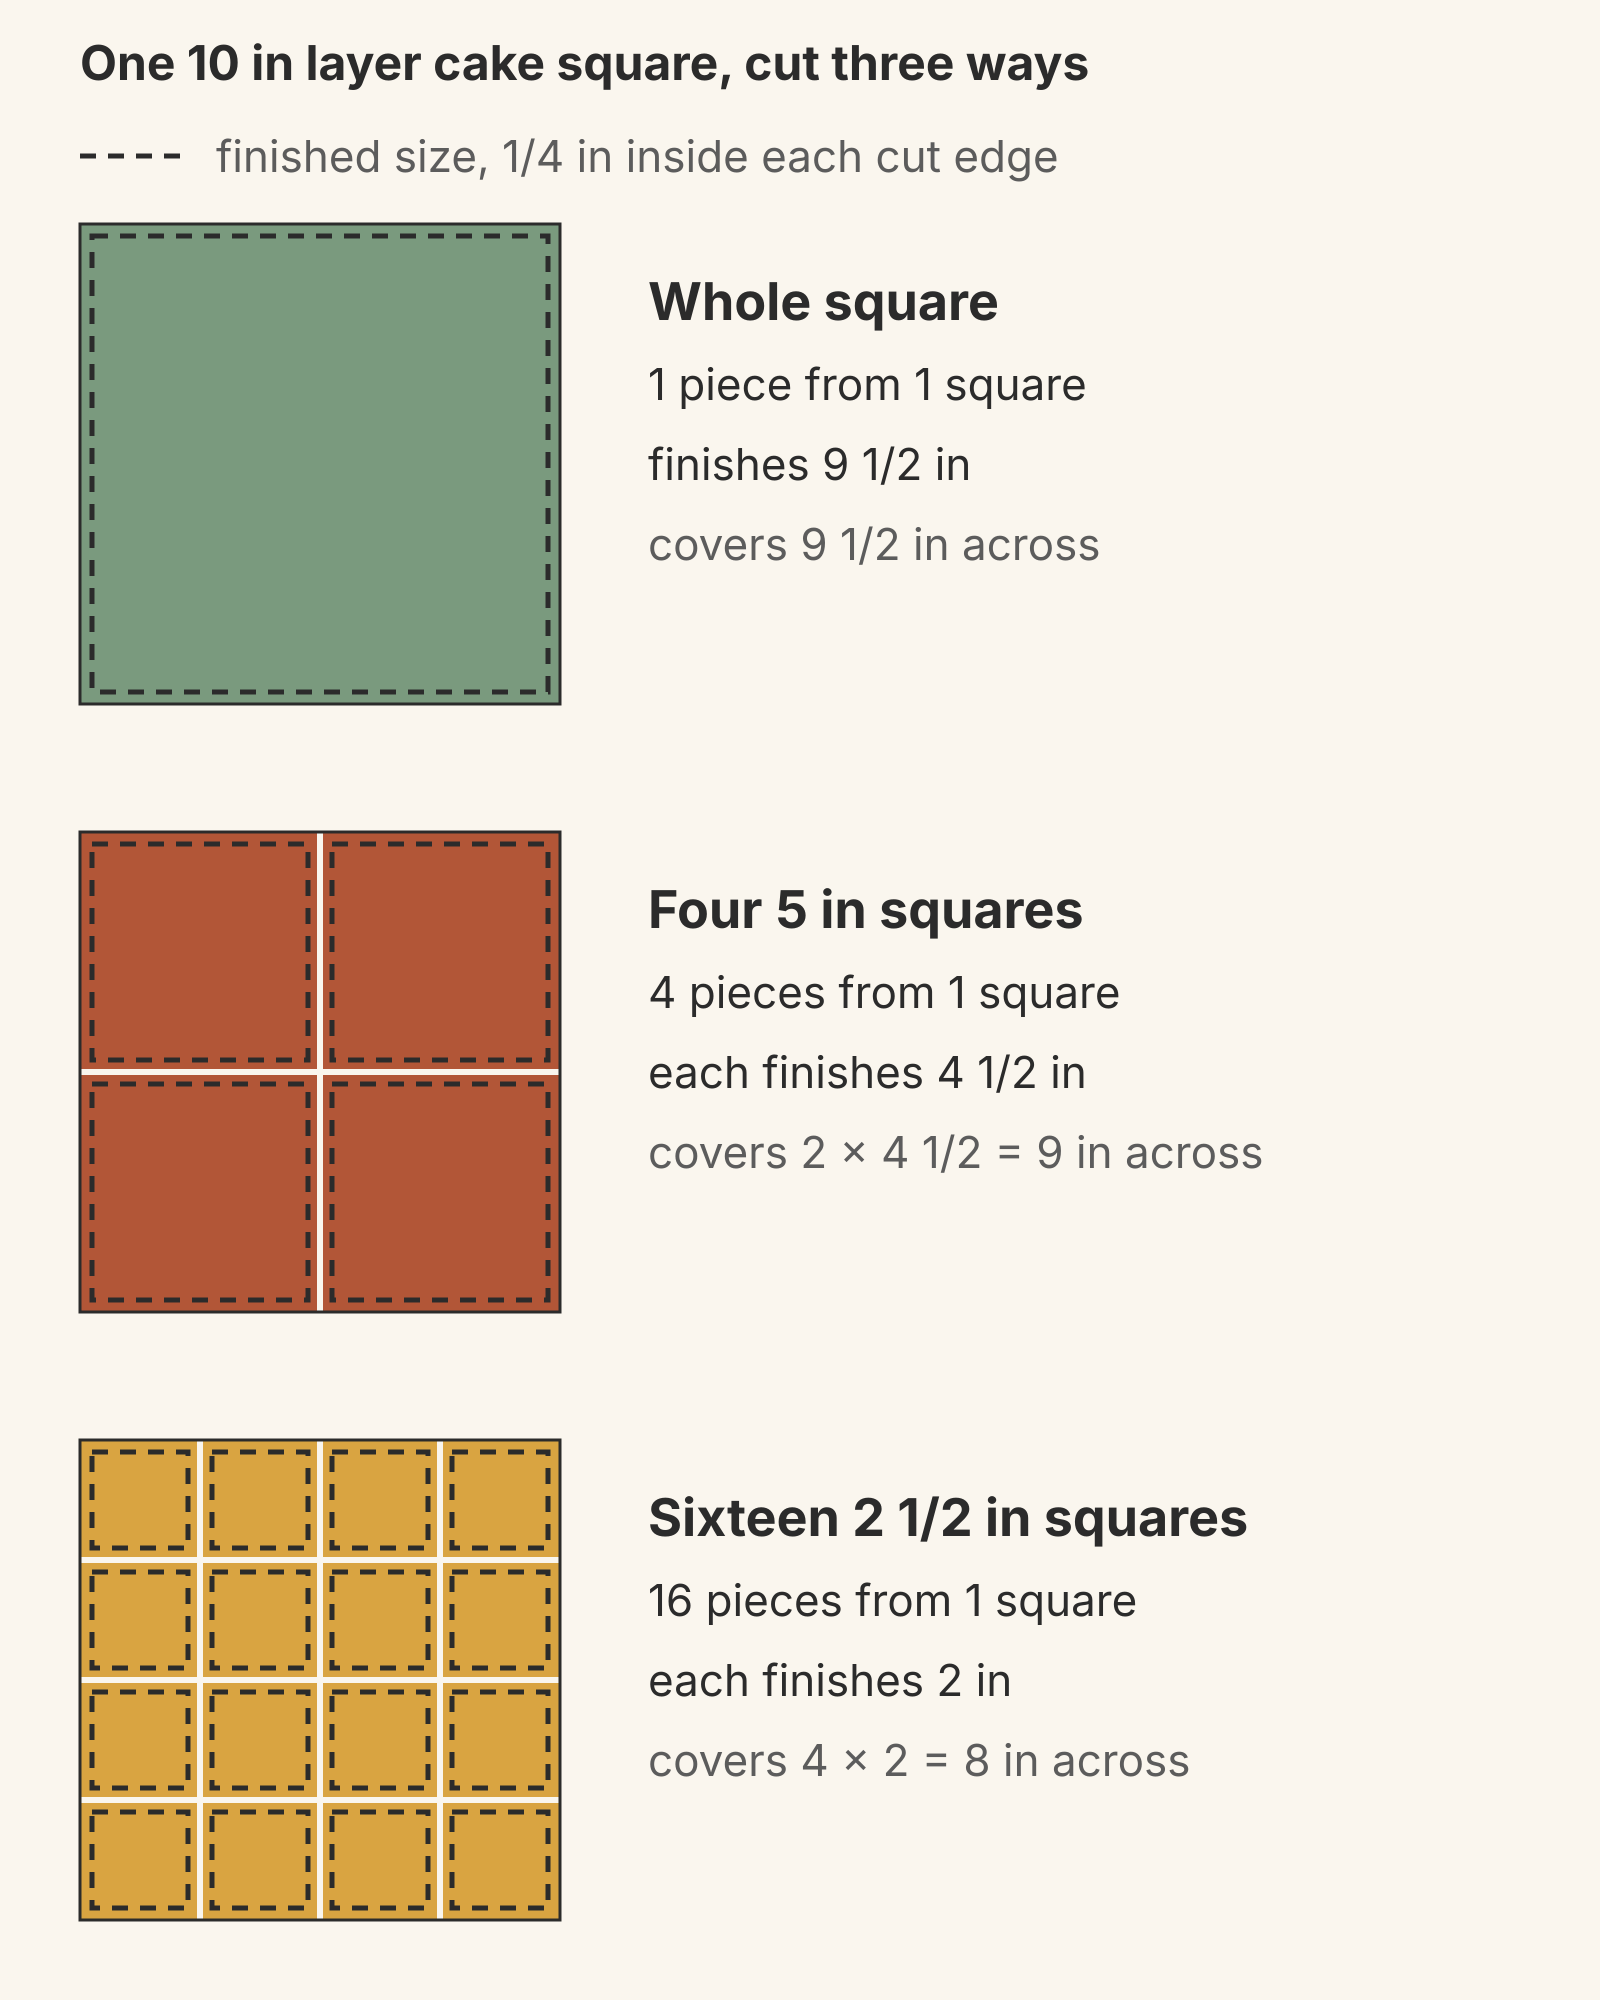
A piece joined on all four sides finishes 1/2 inch smaller than you cut it, because each side gives up 1/4 inch to the seam. That half inch is charged once per piece. The more pieces you cut across a 10-inch square, the more times you pay it.
- One piece across (the whole square): 10 - 1/2 = 9 1/2 inches finished.
- Two pieces across (5-inch quarters): 2 x 4 1/2 = 9 inches.
- Four pieces across (2 1/2-inch squares): 4 x 2 = 8 inches.
So the finished width one square covers is 10 inches minus 1/2 inch for each piece across. The pieces don't have to be the same size. The Square in a Square Layer Cake Quilt handout from Tricia Mathis at Utah State University Extension cuts each square into pieces 2 1/2, 5 and 2 1/2 inches across. Each block gets its center from a different square. That's three pieces across, and the handout says the block measures 9 x 9 inches, so it finishes at 8 1/2 inches. Any whole squares used as alternate blocks get trimmed to 9 x 9 to match.
We drew these diagrams for this article and haven't sewn them.
Option 1: Keep the squares whole
Whole squares give you 42 units that finish at 9 1/2 inches.
- 6 across, 7 down: 57 x 66 1/2 inches.
- 7 across, 6 down: 66 1/2 x 57 inches, the same top turned sideways.
- 5 across, 8 down: 47 1/2 x 76 inches, using 40 squares and leaving 2 spare.
This is the biggest top one pack can make on its own, with the fewest seams and the most of each print on show. It's the right cut for large-scale prints and for a first layer cake quilt. For comparison, our quilt size chart suggests 50 x 65 inches for a throw, so the 6 x 7 grid is a generous one.
Option 2: Cut each square into smaller squares
Four 5-inch squares from each layer cake square give you 168 squares that finish at 4 1/2 inches. Christine Mann's six ways to cut up a layer cake at New Quilters lists this cut first, with the same 4 1/2-inch finished size. Sewn 12 across and 14 down, they make a 54 x 63-inch top. That's 3 inches narrower and 3 1/2 inches shorter than the whole-square top.
You give up very little size, and every print now appears four times. Scatter the four copies and the quilt looks scrappier than 42 big squares can. That's the main reason to quarter a layer cake.
Sixteen 2 1/2-inch squares from each one give you 672 squares that finish at 2 inches. Sewn 24 across and 28 down, they make a 48 x 56-inch top. That's a lot of cutting and sewing for a lap-size quilt. Save this cut for designs that really need small squares, or for mixing with other fabric.
Option 3: Pair squares for half-square triangles
Both HST methods here start with a pair of squares, so 42 squares become 21 pairs. Put a light print with a dark one in each pair. Mark, sew and trim them as you would any other fabric. Our two-at-a-time HST guide and eight-at-a-time HST guide cover the methods; here we only count what they yield.
Each guide gives two starting-square rules. The familiar 7/8-inch rules would turn a 10-inch pair into HSTs that finish at 9 1/8 or 4 1/8 inches, awkward sizes to plan with. So we use the guides' oversized rules, which leave room to trim to an even size:
- Two at a time: each pair makes 2 HSTs. The oversized rule starts with squares 1 inch bigger than the finished size. So a 10-inch pair trims to 9 1/2 inches and finishes at 9 inches. 21 pairs make 42 HSTs, and a 6 x 7 grid finishes at 54 x 63 inches.
- Eight at a time: each pair makes 8 HSTs. The oversized rule starts with squares twice the finished size plus 2 inches. So a 10-inch pair trims to 4 1/2 inches and finishes at 4 inches. 21 pairs make 168 HSTs, and a 12 x 14 grid finishes at 48 x 56 inches.
Christine Mann's New Quilters list gives the same 9-inch and 4-inch HSTs, though she cuts the triangles apart before sewing them. To trim either size so the points meet, see our guide to trimming half-square triangles.
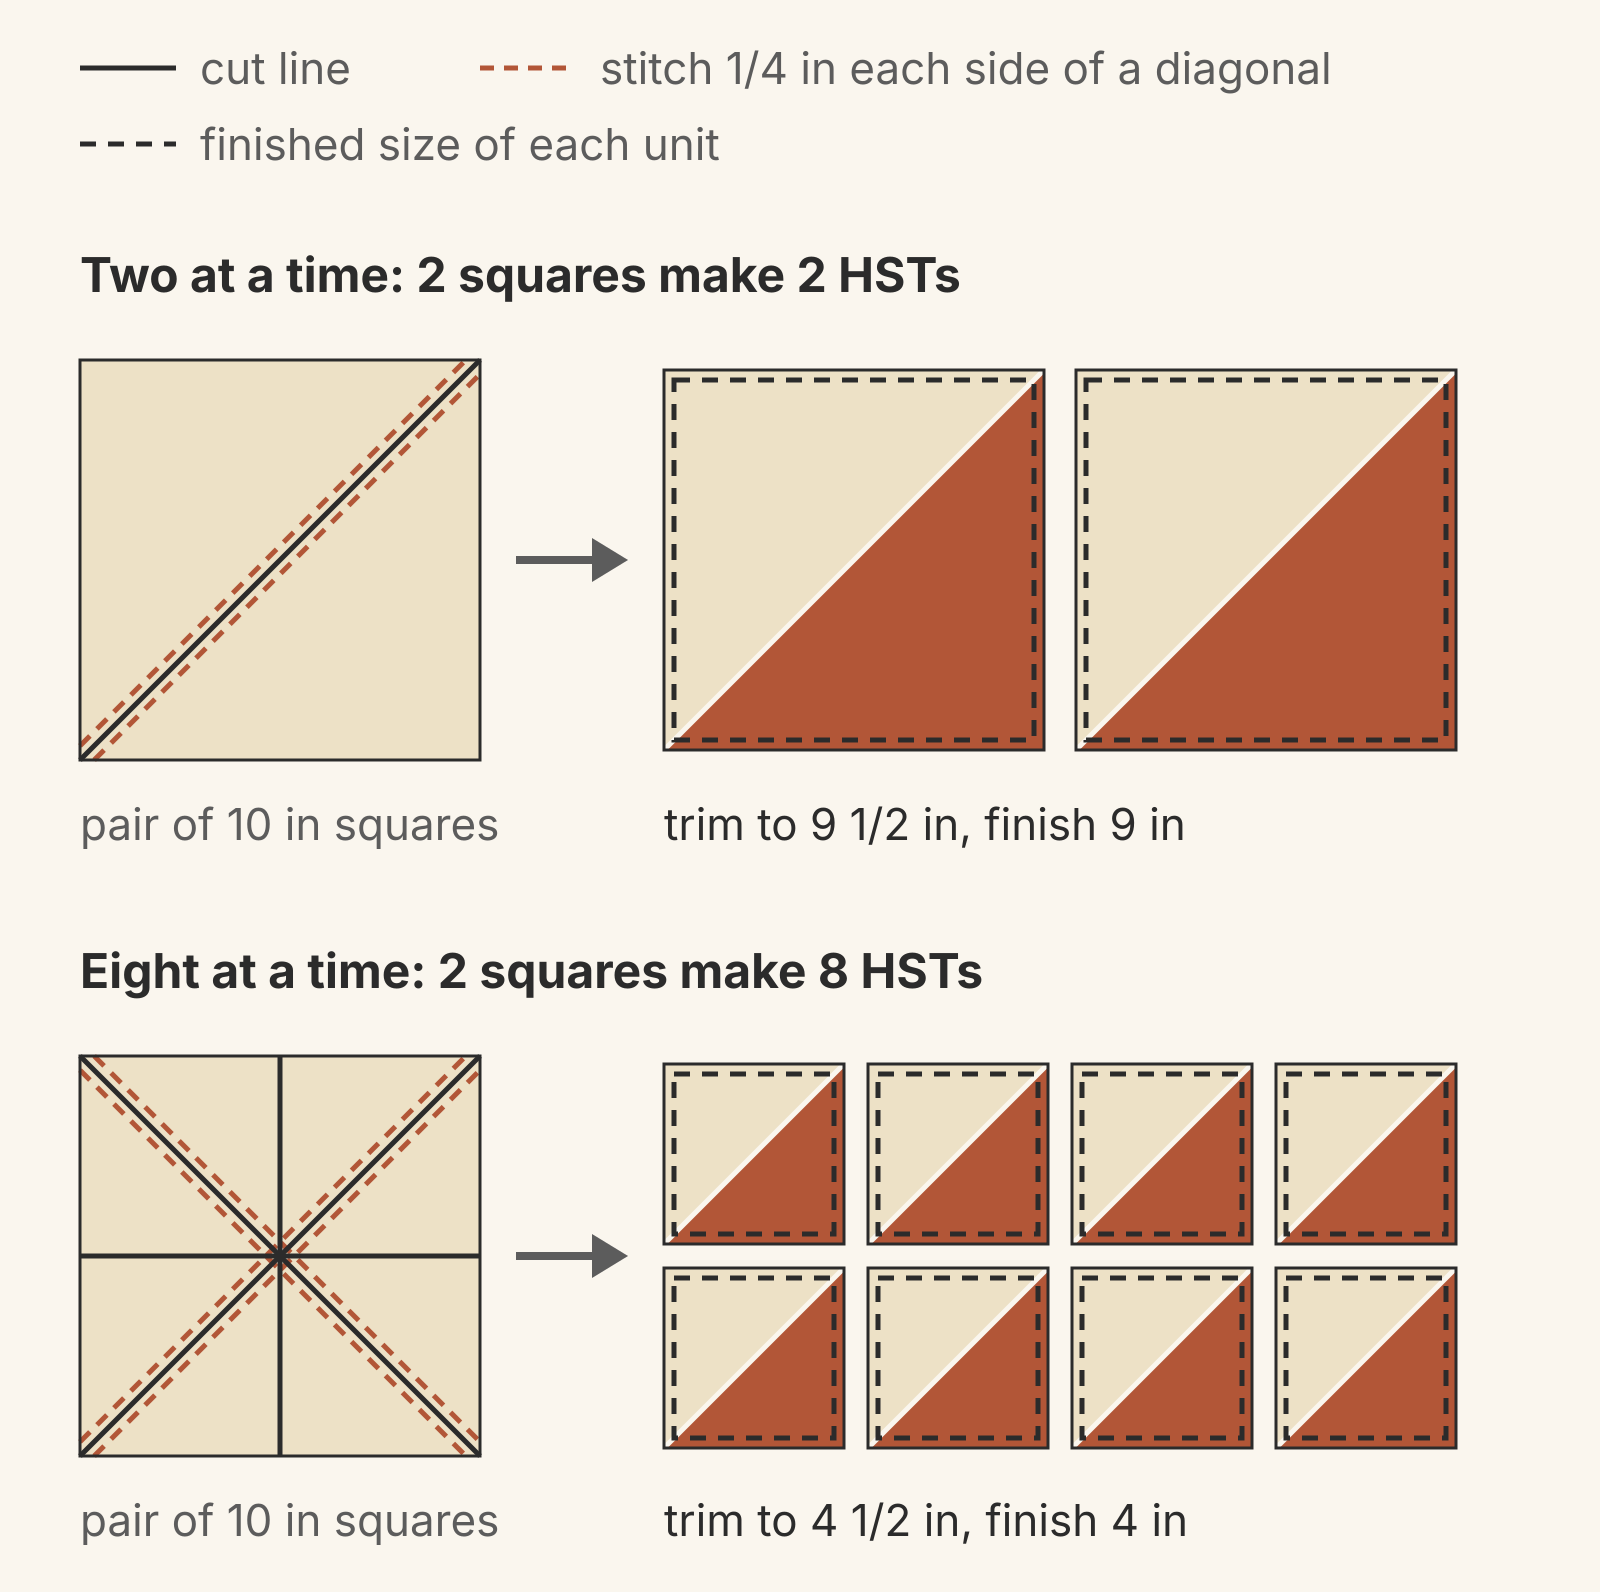
With these oversized rules, the HSTs cost exactly as much size as the matching straight cuts. A 9-inch two-at-a-time HST covers the same width as two 4 1/2-inch quarters. Two 4-inch eight-at-a-time HSTs cover the same 8 inches as four 2-inch squares. That's why their quilt tops come out the same size.
Repetition is the tradeoff. Each pair makes identical units, so you get 21 fabric combinations either way: two copies of each from two-at-a-time, eight copies of each from eight-at-a-time.
Compare the five cuts side by side
| Cut | Units from 42 squares | Finished unit | Top, no borders |
|---|---|---|---|
| Whole squares | 42 | 9 1/2 inches | 57 x 66 1/2 inches (6 x 7) |
| Four 5-inch squares each | 168 | 4 1/2 inches | 54 x 63 inches (12 x 14) |
| Sixteen 2 1/2-inch squares each | 672 | 2 inches | 48 x 56 inches (24 x 28) |
| Two-at-a-time HSTs, 21 pairs | 42 | 9 inches | 54 x 63 inches (6 x 7) |
| Eight-at-a-time HSTs, 21 pairs | 168 | 4 inches | 48 x 56 inches (12 x 14) |
The finished area tells the same story. The whole-square top covers 3,790 1/2 square inches. Quarters and two-at-a-time HSTs cover 3,402, about 90 percent of that. The 2 1/2-inch squares and eight-at-a-time HSTs cover 2,688, about 71 percent. The difference goes into the extra seam allowances and HST trimmings.
Add background fabric to win the size back
Pair each print with a background square instead of another print. That gives you 42 pairs instead of 21, so the HST counts double:
- Two at a time: 84 HSTs finishing at 9 inches. An 8 x 10 grid uses 80 of them for a 72 x 90-inch top, with 4 spare.
- Eight at a time: 336 HSTs finishing at 4 inches. A 16 x 21 grid uses all of them for a 64 x 84-inch top.
You need 42 background squares, each 10 inches. Four fit across fabric with at least 40 inches of usable width. That's 11 strips cut 10 inches deep, or 110 inches. Buy 3 1/4 yards (117 inches) so you have room to straighten the edge. Each HST then pairs one print with the background, so every print shows as a triangle against the same fabric.
A border works with any of the cuts. A 4-inch border around the 48 x 56-inch top brings it to 56 x 64 inches, close to the whole-square throw. Our quilt border ideas cover widths and corners.
Which cut should you choose?
- Big prints, or your first layer cake quilt: keep the squares whole for a 57 x 66 1/2-inch throw.
- A scrappier look at nearly the same size: cut quarters for a 54 x 63-inch top.
- Triangles without losing the throw: use two-at-a-time HSTs for 54 x 63 inches. Our HST layouts article shows how turning the same units changes the quilt.
- Lots of small HSTs: use eight at a time, and add background squares or a border if you want more than 48 x 56 inches.
Plan the grid before the first cut
Count your squares, measure one, and pick the finished unit size. Then multiply the columns and the rows by that size before you cut anything. Write both the cut size and the finished size on your plan. Then a 4 1/2-inch trimmed HST won't get mistaken for a 4 1/2-inch finished one. Our guide to finished vs unfinished triangle sizes shows how to translate one into the other.
In QuiltLab's Quilt Editor, start a Grid quilt and set the columns, rows and finished block size. For the eight-at-a-time top that's 12 columns, 14 rows and 4-inch blocks, and Layout shows the 48 x 56-inch finished size. Add a border under Borders and its width adds to the total. QuiltLab doesn't work out cutting sizes or yardage, so keep the 10-inch starting squares and trim sizes in your own notes. To see your actual prints in the plan, photograph them, save them as swatches in the Swatch Editor, and try them in blocks before you make the first cut.
Quilt Editor: Arrange Blocks and Fabric →Set grid columns, rows and block size, and add bordersRelated posts

How to Design a Bargello Quilt: Plan the Wave on Paper
A bargello wave is a staircase of stepped columns. Number your strips, write one row per column, and see how column width turns a zigzag into a curve.

Borderless Quilt Design: Plan an Edge That Looks Finished
With no border, the outer blocks and the binding make the edge. Compare whole and halved motifs on one 48 x 60 inch quilt, then pick the binding color.

Crosshatch Quilting: How to Make the Lines Meet at the Edges
Space a 45-degree crosshatch so the lines meet in a V at every edge and corner. Choose the edge step first, mark dots around the quilt, then connect them.