Where to Place Applique on Pieced Quilt Blocks
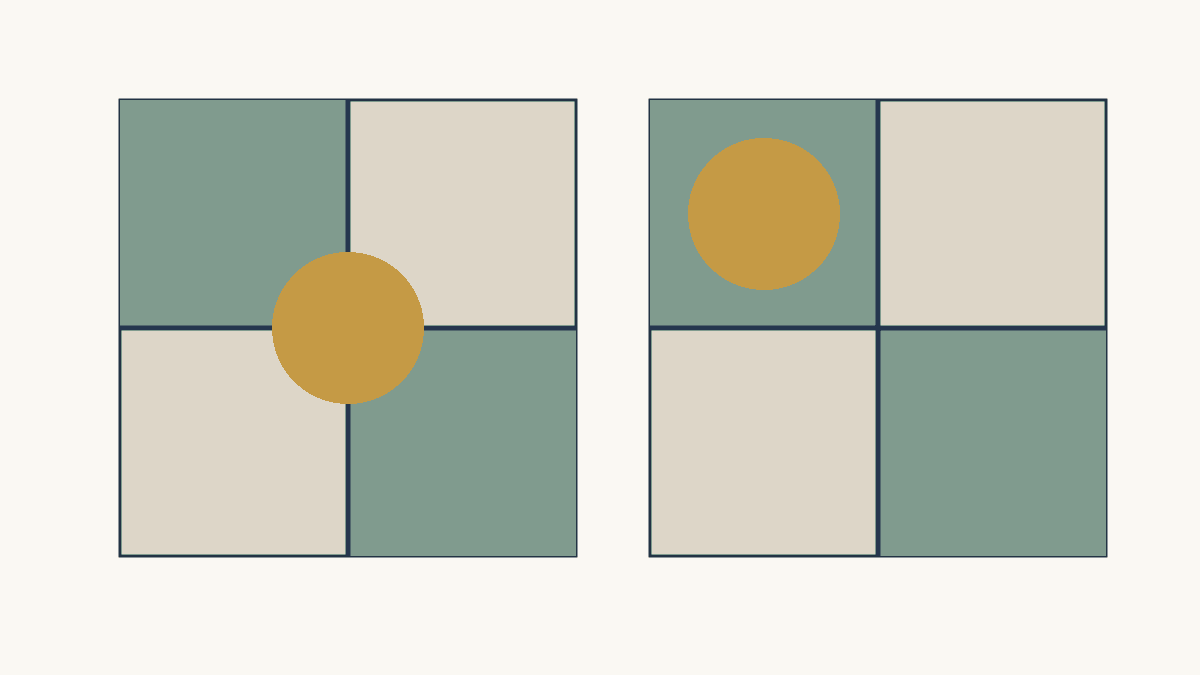
You can add applique to pieced quilt blocks. If you want the piecing to stay clear, start by placing the motif inside an open patch. Then compare it over an intersection and along one seam at the same size. Move it to the center when you want the motif to interrupt or unite those background lines.
Then check the actual seam allowances and applique method on a representative sample. A visually quiet position and a physically comfortable place to stitch are related decisions, but the drawing settles only the first.
Decide what the piecing contributes
A pieced background can be a frame, a grid or a feature in its own right. Before covering it, name the lines that matter.
In a Four Patch, the crossing seams divide the block into four clear areas. A large motif over the center can soften that division. Moving the motif into one patch keeps the crossing visible and makes the applique feel more separate from the background.
Our raw-edge versus turned-edge applique guide compares edge approaches. Choose the visible outline you want here, then use the selected method's actual finished shape and preparation requirements when making the pieces.
Keep a photograph or drawing of the bare block beside every audition. That makes it easier to notice which useful seam disappears when a motif moves.
Compare three positions at one size
Our study is a finished 12-inch Four Patch. Its seams run vertically and horizontally through the center, at 6 inches from the left and top edges.
Place the same 4-inch-diameter circle in three positions:
| Circle center | Vertical seam hidden | Horizontal seam hidden |
|---|---|---|
| (6,6) | 4 in | 4 in |
| (6,3) | 4 in | None |
| (3,3) | None | None |
Coordinates are measured from the upper-left corner of the finished block. At (6,6), the circle covers the seam crossing. At (6,3), its lower edge stops at 5 inches, before the horizontal seam at 6. At (3,3), its entire shape stays between 1 and 5 inches on both axes.
That open-patch position leaves a 1-inch gap between the circle and each internal seam. It also leaves 1 inch to the two nearby finished outside edges. Those clearances describe this drawing; choose yours by looking at the actual motif, fabric and neighboring blocks.
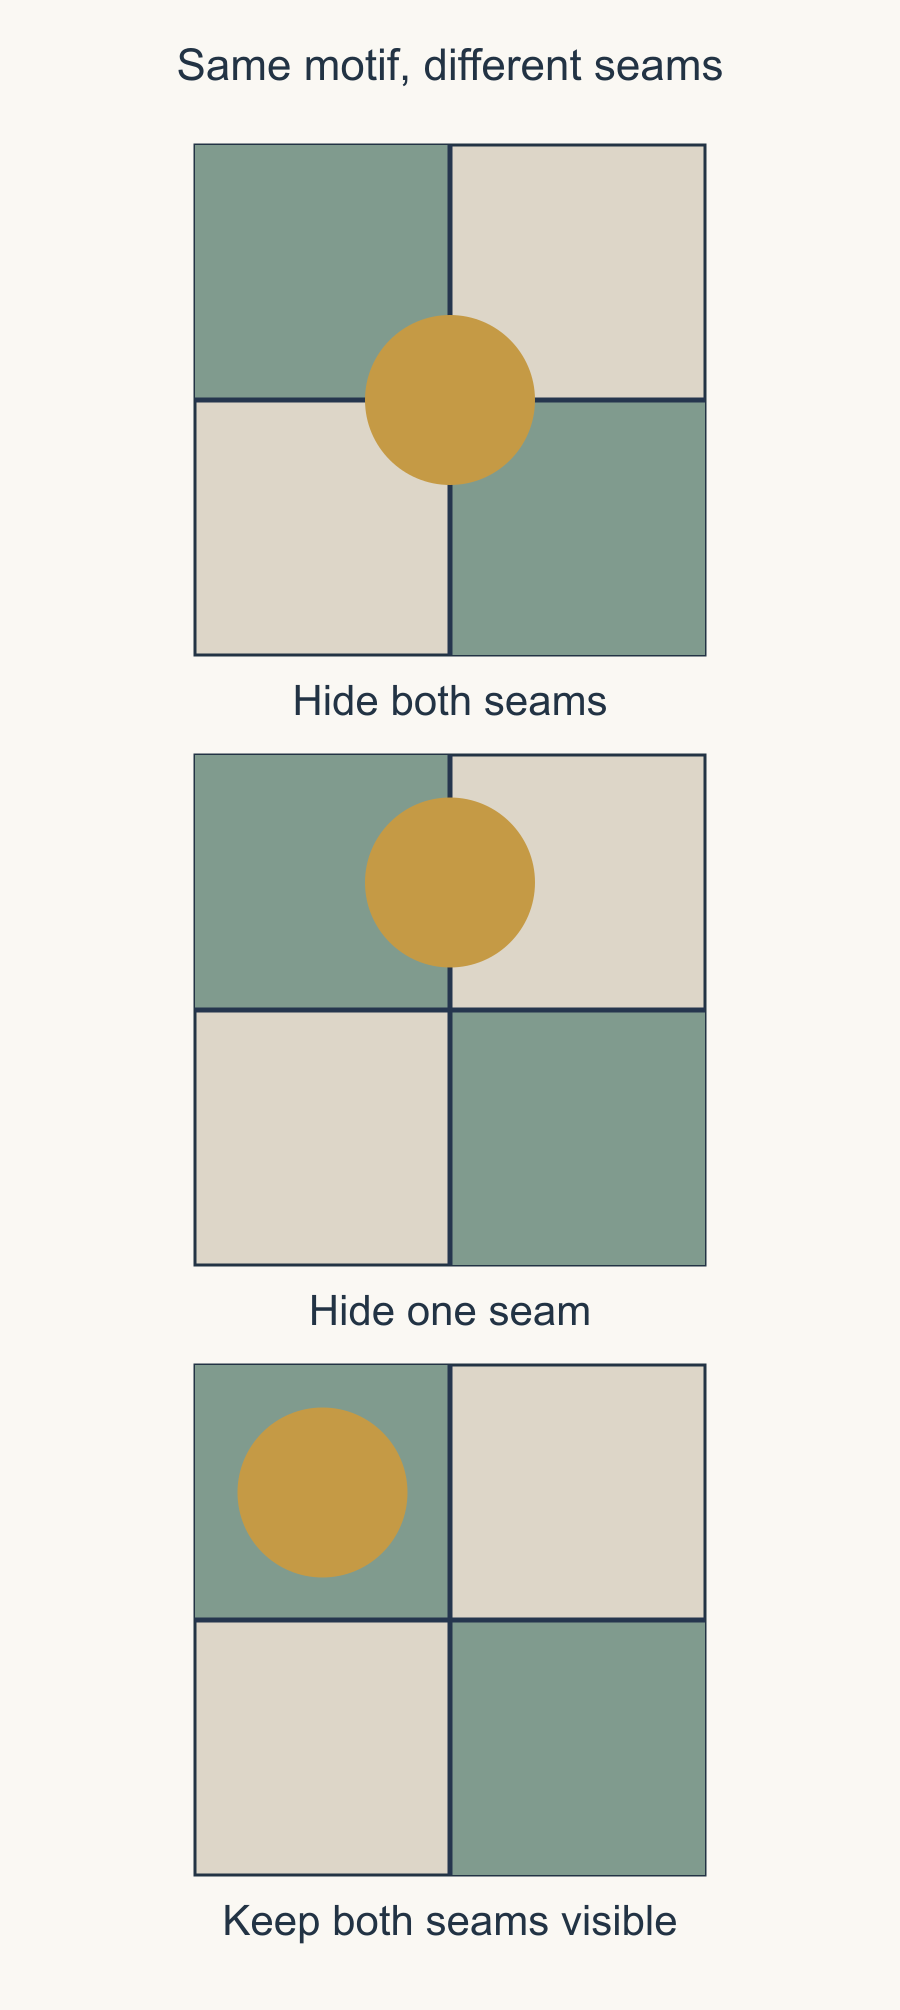
The circle's size and area never change. The difference comes from its relationship to the background lines.
Use the covered seam as a design choice
Choose the centered position when the motif should bring the four patches together or interrupt a strong crossing. The circle becomes the obvious meeting point.
Choose the one-seam position when you want the motif to connect two patches but leave the other seam readable. That can make the background feel less divided without covering its whole structure.
Choose the open-patch position when the piecing should stay clear and the applique should sit within one area. Check its distance from the block's outside seams too, particularly if the block will join other blocks later.
Try the positions with actual fabric colors. A seam between similar fabrics may be visually quiet even when exposed; a high-contrast seam may remain a strong line until it reaches the applique edge.
Register the motif to the finished block
Mark the intended center and orientation on your working plan. Use reference points you can recognize on the actual block without depending on an uneven raw edge.
Keep raw-edge measurements separate from the finished frame. For example, a 12.5-inch unfinished block with a future 1/4-inch seam at each outside edge becomes 12 inches finished. A motif center 3 inches from the finished left and top edges is therefore 3.25 inches from the corresponding raw edges. Mark the frame first so later joining doesn't change the margin you meant to keep.
Lisa Sliva's Tales of Cloth applique tutorial uses quarter creases to align completed EPP blocks on their backgrounds. Her project has its own construction, but the useful principle is a shared reference between motif and background.
For a pieced block, compare the seam crossing with the measured finished center. If they disagree, decide whether the motif follows the visual piecing or the measured block frame. Hiding the disagreement without noticing it can create problems when several blocks repeat.
Use your chosen method's compatible placement and marking approach. Do not assume a mark, glue or heat treatment suits every fabric simply because it appears in another teacher's project.
Photograph before securing
Keep the motif loose while comparing positions. Photograph each version from directly above with the block's top identified.
Jessie Zeigler's applique-placement lesson shows auditioning placements, photographing alternatives and using registration lines before securing the pieces. A recorded comparison is especially helpful when a small move changes which seam a motif covers.
Look at the photographs together at the same size. Ask which seams are still visible and whether the motif seems connected to the background. Also check the spaces between its edge and nearby seam intersections.
Choose a version for a reason you can write in one sentence: "Bridge the upper two patches and keep the horizontal division clear." That is more useful than remembering that one photograph looked better.
Inspect the back before stitching
Turn the block over and look at the pressed allowances under the chosen position. Note where the applique stitching line will cross a seam and where several allowances meet.
Trace the proposed edge on the front as well. In the centered drawing, the circle's edge meets the seams at (6,4), (8,6), (6,8) and (4,6). Its interior hides the central crossing, while its perimeter crosses the seams farther out. Your attachment stitch follows the chosen edge method, so inspect that route and the layers beneath it before deciding which position is easier to sew.
A drawing of the front cannot tell you the thickness of those layers in your actual cloth. Make a small sample with the same piecing, pressing and applique method if those crossings are unfamiliar. Evaluate the stitching and handling before preparing all the blocks.
Kathy K. Wylie's placement lesson aligns the pattern and background by their centers and uses key matching points. She also cautions that an overlay alone does not prevent pieces from moving while you sew. Keep checking the selected placement as it becomes attached.
Plan the neighboring blocks too
A motif close to the edge may seem centered in one patch but crowded when another block is joined beside it. Lay out at least the adjoining blocks or their finished-size paper outlines.
Check whether the applique repeats across a row. If every circle covers a different amount of seam, decide whether that variation is intentional. A shared reference sheet helps keep repeated blocks consistent.
Record the finished block frame, the motif's center and the visible seams you mean to preserve. Then audition the actual motif at those references. Your next move is to choose which background line should remain visible, before fixing the applique permanently in place.
Plan your next quilt
Lay out blocks and try colors in QuiltLab's grid editor before you cut.
Free forever, no card needed.
Get quilting tips by email
QuiltLab updates, tips and quilting inspiration. Unsubscribe anytime.
Related posts
Rounded Quilt Corners: Will Your Motif Survive?
Compare two corner radii against nearby motifs before trimming, then plan a consistent curve and suitable binding method.

Lightweight Quilt Batting: Check Care First
Write the coverlet’s care requirements, check the exact batting limits, and test the finished combination before calling it lightweight.
Quilting Negative Space: Extend, Fill or Echo
Compare three quilting approaches on one fixed quilt layout, then count the lines and check the open areas.