How to Keep an Applique Placement Guide Aligned
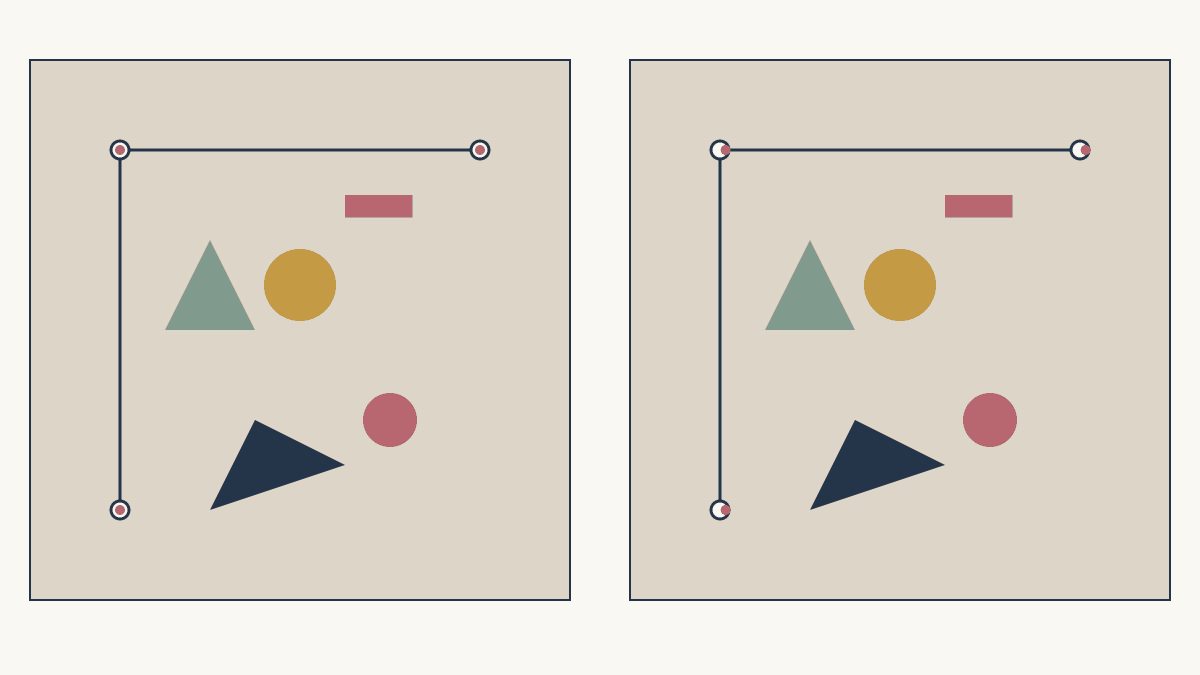
To keep an applique placement guide aligned, trace the finished front view onto a clear overlay and match several widely separated reference marks on the background. Pin one side so you can lift the guide, place a shape and lower it again. Recheck the marks whenever the guide moves.
An overlay is especially useful when you cannot see a paper pattern through a dark background. It shows where the shapes belong; your chosen basting or attachment method keeps them there after you lift it away.
Make a guide that lifts like a page
Start with the pattern's front-view placement sheet and a clear overlay large enough to cover it. Lay both flat, then trace the design and the reference lines you will use to position it. Keep the guide in the direction you want to see on the finished quilt.
Julee's overlay lesson at Glorious Applique describes tracing onto clear plastic, labeling the viewing side and pinning two corners before lifting the sheet to place pieces. She recommends the method when the background is hard to see through or a light box is unavailable.
Pin two adjacent corners so the opposite edge can lift like a page. Make sure the guide can lie flat again without pulling the background. A crease or trapped fold makes an otherwise correct tracing hard to register.
Write FRONT VIEW and TOP outside the motif area, where the labels stay visible. Keep this guide separate from any reversed preparation sheet. Our applique mirroring article explains when a transfer needs that reversal.
Remove ordinary plastic before using an iron. Only use an overlay during a heat process if that exact product's directions permit it.
Give the guide three clear references
Choose marks you can identify on both the guide and the background. A center plus separated horizontal and vertical references helps you see a turn that one center mark would miss.
For the drawn example, measure from the background plan's upper-left corner. Put A at (2,2), B at (10,2) and C at (2,10), in inches. A to B spans 8 inches horizontally; A to C spans 8 inches vertically.
The three points form a right angle. A is the upper-left reference, B the upper-right and C the lower-left. Match all three before positioning the first shape.
Kathy K. Wylie's placement lesson aligns a pattern and background by their centers and uses key matching points. Shared design references give you something more dependable than an irregular raw edge.
If your background was cut generously for later trimming, keep the design's center and finished frame clear. Centering the guide on a frayed or uneven cut edge can put the whole composition in the wrong place.
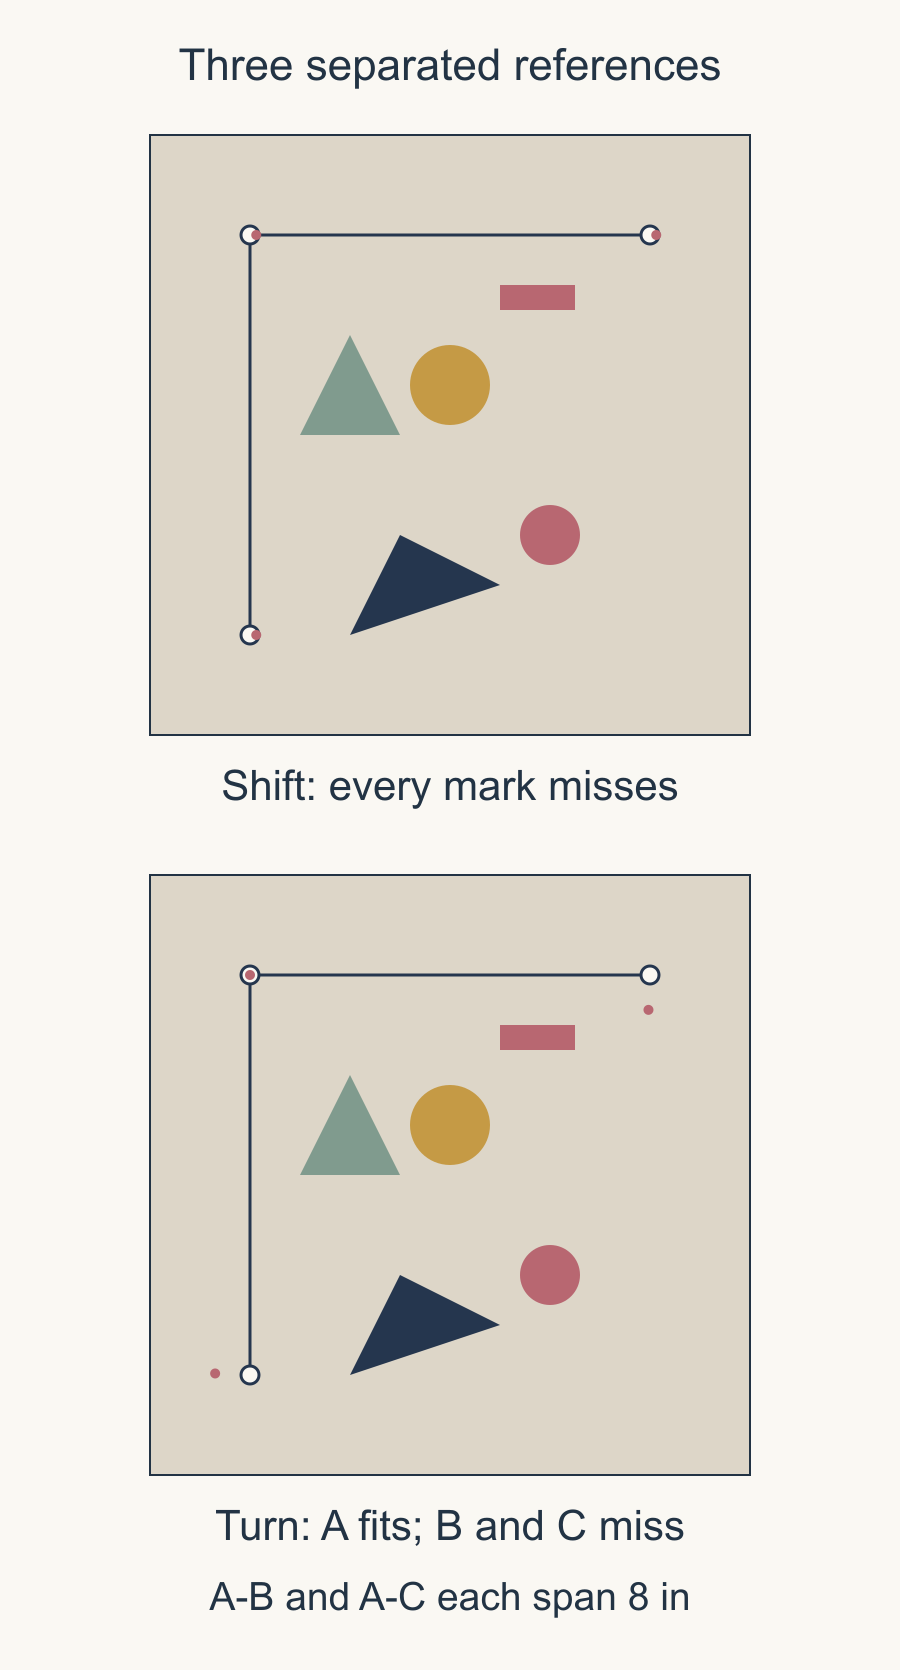
When every mark misses, check for a shift
Suppose the guide lands one-eighth inch to the right. Every reference moves by the same amount:
| Mark | Background position | Shifted guide |
|---|---|---|
| A | (2,2) | (2.125,2) |
| B | (10,2) | (10.125,2) |
| C | (2,10) | (2.125,10) |
Move the guide left and recheck all three points. Its internal distances are still correct; the whole sheet has moved.
Avoid moving the first fabric shape to disguise the error. That gives later pieces a different reference from the one on the placement plan.
When one mark fits, check for a turn
A rotated guide can match A while B and C miss. Nudging the whole sheet back and forth will keep fixing one mark and spoiling another.
Hold A in place, return the guide to its intended direction, then check the line from A to B and the line from A to C. Confirm both 8-inch spans if the guide came from a printout or several taped pages.
If shifting and turning cannot bring all three points together, check the printed scale and page assembly. Moving the fabric pieces will not correct a guide whose dimensions have changed.
Also check FRONT VIEW. An asymmetric design makes reversal easy to catch: the unequal shapes in this example change places when the guide turns over.
Place a few shapes, then lift and look
Decide the overlap order before securing the pieces. Our applique layer-order guide shows how to identify which shape must go underneath another.
Lower the registered overlay and position the first piece using your chosen preparation method. Lift the guide and inspect the actual fabric. A loose tip can move as the plastic rises or as you reach for the next piece.
Jessie Zeigler's applique-placement lesson uses auditioned arrangements, photographs and registration lines before securing the pieces. A photograph of your chosen arrangement gives you a useful reference once the guide is out of the way.
Work through a few shapes at a time. Each time you lower the guide, match its references before using a neighboring shape as your landmark.
Keep checking as the pieces are attached
Kathy Wylie raises a useful question about overlays: how will the pieces stay in place during sewing? Her method marks the design directly on the background. If you prefer a lift-up guide, choose compatible marking and holding methods for your fabrics, following their directions.
Check important meetings as the work progresses. If a stem must touch a flower, inspect that join after attaching the earlier piece. A small drift is easier to correct before other shapes depend on it.
Keep the guide and its reference dimensions with the project. For repeated blocks, use the same named marks each time.
Before placing today's first fabric shape, lower the guide, match all three points, lift it and replace it. Once you can repeat that motion without losing the references, start with the pieces that establish the composition.
Plan your next quilt
Lay out blocks and try colors in QuiltLab's grid editor before you cut.
Free forever, no card needed.
Get quilting tips by email
QuiltLab updates, tips and quilting inspiration. Unsubscribe anytime.
Related posts
Rounded Quilt Corners: Will Your Motif Survive?
Compare two corner radii against nearby motifs before trimming, then plan a consistent curve and suitable binding method.

Lightweight Quilt Batting: Check Care First
Write the coverlet’s care requirements, check the exact batting limits, and test the finished combination before calling it lightweight.
Quilting Negative Space: Extend, Fill or Echo
Compare three quilting approaches on one fixed quilt layout, then count the lines and check the open areas.