


Ohio Star Quilt Block Variations: Will the Star or Center Stand Out?
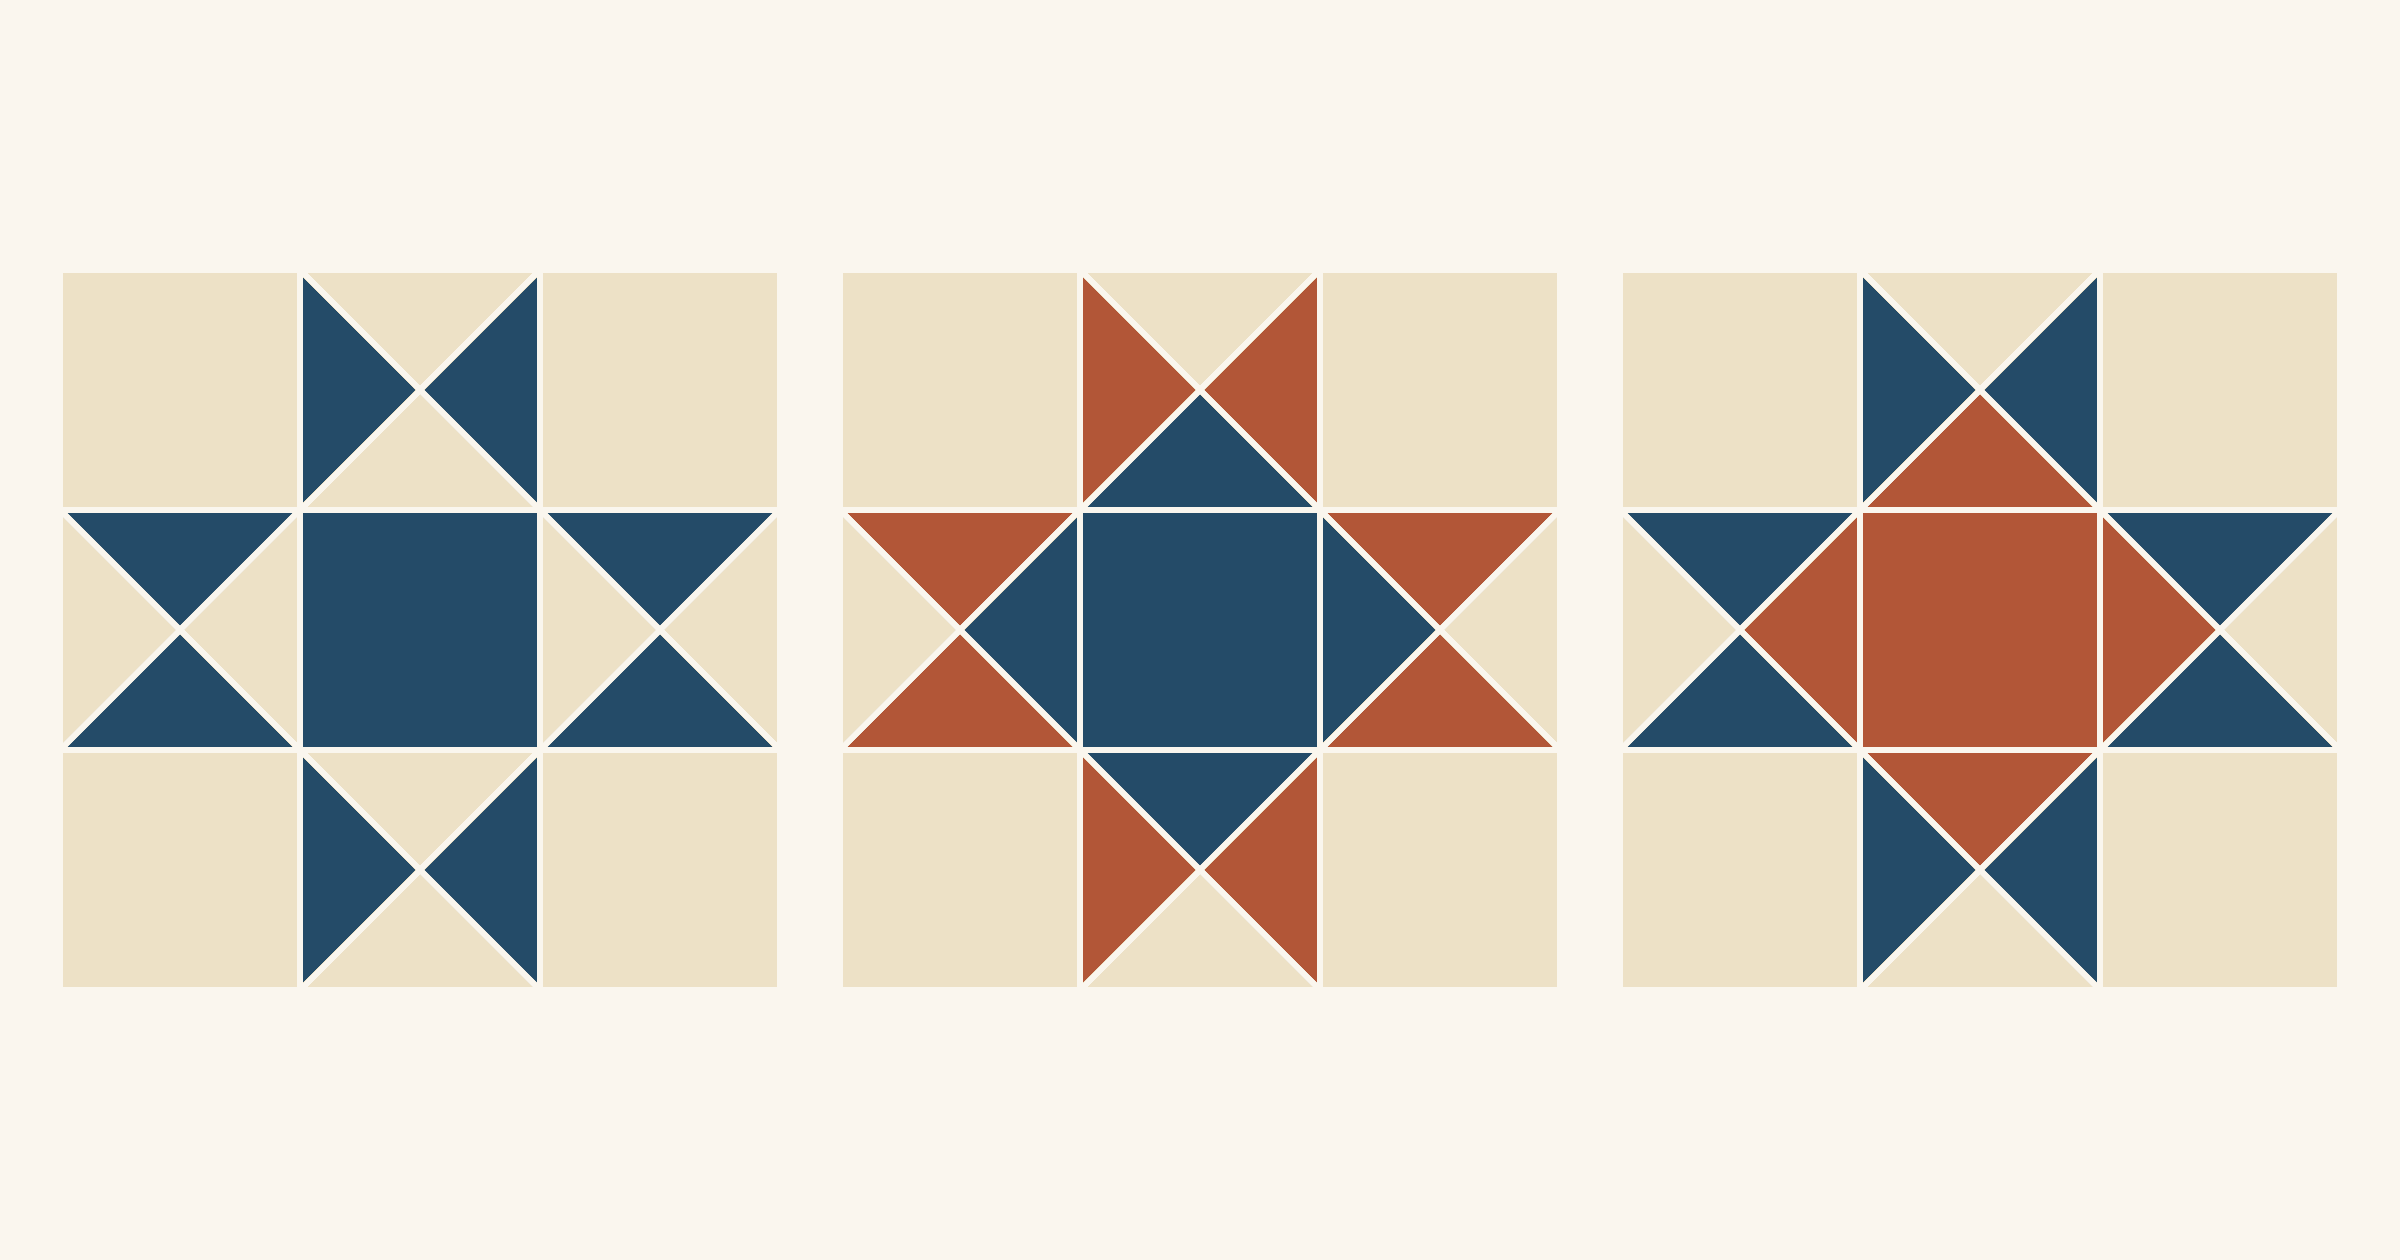
Many Ohio Star variations keep the same nine-patch and change only where the fabrics go. In her Ohio Star tutorial at Create Whimsy, Lynn Woll calls the two-fabric version the traditional block and asks for "strong value differentiation" in your fabrics. Her three- and four-fabric versions add a new fabric to the center, then to the triangles around it; she notes the four-fabric layout also goes by Variable Star. However many fabrics you use, the part with the strongest value contrast against its neighbors is the part you see first.
For a first Ohio Star, use two fabrics: a dark fabric for the eight points and the center, on a light background. To make the center lead instead, put your darkest fabric in the center and the four triangles that touch it, and drop the points to a middle value. Below, one 12-inch star gets four color maps so you can see each change on its own. We drew these diagrams for this article and haven't sewn them.
The four fabric roles in an Ohio Star
Our example is a 12-inch Ohio Star, a nine-patch of 4-inch units: four plain corner squares, one center square and four hourglass units (quarter-square triangles). Each hourglass is split into four triangles, and those triangles do three different jobs. That gives the block four roles:
- B, background: the four corner squares, plus the outer triangle of each hourglass, the one along the block's edge.
- P, points: the two side triangles of each hourglass, eight in all.
- I, inner triangles: the triangle of each hourglass that touches the center square.
- C, center: the square in the middle.
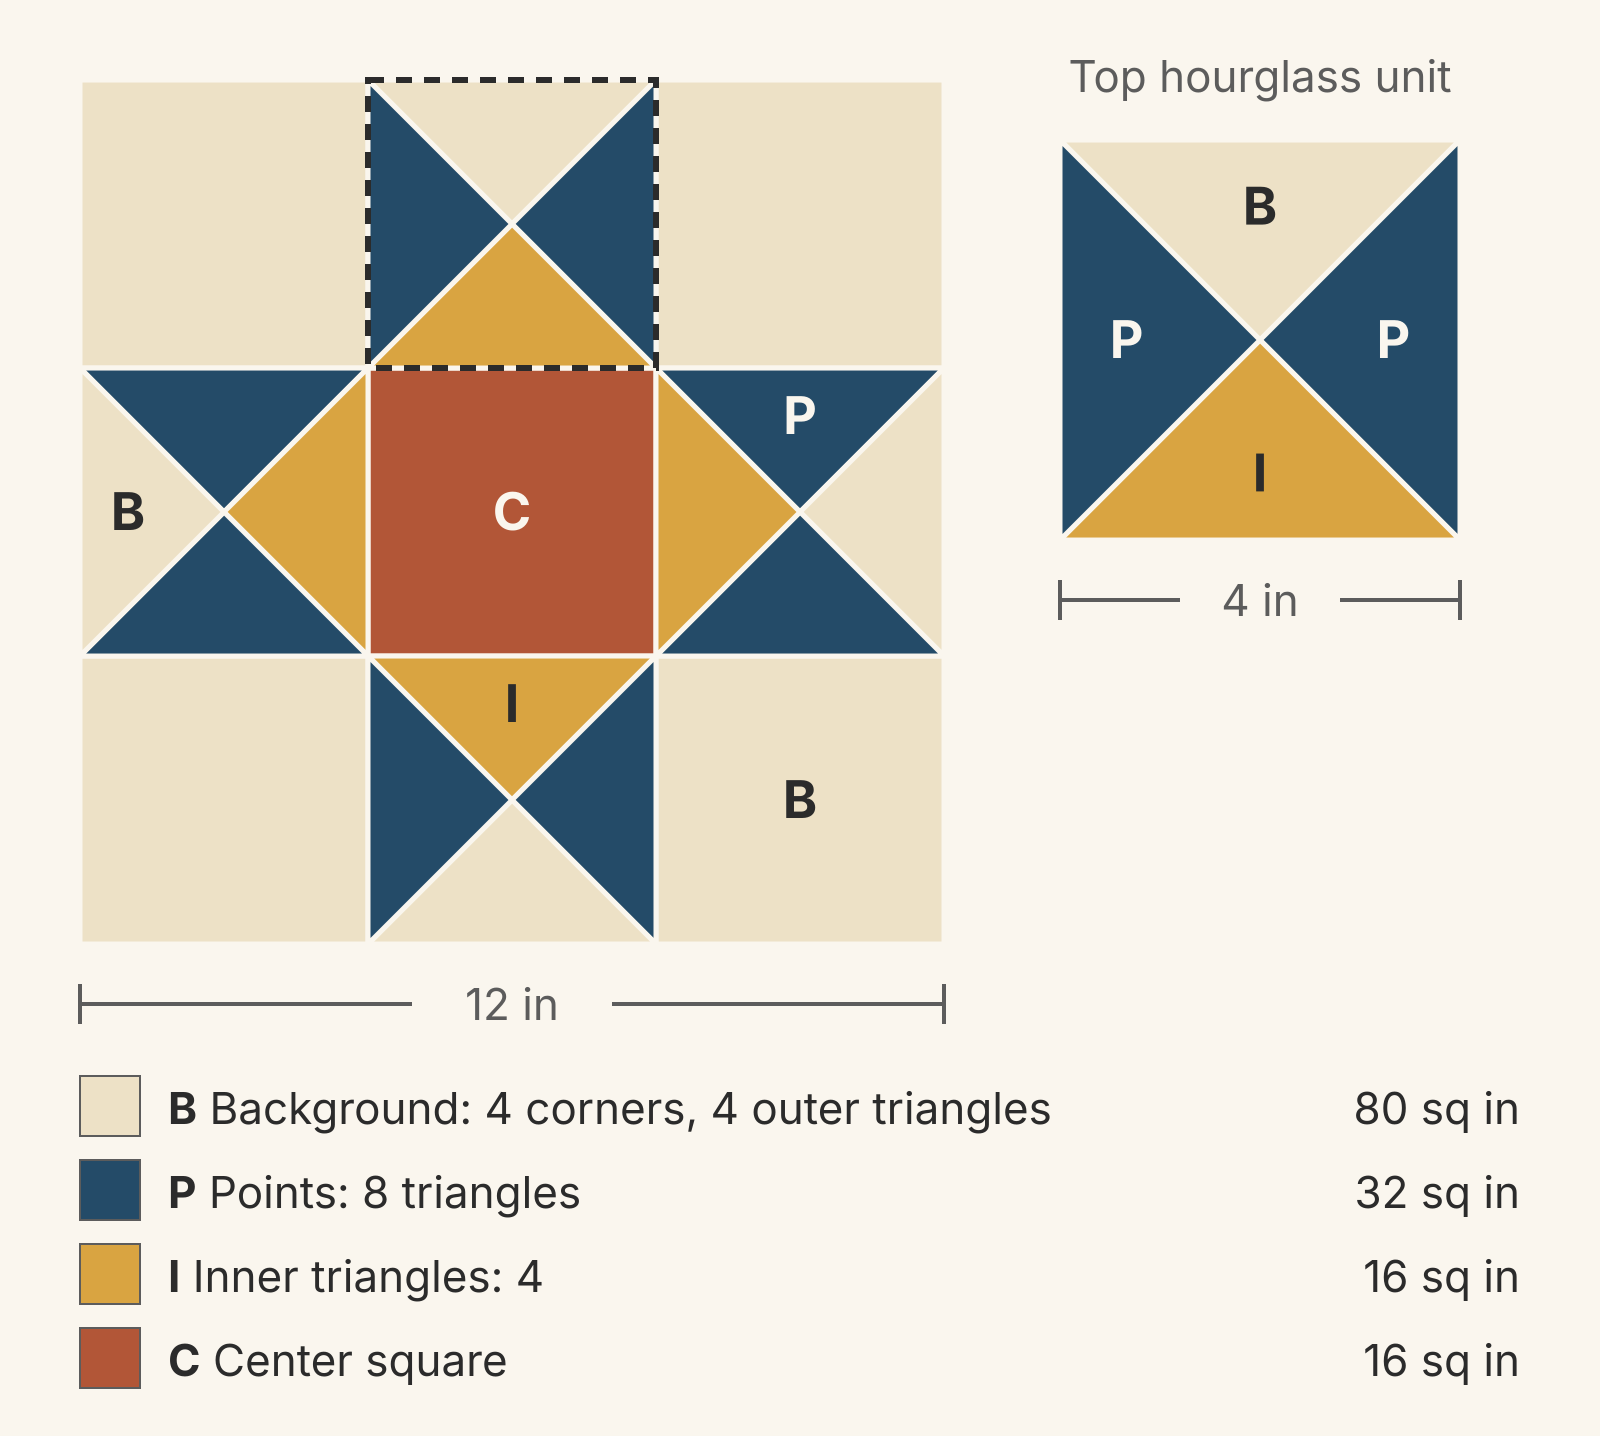
Each 4-inch unit covers 16 square inches, and each hourglass triangle covers a quarter of that, 4 square inches. Here's how much of the finished block each role covers:
| Role | Pieces | Area | Share of block |
|---|---|---|---|
| Background (B) | 4 corner squares, 4 outer triangles | 80 square inches | 56% |
| Points (P) | 8 triangles | 32 square inches | 22% |
| Inner triangles (I) | 4 triangles | 16 square inches | 11% |
| Center (C) | 1 square | 16 square inches | 11% |
The total, 80 + 32 + 16 + 16 = 144, is the full 12-inch square. The background covers more than half the block, so it sets the overall lightness of your quilt even though it's rarely what you notice first.
Separate the points inside each hourglass
Look at one point. It touches the background along two of its three sides: the corner square on its long side and the outer triangle on one short side. Its third side touches the inner triangle. So each point needs two value changes to show:
- Points against background. If they're close in value, the star disappears.
- Points against inner triangles. If they're close, the points run into the center and the block reads as one large star shape.
The simplest hourglass uses two fabrics: points in one, and the outer and inner triangles both in the background. Add a third fabric for the inner triangles and you can change the center without touching the points. Melissa Mortenson's 12-inch Ohio Star at Polka Dot Chair builds that unit from two half-square triangle units: one of points and background, one of points and a fabric she labels "Inside Star Contrast." She turns the units "so light triangles point to the center." Our quarter-square triangle size chart gives the cut squares and trim marks for a 4-inch hourglass.
Four color maps on one 12-inch star
All four maps use the same block and the same palette: navy (dark), rust (medium) and cream (light). The background is cream every time. Only the points, inner triangles and center change.
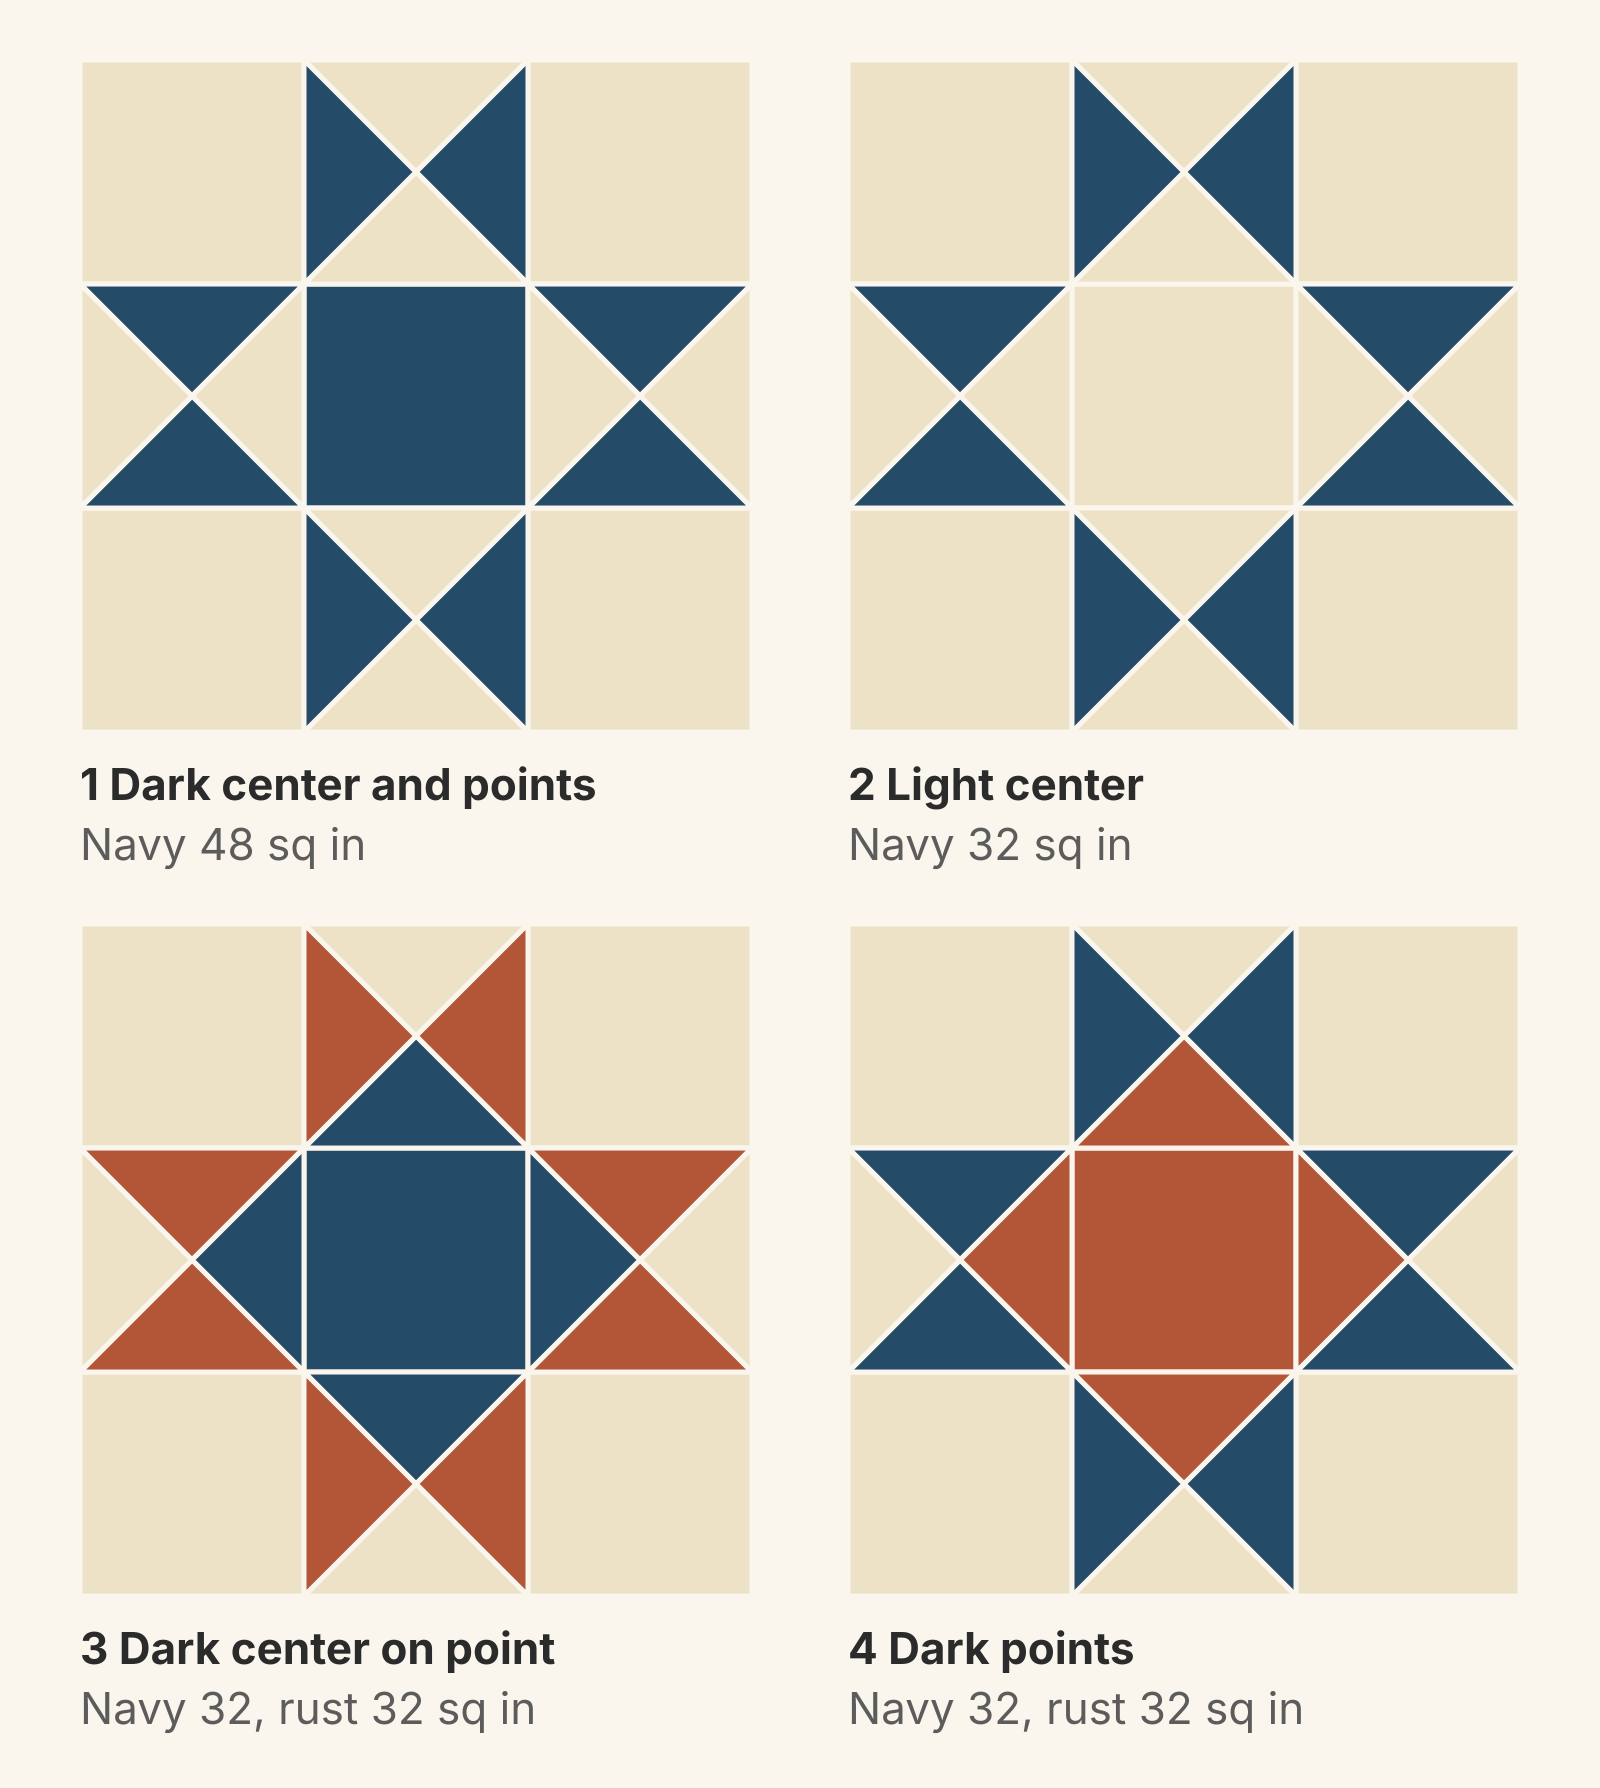
Map 1: dark center and points
Put navy in the points and center, and cream everywhere else. Navy covers 48 square inches, a third of the block. The center touches the points only at its four corners, with cream inner triangles between them, but the shared fabric ties them into one star. Woll shows this version too, with the center matching the points, and lists Eight Point Star among its other names.
Choose this map for a first star or a scrappy quilt. A star that's all one value holds together even when the prints vary.
Map 2: light center
Keep the navy points and make the center cream. Navy drops to 32 square inches, 22% of the block. The center, the inner triangles and the background now share one fabric, so the star reads as a ring of eight points around an open window. Woll's basic two-color block uses this structure, with yellow points on navy.
Choose it when you want a lighter star, or a plain center you'll fill with quilting later.
Map 3: dark center on point
Put navy in the center and the four inner triangles, and rust in the points. Together, the center and inner triangles make a square on point with 8-inch diagonals and 32 square inches of navy. It's the darkest and largest single shape in the block, and it sits in the middle, so it reads first. The rust points become a second ring around it.
Choose this map when the center is the reason you picked the block. If you fussy-cut the center, plan the motif for the 4-inch finished square. Both Mortenson and Marcia Hohn in her Quilter's Cache Ohio Star cut that center at 4 1/2 inches for a 12-inch block. The inner triangles are separate pieces, so a tonal fabric there frames a busy center well.
Map 4: swap the dark and medium
Keep Map 3's fabrics and amounts, but put navy in the points and rust in the center and inner triangles. Now the points have the strongest contrast with the cream, so the star leads, with a warm square on point inside it.
That's the lesson of the last pair. Maps 3 and 4 each use 32 square inches of navy, 32 of rust and 80 of cream. Swapping two values changes which part you notice first.
Check the values in grayscale
Map 4 works because navy is clearly darker than rust. Color alone can fool you here. The AQS blog on color value points out that value is relative: a fabric "may appear light among dark fabrics, yet may be the darkest-value fabric in another fabric group." It suggests a digital camera's black-and-white setting to check.
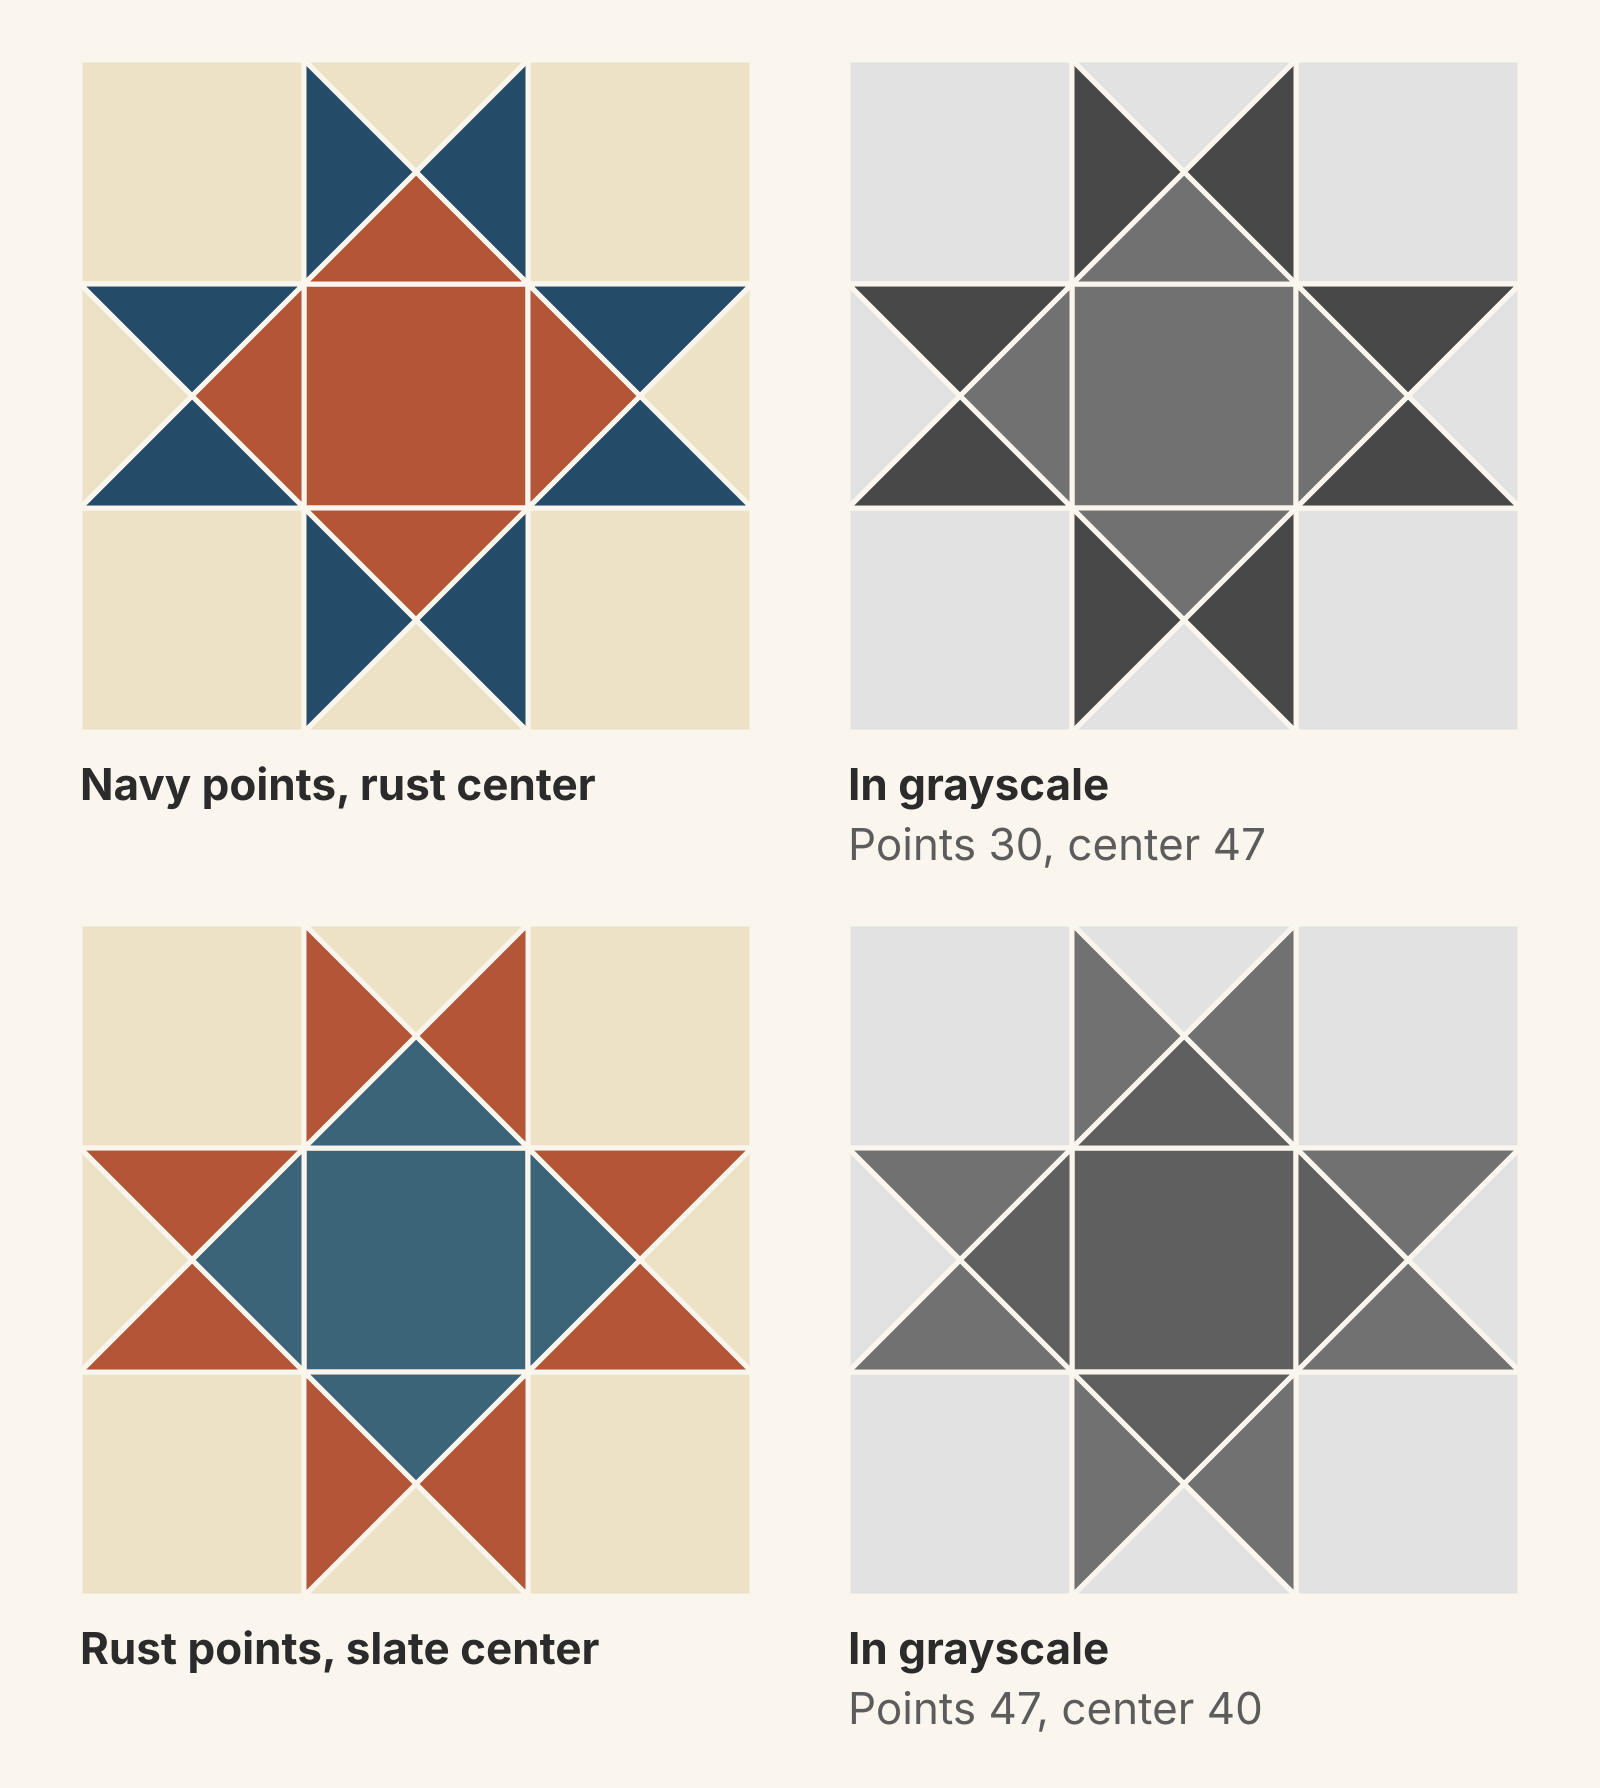
On a 0 to 100 lightness scale, where black is 0 and white is 100, the navy in these diagrams measures 30, rust 47, slate blue 40 and cream 90. In the top row, the points and center sit 17 apart, and both are far from the cream. The grayscale block still shows points, center and background as separate shapes.
The bottom row puts rust in the points and slate blue in the center. Rust and slate look like opposites in color, but they're only about 7 apart in lightness. In grayscale, the points barely separate from the center, and the block reads as one 64-square-inch star on cream. If you wanted a framed center, pick a darker blue or a lighter rust. Our grayscale value check shows how to catch pairs like this before you cut.
Value sets the structure, but saturation pulls too. A bright, warm rust can compete with darker navy points. Our color theory guide covers more ways to see value and how saturation changes what jumps out.
Worked example: a 48 x 60-inch quilt of Map 3 stars
Say you want a throw of 20 stars, 4 across and 5 down, with no sashing. That's 48 x 60 inches, or 2,880 square inches.
Each block holds 32 square inches of navy, 32 of rust and 80 of cream. Times 20 blocks, the quilt top shows 640 square inches of navy, 640 of rust and 1,600 of cream. That's the visible finished area. Your yardage will be larger, because seam allowances and your cutting method add fabric.
When you audition, lay out about two and a half times as much cream as navy. Equal folded stacks make the navy look like far more of the quilt than it will be.
Then look at where the blocks meet:
- Corners join. Where four blocks meet, four 4-inch corners make an 8-inch square of cream.
- Outer triangles join. Along each shared edge, two outer triangles make a small cream square on point with 4-inch diagonals.
- Point tips meet. The tips of neighboring stars touch at each seam.
Together, the points become a lattice: every cream square and diamond between the stars is framed by point triangles. In Map 3 that lattice is rust, and the navy squares sit inside it 12 inches apart, center to center. When the points are your darkest fabric, as in Maps 1, 2 and 4, the lattice can compete with the stars, so sketch four blocks before you commit. If you change the corner fabric, new shapes appear at those joins; our post on how secondary patterns form shows how to trace them.
Try the maps in QuiltLab
You can test all four maps on screen before cutting. Draw the 12-inch star once in the Block Editor: squares for the corners and center, and four triangles for each hourglass. Select the eight points together and change their fabric in one step, then do the same for the center and inner triangles. Save the block, open a Grid quilt in the Quilt Editor and place it in a 2 x 2 layout to see the corners and point tips meet. Our Ohio Star block page shows the block with its cutting chart.
Block Editor guide →Draw pieces, assign fabrics and save blocks for your quilt layoutsOnce you've picked a map, sew one test star and photograph it in color and in grayscale from across the room. If the part you meant to lead is the one you see first, cut the rest. For a star built from flying geese instead of hourglass units, see our Sawtooth Star color placement comparison.
Related posts
Irish Chain Quilt Colors: Which Fabric Goes Where?
Most Irish Chains put darker chain fabrics on a light background. Compare single and double chain value maps and see which fabric shapes the diamonds.
Rail Fence Quilt Color Placement: Which Strip Makes the Zigzag?
Put your lightest and darkest fabrics on the outside strips and a medium in the center. Three 24-inch studies show why the outside strips draw the zigzag.
Courthouse Steps Color Placement: Where Do Lights and Darks Go?
Put light fabric on one pair of opposite sides and dark on the other, or color by rounds for framed squares. Two 10-inch maps show how each one repeats.