


Rail Fence Quilt Color Placement: Which Strip Makes the Zigzag?
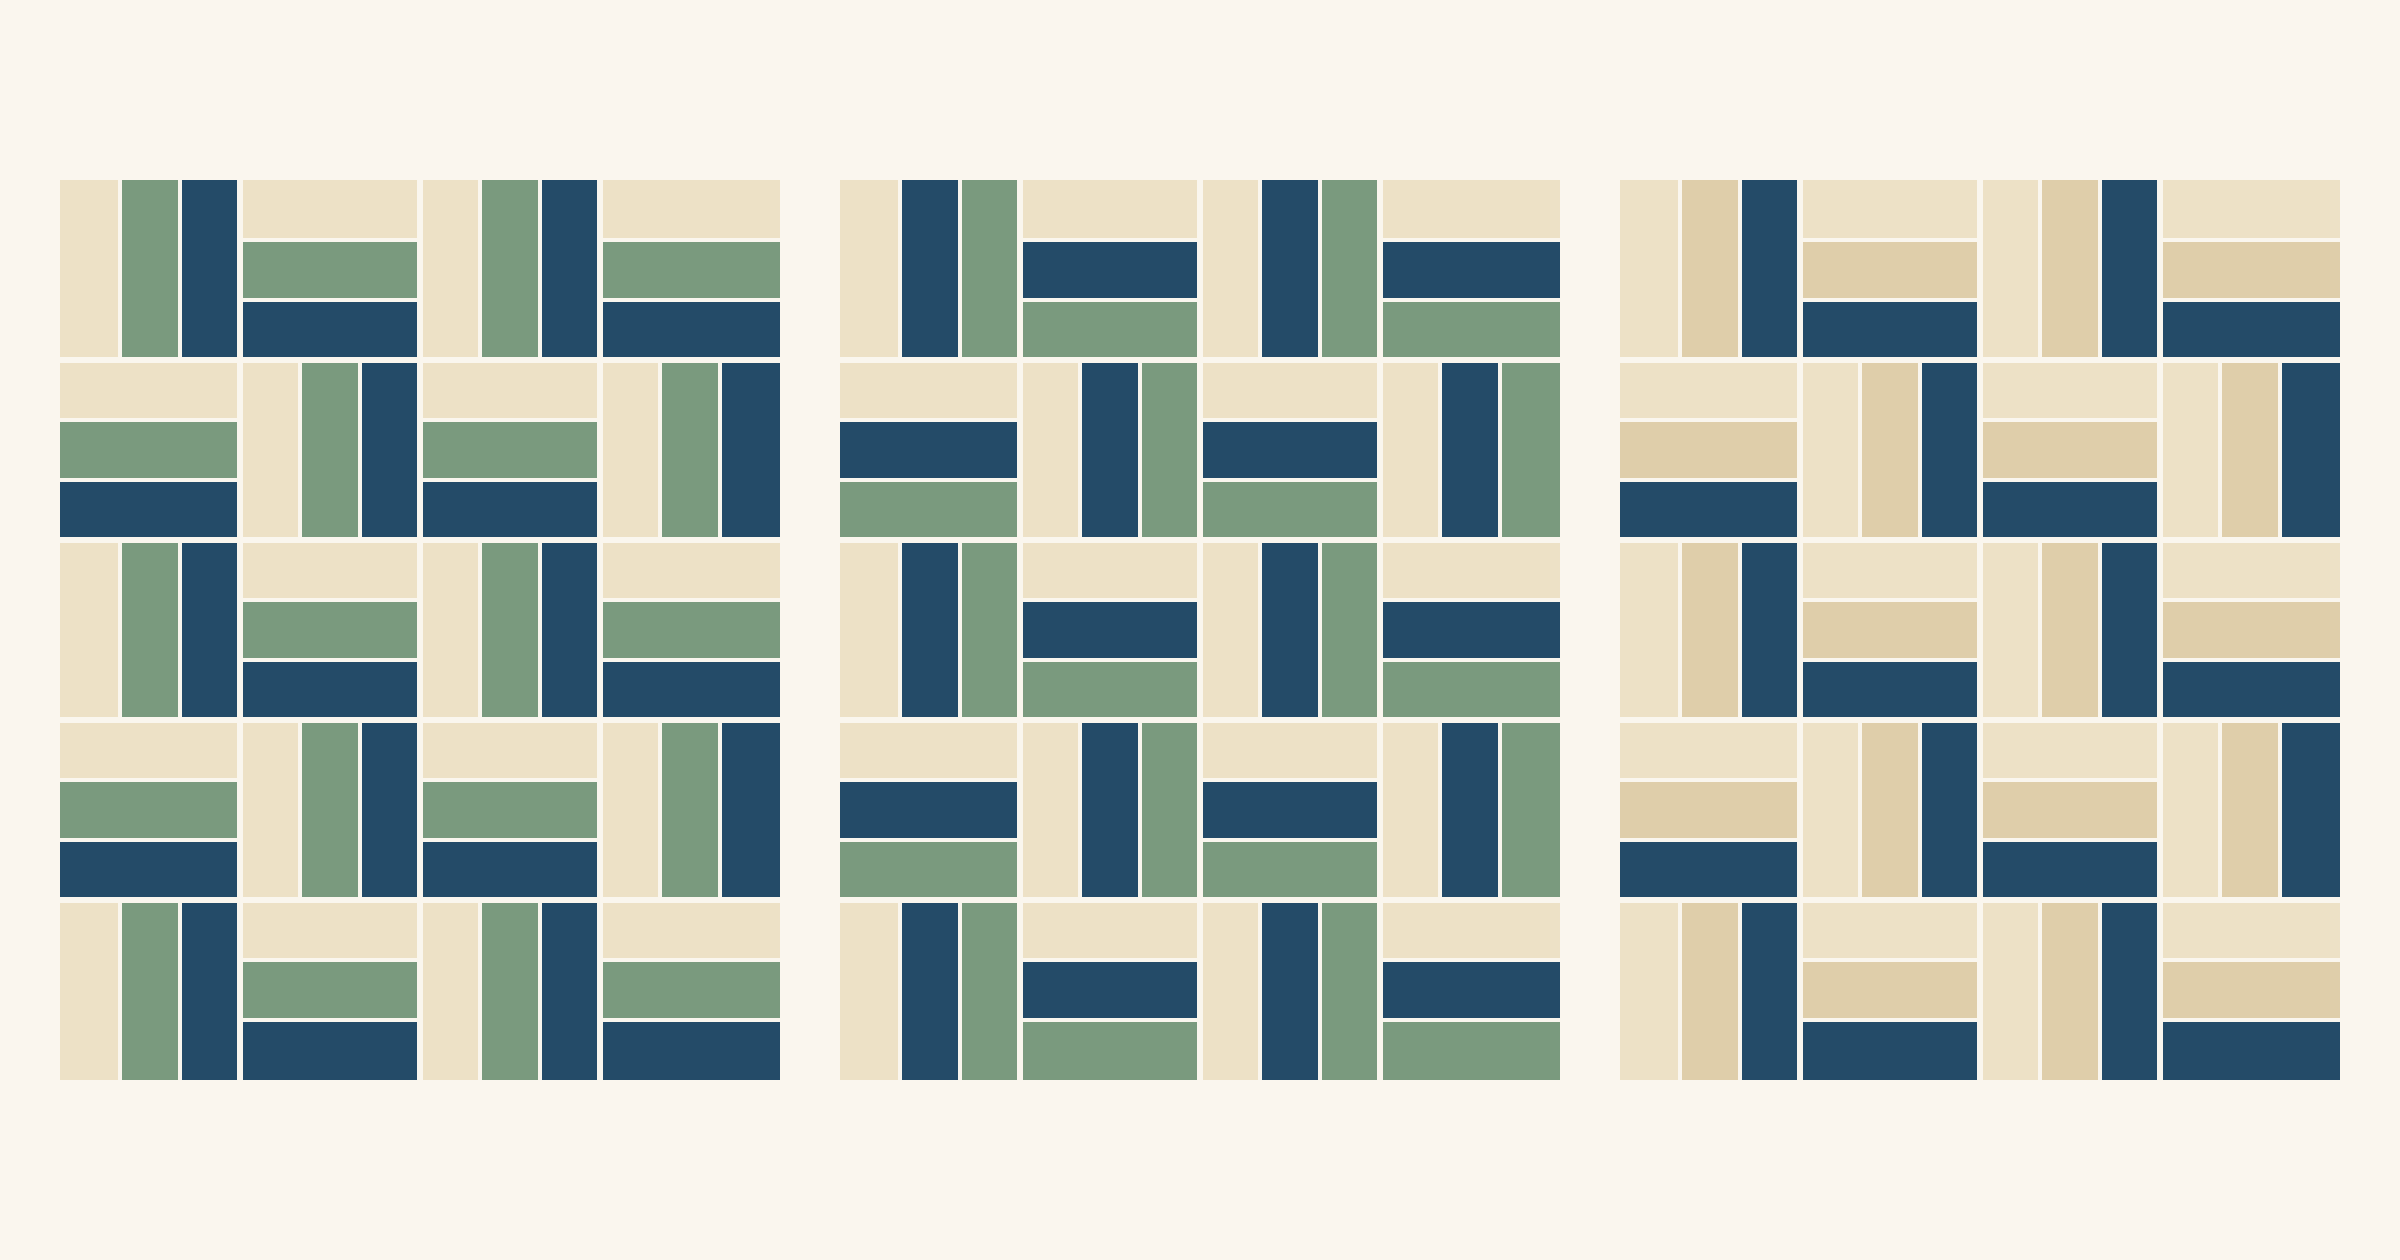
For a three-color Rail Fence, put your lightest and darkest fabrics on the two outside strips and a medium in the center. Then turn every other block a quarter turn, all in the same direction. That's the order the popular tutorials use. Lynn Woll's jelly roll Rail Fence at Create Whimsy sews dark on one side, medium in the middle and light on the other. Julie Baird sets her fabrics from light to dark "to make it easier to see the design" in her Rail Fence designs at Generations Quilt Patterns.
The reason is geometry. Only the outside strips meet the next block along their full length, so they're the ones that join into the zigzag. Below, we keep one 6-inch block with three 2-inch strips. Only the order and the values change, so you can see what each choice does.
Why the outside strips make the zigzag
Our test block is 6 inches finished, made of three strips 2 inches finished. Cut the strips 2 1/2 inches wide, sew three together into a 6 1/2-inch strip set, and cut the set into 6 1/2-inch squares. Those are the same numbers Lynn Woll uses with jelly roll strips. To see how many 6 1/2-inch pieces one strip gives, check our jelly roll strip counts. Our Rail Fence Trio reference groups four of these squares into one larger block.
The pattern comes from the layout. C&T Publishing's free Fields and Fences project, a quilt by Becky Goldsmith, puts it simply: "You create an overall design by turning the blocks so that the strips run either horizontally or vertically." In our drawings, the upright blocks have cream on the left and navy on the right. The turned blocks are the same block turned a quarter turn clockwise, so cream moves to the top and navy to the bottom.
Now look at where an upright block meets a turned one:
- The outside strips join. The upright block's navy strip runs down the shared seam and meets the turned block's navy strip at the corner. Together they make one step, 6 inches down and 6 inches across. Step after step, they form a zigzag that runs diagonally across the quilt. The cream strips do the same on the other side of the block.
- The center strip stays alone. It touches the next block only at its 2-inch ends. Whatever fabric you put there, it reads as a separate 2 x 6-inch bar.
The rule holds with four or five strips, too. The two outside strips join, and every strip between them becomes a bar.
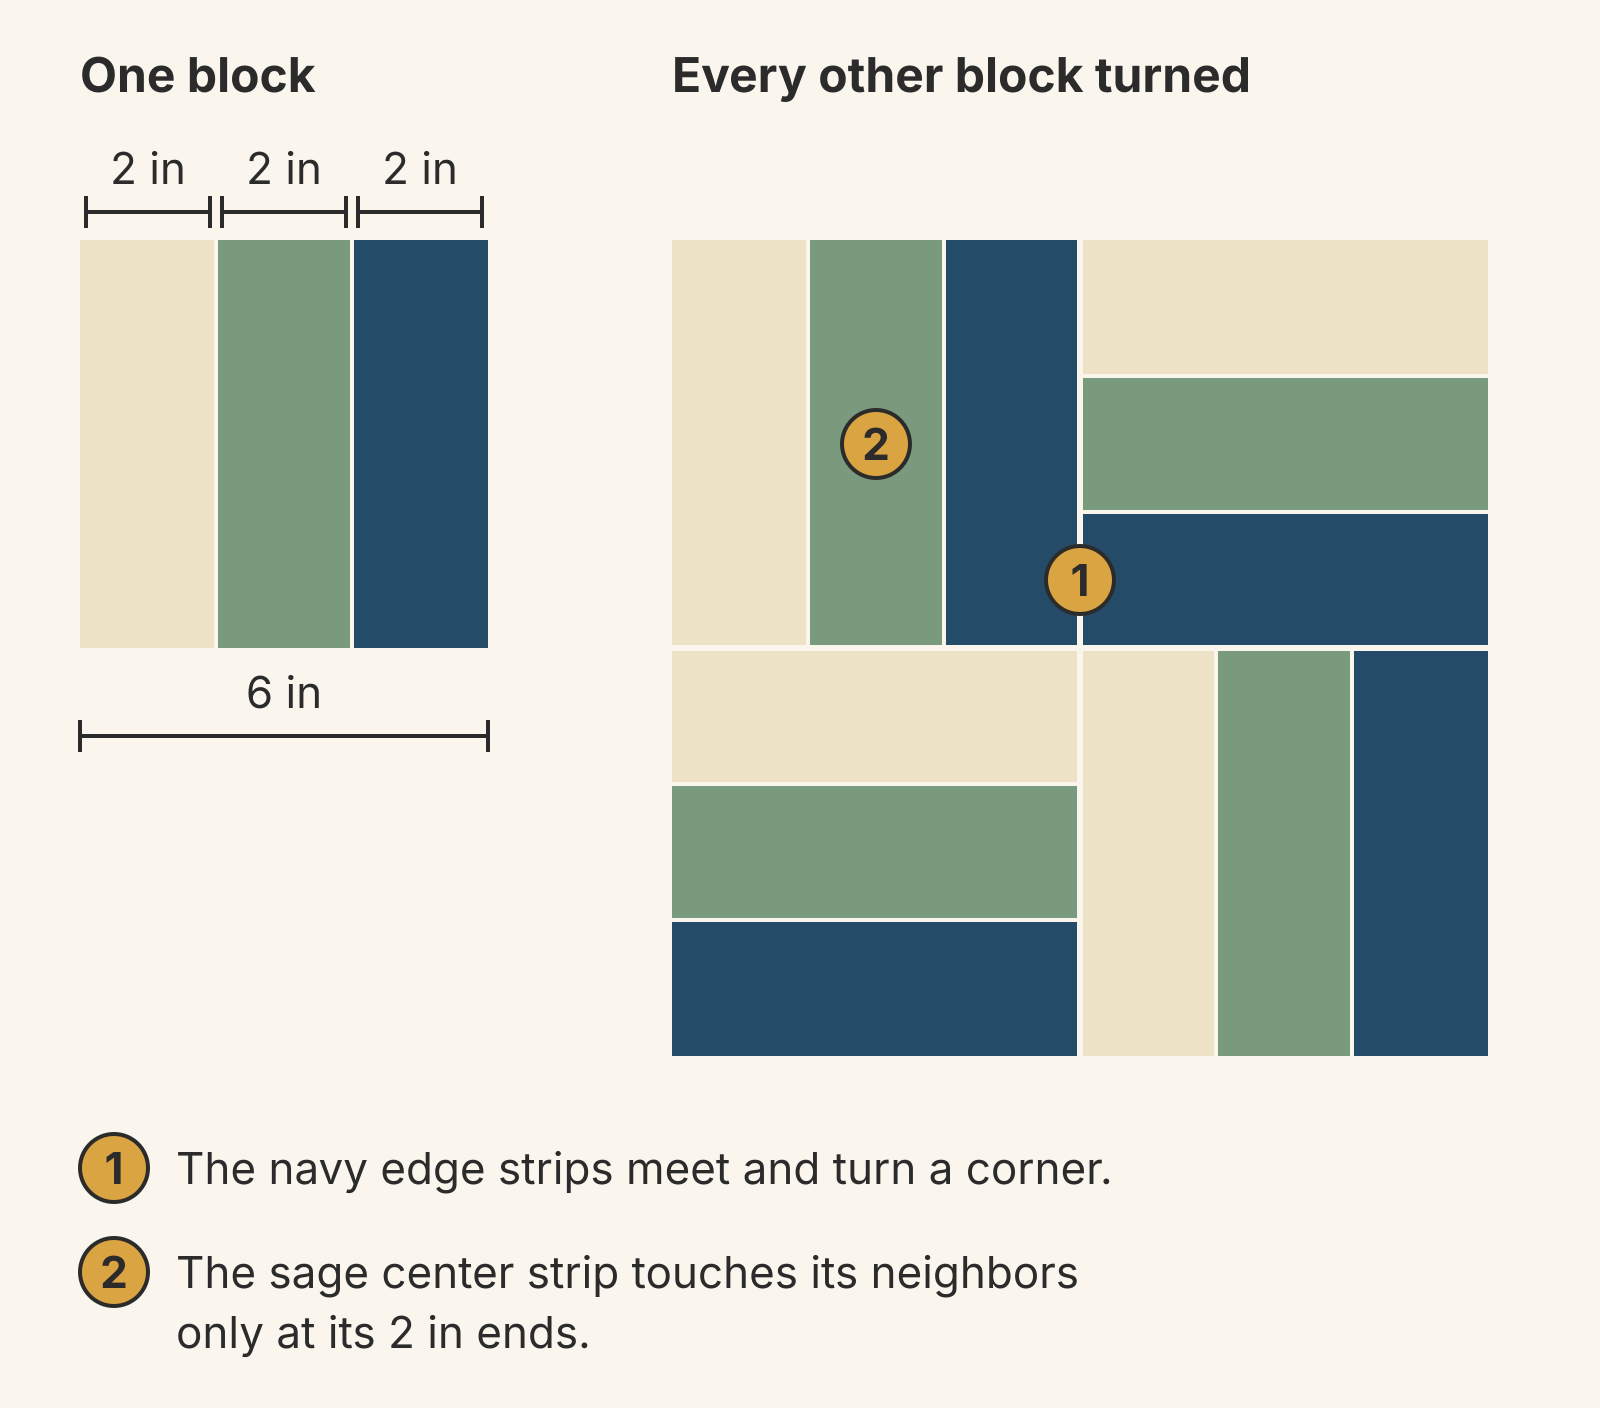
So the two outside strips draw the zigzag, and the center strip makes bars. Where you put your strongest value contrast decides which one you see first. It's the same edge-meets-edge effect behind other secondary patterns in quilts.
Three value arrangements with the same strips
Each study below has 16 blocks in four rows of four, 24 x 24 inches finished, with every other block turned clockwise. Every fabric covers a third of each block, 12 of its 36 square inches, so the amounts never change. Only the order and the values do.
Here are the values of our four drawing colors, measured as CIELAB lightness, where 0 is black and 100 is white:
| Fabric | Value | Reads as |
|---|---|---|
| Cream | 90 | Light |
| Tan | 83 | Light |
| Sage | 61 | Medium |
| Navy | 30 | Dark |
With real fabric, rank your pull in a black-and-white phone photo instead. Our color and value guide explains why value carries a pattern more than hue does.
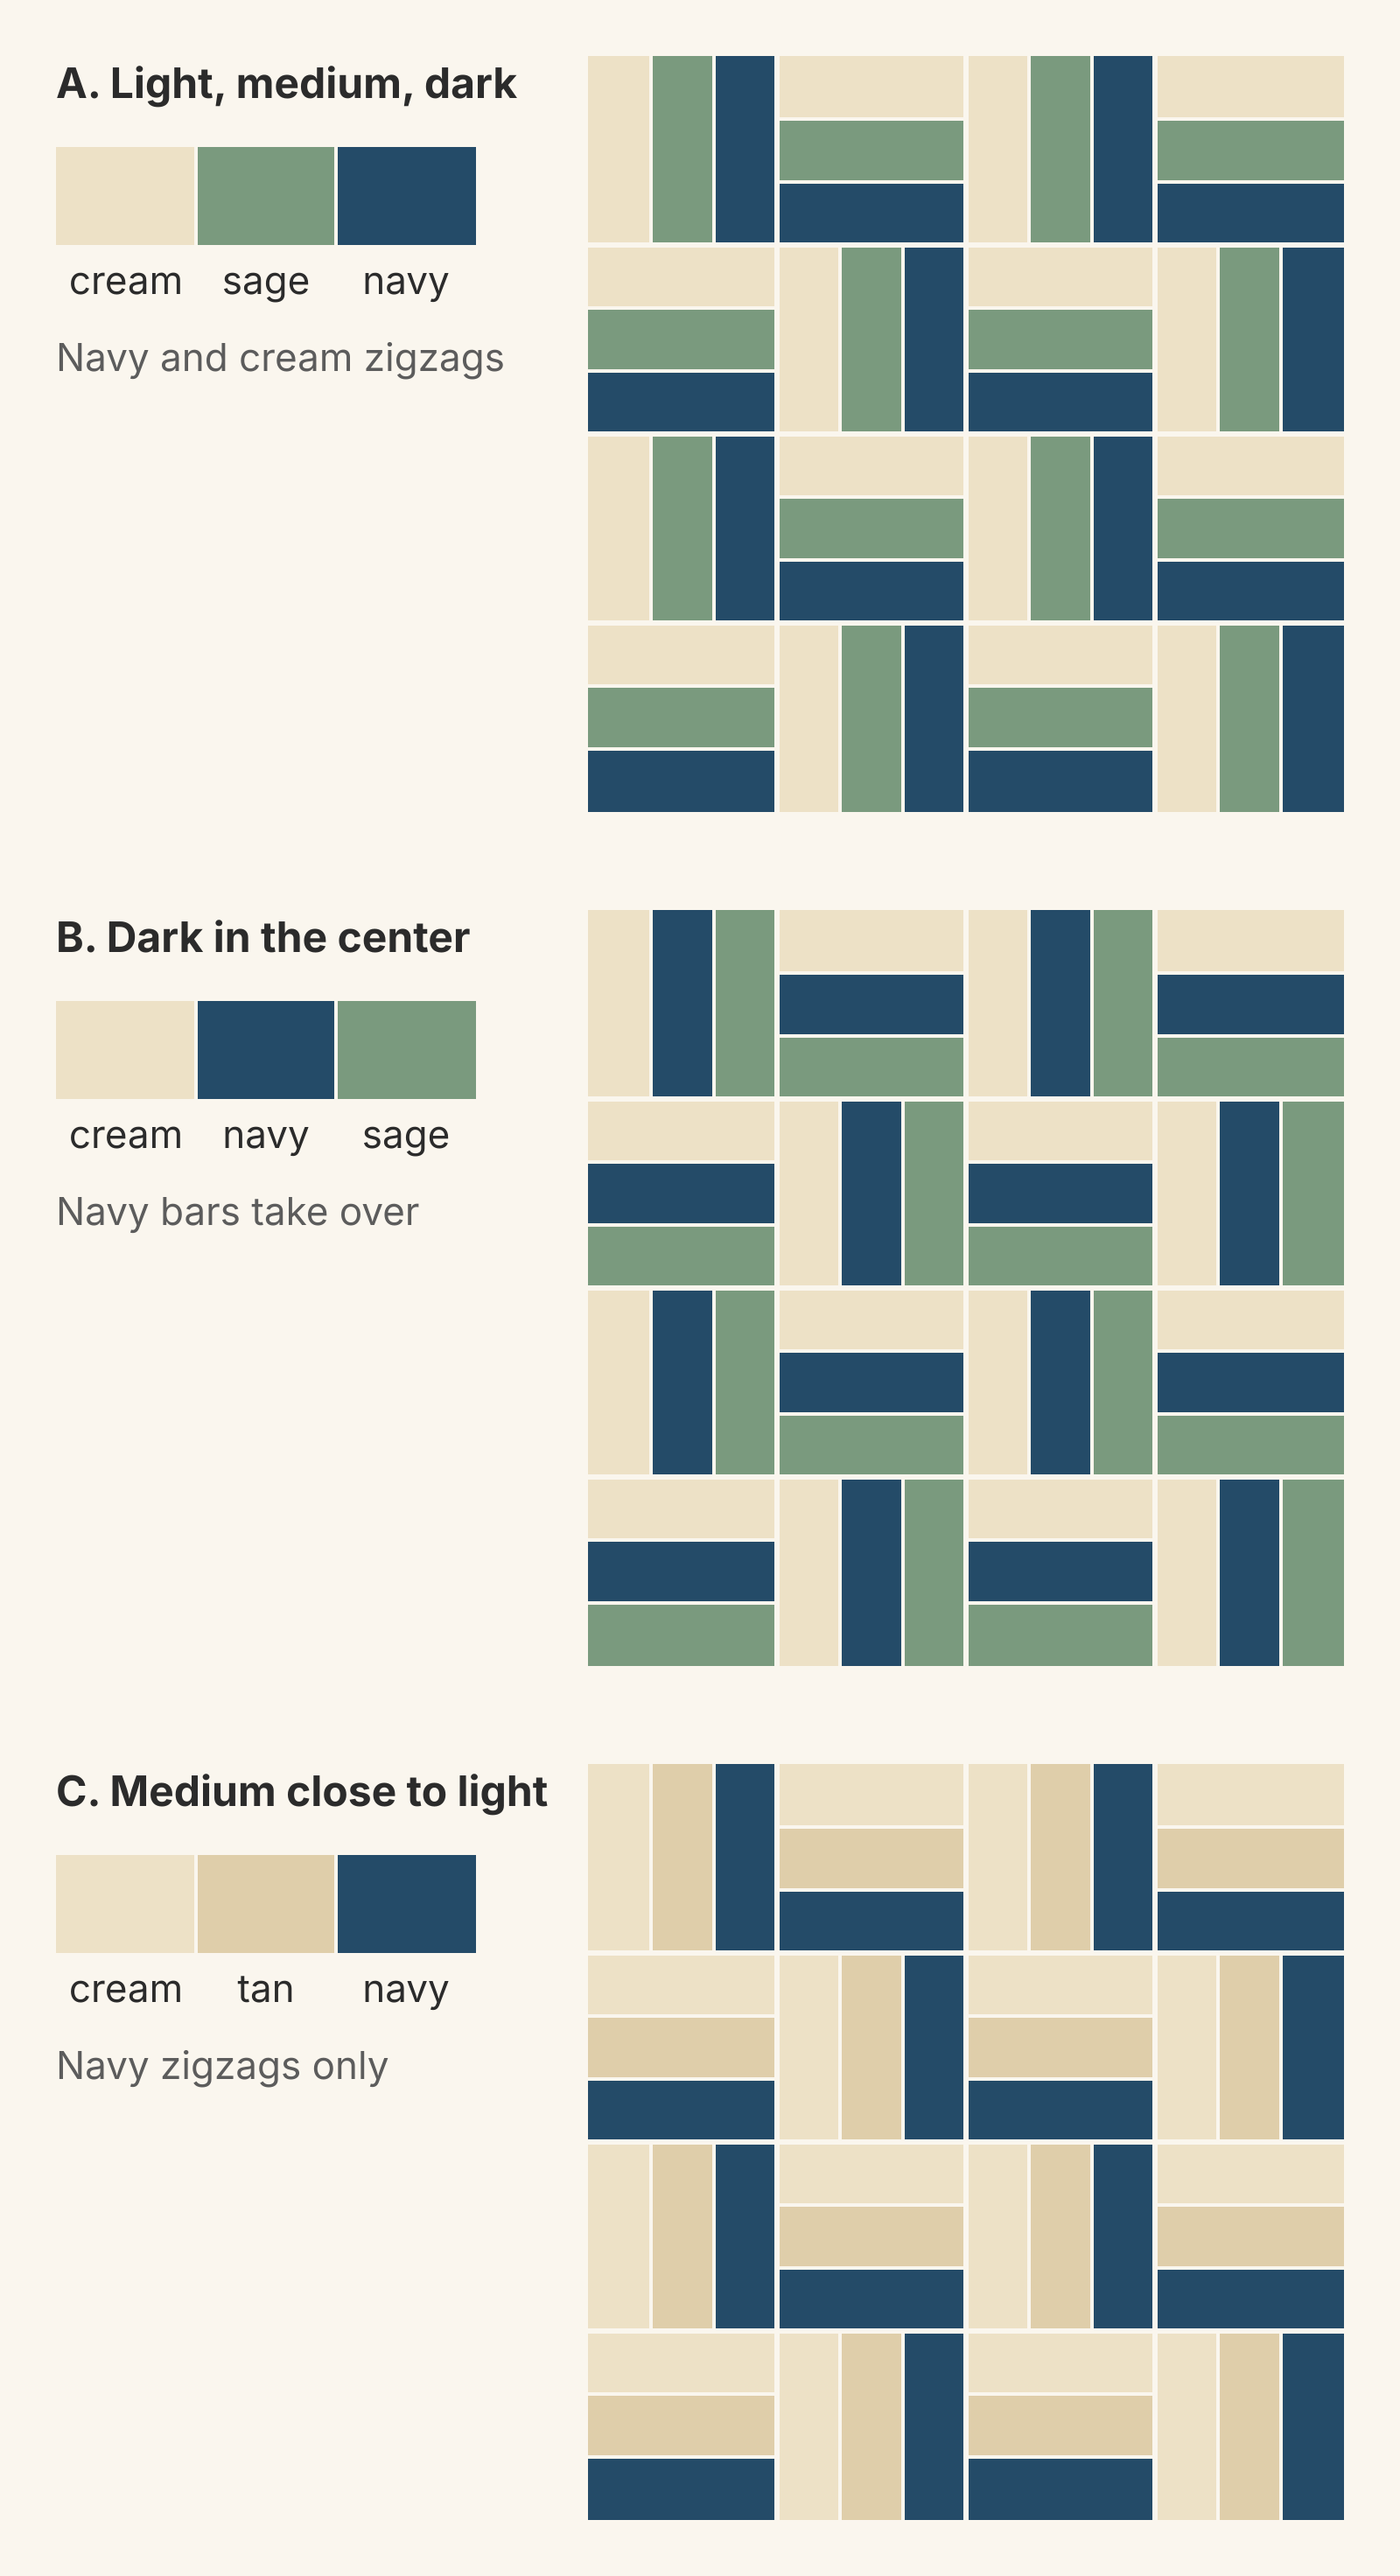
A. Light, medium, dark: navy and cream zigzags
Cream, sage, navy is the graded order from the opening. Navy steps and cream steps run side by side from top left to bottom right, with sage bars between them. Sage sits at 61, almost exactly halfway between cream at 90 and navy at 30. It separates the two zigzags without joining either one.
B. Dark in the center: navy bars take over
Same three fabrics, new order: cream, navy, sage. Navy is now the center strip, so it can't connect. The study turns into 16 separate navy bars, alternating upright and flat. Cream and sage still make zigzags on the outside. But cream against sage is a 29-point jump, about half the 60 points between cream and navy, so the bars win. The top reads more like a weave than a fence. That's a fine look if you want it; just expect a quiet zigzag.
C. A medium close to the light: navy zigzags only
Cream, tan, navy keeps the graded order on paper. But tan at 83 sits only 7 points from cream, so it reads as a second light. In the drawing, the cream and tan strips blend into one 4-inch light band. What's left are 2-inch navy zigzags on a light ground, the crispest of the three studies. Choose this when you want one bold color to carry the zigzag. A medium close to the dark works the other way and leaves a light zigzag on a dark ground.
For most three-color Rail Fence quilts, start with A or C. Use B when you want the bars.
What if all three fabrics are mediums?
Jennifer Houlden explains why this happens so easily in her article on contrast at QuiltSocial. Most stashes are heavy on medium values and short on very light and very dark fabrics. She also warns that a quilt made from only one value range "would be dull due to little or no contrast." In a Rail Fence, that looks like a zigzag you have to hunt for.
You don't need three new fabrics. Swap one outside strip for something clearly lighter or darker, and keep a medium in the center. The two mediums left will blend, as cream and tan do in study C, and the new strip draws the zigzag. If all you have is mediums and a background fabric, put the background on one edge.
Worked example: a 48 x 60-inch throw
Say you want a throw from the same 6-inch block, with cream, tan, sage and navy on hand.
- Count the blocks. Eight across and ten down makes 80 blocks and a 48 x 60-inch top before borders. Half of them, 40, get turned.
- Cut. Use 2 1/2-inch strips, sew them in threes into 6 1/2-inch strip sets, and cut 6 1/2-inch squares. These sizes assume an accurate 1/4-inch seam, so measure your first strip set before you cut every square.
- Put the widest value gap on the edges. Cream at 90 and navy at 30 are 60 points apart, more than any other pair. They go on the outside strips.
- Pick the center for the look you want. Sage gives you navy and cream zigzags, as in study A. Tan leaves only navy zigzags, as in study C. Keep navy out of the center unless you want bars.
- Check the amounts. Each of your three fabrics covers 960 of the top's 2,880 square inches, whatever order you choose. The order changes the look; the share stays the same.
Keep every turn in the same direction
Turning direction matters too. With clockwise turns, our zigzags run from top left to bottom right. Counterclockwise turns run them from bottom left to top right. Either works, but mixing them breaks the line. Julie Baird's pinwheel layout shows that changing which edge the dark strip faces can build a different design entirely.
One block turned the wrong way is easy to miss. Its navy strip lands on the opposite edge, so the zigzag jumps into its neighbor, and a cream strip sits where the navy should continue. Before you join rows, check that every turned block has its dark strip on the same edge, and every upright block on the same side. In our drawings, that's the bottom and the right.
Try your order on 16 blocks first
Before you cut 80 blocks, test your strip order on a 4 x 4 study. In QuiltLab:
- In the Block Editor, choose File > New Block and set it to 6 x 6 inches. Draw three 2 x 6-inch rectangles side by side, give each its fabric, and save. Use File > Save A Copy for each other order you want to compare, then change the copy's fabrics.
- In the Quilt Editor, choose File > New Quilt, then Grid and Create grid quilt. In Properties > Layout, set the block W and H to 6, Cols to 4 and Rows to 4.
- Choose your block in Blocks and place it in all 16 cells.
- Select one block to turn and choose Rotate clockwise in the Transform section of Properties, or press R. Repeat for every other block. Turn them one at a time: with several blocks selected, rotation turns the whole group around its center and moves the blocks.
The Block and Quilt Editors don't work out strip counts or yardage, so take the cut sizes from the block math above. If this is your first Rail Fence, our practice path for easy beginner blocks starts with a single three-rail block. Once a study reads the way you want, sew four real blocks in a two-by-two group and check the zigzag in fabric before you cut the rest.
Related posts
Irish Chain Quilt Colors: Which Fabric Goes Where?
Most Irish Chains put darker chain fabrics on a light background. Compare single and double chain value maps and see which fabric shapes the diamonds.
Ohio Star Quilt Block Variations: Will the Star or Center Stand Out?
Many Ohio Star variations keep the same nine-patch and move the fabrics. Compare four color maps on one 12-inch star and see why value decides what you notice first.
Courthouse Steps Color Placement: Where Do Lights and Darks Go?
Put light fabric on one pair of opposite sides and dark on the other, or color by rounds for framed squares. Two 10-inch maps show how each one repeats.