Write Quilt Pattern Cutting Instructions That Add Up
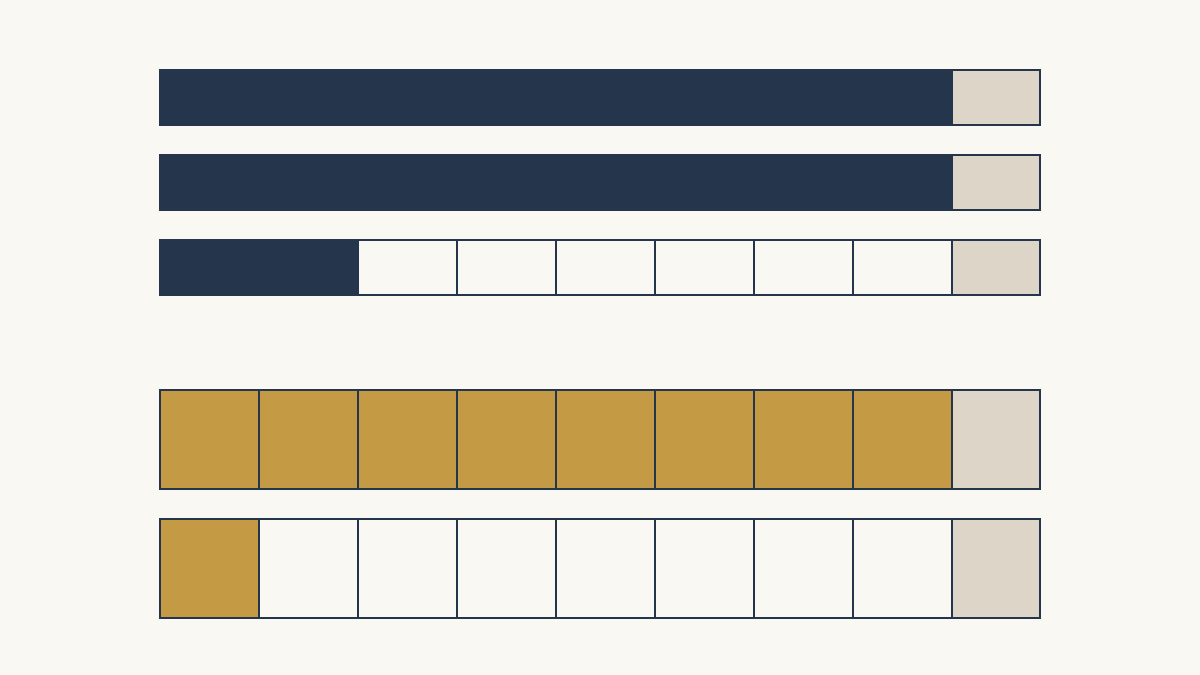
List the starting strips, then state the exact number and size of pieces to subcut from them. Give each piece one label and use it in the sewing steps. Finally, multiply the pieces used per unit by the number of units. Those totals should match the cutting instructions.
For a first audit, choose one size and one short assembly step. Match its labels and counts completely before spreading the same chart format across a multi-size pattern.
Give every piece one stable name
Choose a piece-label system and use it consistently in the cutting chart, diagrams and instructions. If a rectangle is A in the chart, it should remain A wherever the reader uses it.
Cheryl Brickey's general pattern-writing guidelines emphasize clear assumptions and consistent fabric and piece naming. A stable label lets a reader follow the fabric through the document without guessing whether two names describe the same cut.
Keep fabric names separate from piece names. Fabric 1 might supply several differently sized pieces, while a label such as A identifies one size and role. Explain that relationship at the beginning of the chart.
Our quilt-pattern writing guide covers the full document. This audit focuses on one route from cutting instructions to the step that consumes the pieces.
State the cutting dimensions clearly
Our hypothetical audit uses two piece labels:
| Label | Cut size | Required quantity | Intended use |
|---|---|---|---|
| A | 2.5 by 4.5 in rectangle | 18 | Two per unit |
| B | 4.5 in square | 9 | One per unit |
These are raw cut sizes, so the construction's seam allowances are already included. A reader should cut a 2.5-by-4.5-inch rectangle for A, without adding another allowance to either dimension. Keep finished-unit measurements in the sewing instructions, clearly labeled for their stage.
For each label, write the dimensions in the same order throughout. If width and length have a particular orientation in a directional print, explain that orientation rather than silently rotating a rectangle to improve the yield.
Distinguish the strips from their subcuts
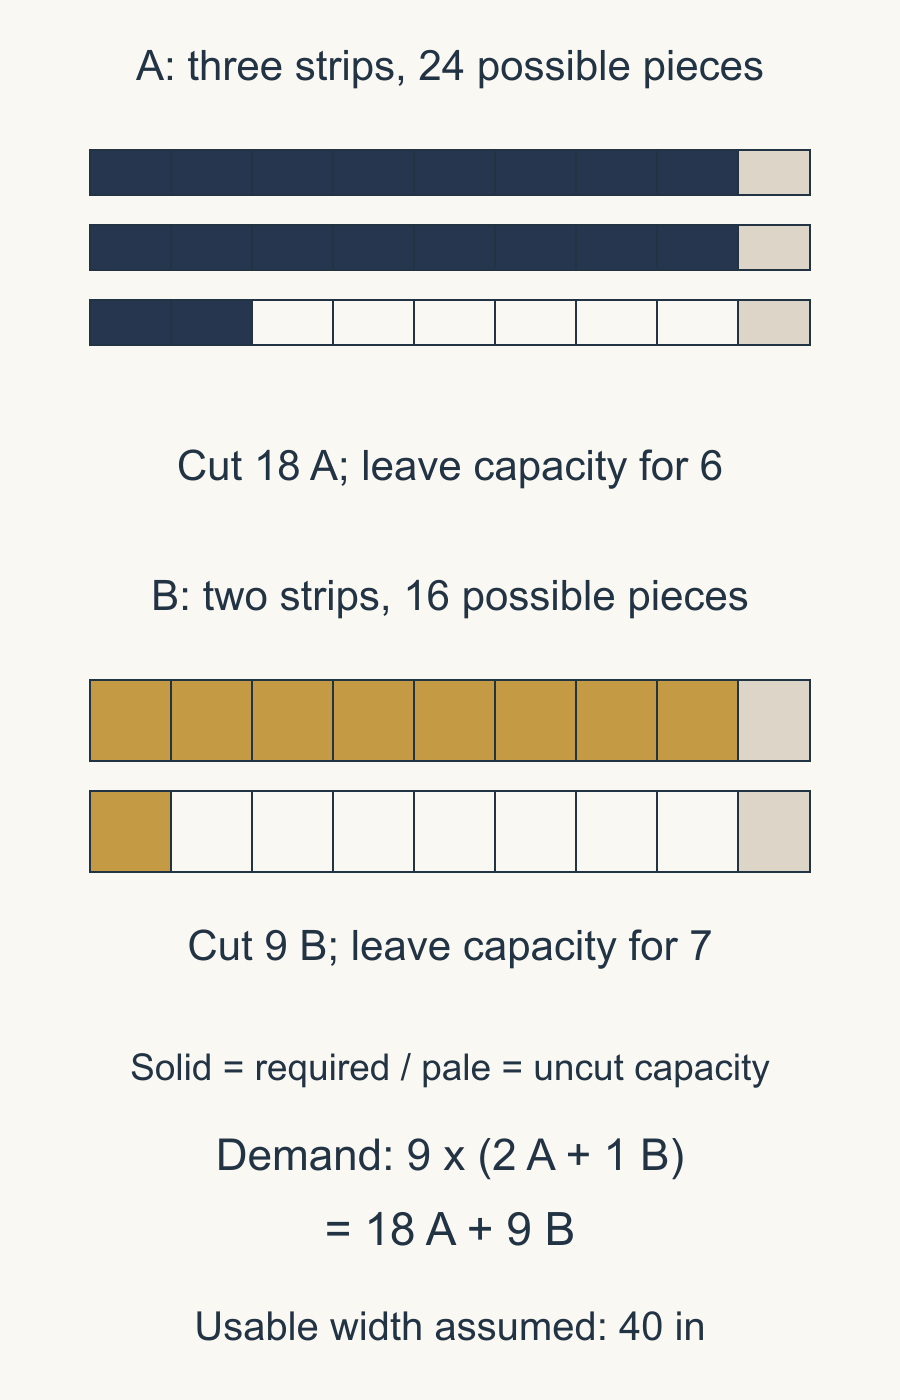
Assume 40 inches of usable fabric width. For A, plan three strips cut 2.5 inches deep across that width, then subcut 4.5-inch lengths from each strip.
Each strip has room for eight rectangles: eight times 4.5 inches uses 36 inches, leaving 4 inches across the assumed usable width. A ninth rectangle would need 40.5 inches, so it won't fit. Three strips therefore provide capacity for 24 A pieces.
For B, plan two strips 4.5 inches deep. Each can yield eight 4.5-inch squares, so the two strips provide capacity for 16 B pieces.
HollyAnne Knight's pattern-reading lesson distinguishes the initial width-of-fabric strips from their final subcuts. Keep that hierarchy visible: the rectangles come out of the strips; they are not an additional fabric purchase on top of them.
Say how many pieces to cut
After the fabric name, the directions for this inventory could read:
- A: Cut three strips, each 2.5 inches by WOF. From these strips, subcut a total of 18 rectangles, each 2.5 by 4.5 inches. Label them A.
- B: Cut two strips, each 4.5 inches by WOF. From these strips, subcut a total of 9 squares, each 4.5 inches square. Label them B.
Define WOF as width of fabric and state the usable width your pattern assumes. Here that is 40 inches after preparation and edge trimming. The word total matters: 18 A pieces come from all three strips together.
Take eight A pieces from each of the first two strips and two from the third. For B, take eight from the first strip and one from the second.
The unused capacities are six A-sized windows and seven B-sized windows. If you stop after the required cuts, those are uncut possibilities in the remaining fabric, not thirteen spare finished patches already in a bag.
| Label | Total strip capacity | Required cuts | Unused capacity |
|---|---|---|---|
| A | 24 | 18 | 6 |
| B | 16 | 9 | 7 |
If you want the reader to cut extras, state that choice separately and explain it. Do not let a chart alternate between capacity and demand without telling the reader which number to follow.
Follow the pieces into the sewing steps
Suppose an assembly step calls for two A pieces and one B piece per unit, repeated nine times.
The demand is 18 A and 9 B, matching the cutting chart. Circle those two chart quantities, then mark the step that uses them. Every piece has a destination, and the repeated count agrees.
Now change the step to “Make 10.” It demands 20 A and 10 B. The strip plan has enough possible capacity, but the instructions only told the reader to cut 18 and 9. The document still fails the audit.
That distinction is useful: a generous fabric plan can conceal an incorrect cutting count. Check the quantities the reader was actually instructed to prepare, not merely the theoretical pieces that could have been cut.
Look for the other label failures
Follow A from the chart to every diagram and step. Is it ever renamed A 1 without explanation? Does one diagram show a different orientation? Does another step consume pieces you have already assigned elsewhere?
Then follow B in the same way. The repeated unit may agree while a later border, corner or test unit needs an additional square. Add that separate demand before declaring the whole pattern reconciled.
Keep a small tally beside the instructions:
| Label | Prepared | Used in nine units | Left after this step |
|---|---|---|---|
| A | 18 | 9 x 2 = 18 | 0 |
| B | 9 | 9 x 1 = 9 | 0 |
If another step needs A, subtract that demand as its own row in your working notes. A negative balance reveals a shortage. An unexplained positive balance means you need to check the instructions or the count. Label any deliberate extras so the reader knows to save them.
Test the pattern after the paper audit
Sherri McConnell's beginner pattern-writing advice works from cuts and a complete sewn sample. That physical check belongs after, and alongside, the document arithmetic.
A paper audit can catch the wrong “Make 10” before anyone cuts. A sewn sample can reveal a wrong dimension, allowance or joining sequence that a balanced inventory would never detect.
Keep the arithmetic result beside the sewing observations. First check that the pieces form the intended unit at the stated seam allowance. Then check whether the measurements, orientation and written sequence agree. Repeat the count audit for each size you offer.
Keep the reader's route short
Put the strip instruction, subcut dimensions and required count close together. Ask another reader to identify those three details for A without your help. If they read 18 as a per-strip quantity, or count strips and subcuts as separate requirements, rewrite the row before copying its format across the pattern.
Start with one label today. Count what the strips can hold, state what the reader should cut, and trace those pieces into the actual instructions. When all three agree, repeat the audit for the next label before sending the whole pattern for technical and sewing review.
Plan your next quilt
Lay out blocks and try colors in QuiltLab's grid editor before you cut.
Free forever, no card needed.
Explore making your own quilt patternsGet quilting tips by email
QuiltLab updates, tips and quilting inspiration. Unsubscribe anytime.
Related posts
Group Memory Quilt Instructions Contributors Can Use
Tell contributors what to send, what may be shared and how their materials will be returned. A sixteen-entry map keeps each memory tied to its maker.
Documenting a Group Quilt from Contributions to Credits
Connect contribution IDs, makers, design decisions and care notes in one record. A sixteen-unit example keeps credits separate from the head count.
Choose One Piecing Skill for Mini Quilt Practice
Practice four-patch intersections in an eighteen-inch mini. Check the cut squares, pressed rows and blocks before joining the nine-block top.