Documenting a Group Quilt from Contributions to Credits
Keep the contribution list, accepted layout and maker credits together in one group-quilt record. For most groups, a folder of photographs and notes plus a printable summary is enough. Each contribution needs its maker and final position; assembly, quilting and finishing need their own credits. A short quilt label can point to the fuller story.
Start while the makers are available to answer questions. The useful result is a record the recipient can read beside the finished quilt, without guessing who supplied an unmarked piece or why the layout changed.
Give the quilt and its contributions stable names
Choose a project name or number and keep it on the layout, material notes and final photographs. Then give each contribution a separate ID that stays with it when the arrangement changes.
The Quilters' Guild's group-quilt planning resource recommends grid references to decide where blocks go. For the maker record, we recommend a separate contribution ID linked to its contributor. That ID can follow a piece before its final grid position is settled.
For example, A2 can move to another row or column while remaining the same contribution. Record its new position instead of changing its identity to match the new square.
If the group hasn't settled what members are sending, start with the format decisions in our group quilt overview. This record follows the project through its final design and credits.
Give the record a simple structure
Keep the summary short enough to read, with the detail filed under the same project name:
| Part of the record | What belongs there | Where to find the detail |
|---|---|---|
| Quilt summary | Name, actual completion date and measured finished size | First page and label |
| Contribution list | Stable ID, maker and accepted row/column | Final layout and story files |
| Making credits | Person and the work they completed | Role list and pattern credits |
| Materials and care | Identified products, directions and unresolved questions | Material notes and label photos |
| Photographs | Front, back, label and identifying details | Clearly named image files |
Write "unknown" where evidence is missing. A planned finish date can stay in the working notes; replace it with the actual completion date in the final summary. Measure the finished quilt before recording its size.
Separate makers from the roles they fill
One person may contribute blocks, assemble the top and sew the binding. Another may quilt the finished sandwich without having made any of its blocks. Give each role a place in the record.
Use plain descriptions: design coordination, contribution, top assembly, quilting, binding, label and photography. Ask how people want their names shown before finalizing public credits.
Susan Roach's Louisiana quilt-documentation instructions distinguish the people who made a top from those who quilted it. That distinction is useful for a group keepsake too: a list of block makers alone can leave later work uncredited.
You can recognize substantial help without assigning authorship someone doesn't want. A donor, a source-pattern designer and the person who quilted the top have different connections to the result. Describe those connections accurately.
Keep any commercial pattern credit and its actual permissions with the project. Contribution to a group quilt doesn't erase the source of a pattern or image used within it.
Work an eight-maker example
For a hypothetical record, imagine eight contributors, A through H, each supplying two units. The project expects 16 contribution records.
Now suppose C also assembles the top and H also quilts it. Keep the contribution list and making roles separate. These three people would appear this way:
| Person | Contribution IDs | Additional making role |
|---|---|---|
| A | A1 and A2 | None in this example |
| C | C1 and C2 | Top assembly |
| H | H1 and H2 | Quilting |
Across all eight contributors, there are eight contributor-role entries plus those two additional making-role entries: ten role entries, filled by eight people. The sixteen units still have sixteen contribution records.
That distinction keeps a credit list honest. Ten roles don't prove ten different makers, and counting only the block makers would leave the assembly and quilting work invisible.
The diagram shows the same sixteen contributions and two additional making roles.
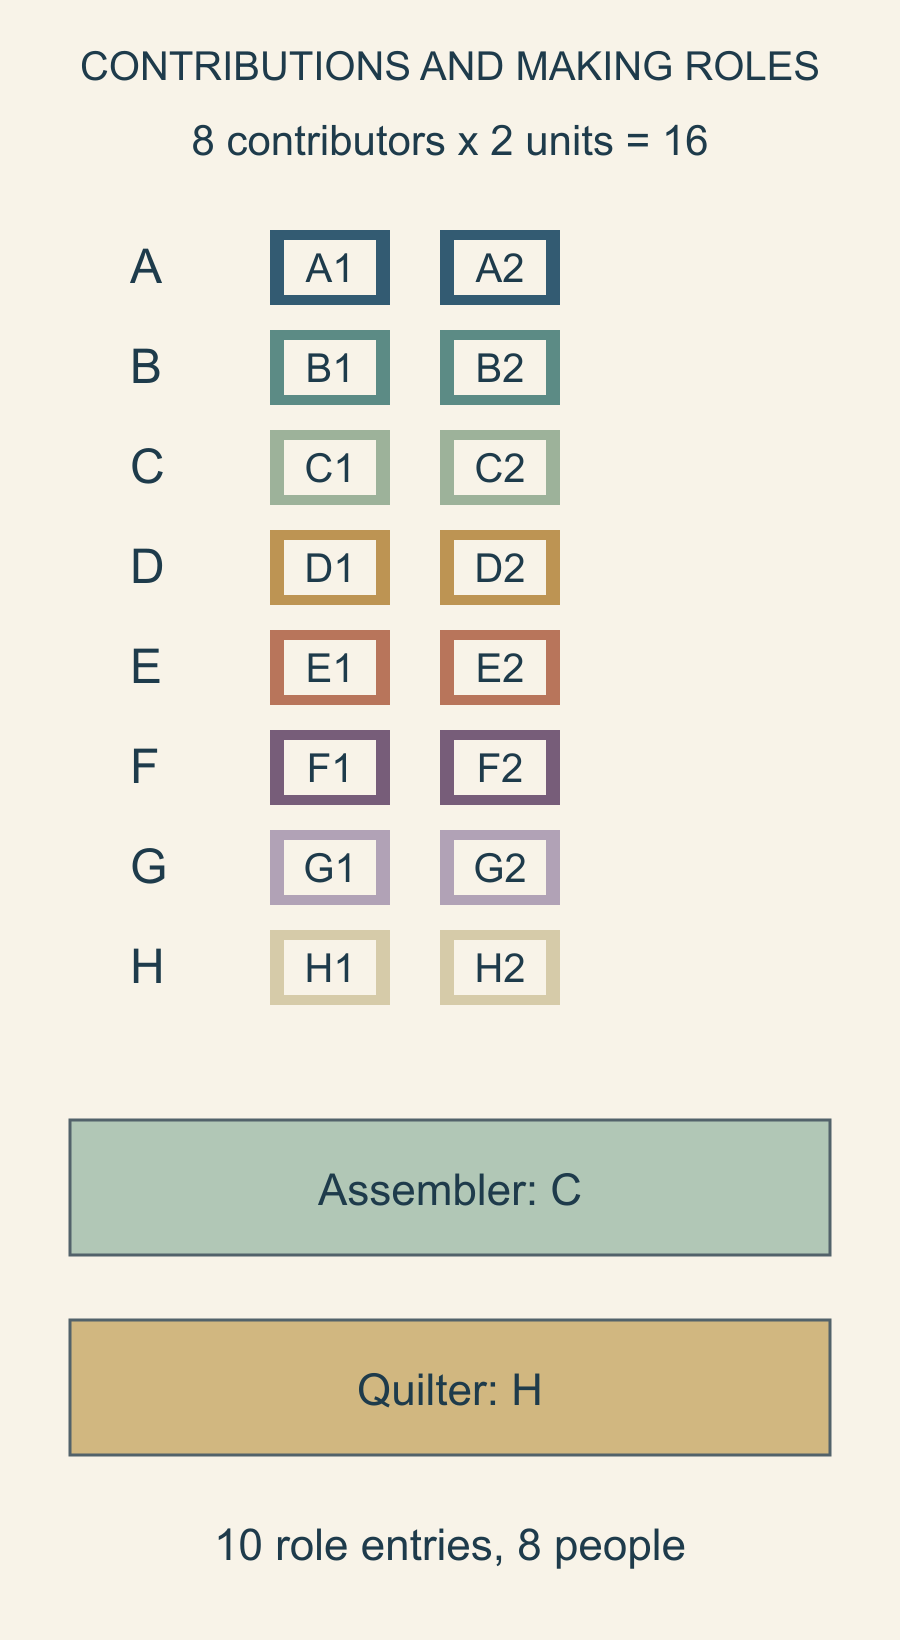
If a ninth person later quilts the project instead of H, the role count stays ten and the head count becomes nine. Update the quilting credit. The sixteen contribution IDs remain unchanged. Binding or photography would add further roles if the record includes them; they are outside this ten-role example.
Record the final layout and why it changed
Save a dated image or drawing of the accepted arrangement. Put row and column references on the working copy so another maker can locate a specific contribution.
Keep a brief decision note for changes that matter. In a four-by-four planning example, A2 and B1 might swap places after the group compares similar prints:
| ID | Maker | Earlier position | Accepted position |
|---|---|---|---|
| A2 | A | Row 3, column 4 | Row 1, column 2 |
| B1 | B | Row 1, column 2 | Row 3, column 4 |
Both IDs stay attached to their makers and stories. The swap still uses sixteen contributions; it changes two positions. Save the accepted map with the reason for the move. "Layout fixed" gives the next person much less to work from.
Name who made or approved the decision according to the group's agreement. Some groups give the assembler freedom to arrange the pieces; others ask all contributors to approve a shared draft. Record the process the group actually chose.
Keep rejected options in a separate folder if they explain a later question. The accepted layout should be easy to identify without opening every image and guessing which one came last.
Choose a label that points to the fuller story
The American Quilter's Society's label guide includes maker, design and care information among the details quilters choose to preserve. A small label has limited space, so decide which facts it must carry permanently.
For a group project, that may include the project name, completion date, group name and the principal making roles. Use the actual agreed names and wording rather than inventing a group identity for a tidier label.
Our quilt-label guide offers wording examples. Keep the contribution list and longer stories in the accompanying record, and state where the recipient can find them.
Avoid relying only on a public link that may later disappear. Give the recipient a readable copy of the record in a form they can keep with the quilt.
Preserve the photographs and material evidence
The Quilt Alliance's documentation guidance connects labels, photographs and the story behind a quilt. Its suggested views include front, back and useful details, so the record preserves more than one attractive overview.
When the actual quilt is ready, identify the photographer and keep the agreed use with the images. Add a view of the label and details that identify a contribution or construction choice. Keep full-size originals as well as smaller sharing copies, and put the project name in the file names.
Keep the material products and care instructions with those photographs. Our materials-record article shows how to preserve product details before packaging disappears. A group project may need several contributors to supply missing information.
Write unknowns plainly. "Fiber not confirmed for contribution D1" is better than assigning cotton because it looks similar to the neighboring pieces.
Make a private record and a shareable copy
The coordinator may need addresses, private stories and contact details to manage returns. The recipient or public audience may need a much smaller set of facts.
Keep those uses separate. Before sharing a photograph of the record, check for private information in its margins as well as its main text. A permission field is only useful if someone reads it before publishing the image.
Give the shareable copy a clear version or date. If a contributor corrects a name or changes a permitted use, update the relevant copies and record what changed.
Close the project with a complete handoff
Read the final record against the actual quilt and accepted layout. Check that every expected contribution is accounted for, every making role has the right credit, and the recipient has the care information the group can support.
Keep return commitments visible until the original items or unused pieces have reached the agreed person. Finishing the quilt doesn't complete a promise to return meaningful material.
Before the handoff, open the recipient's copy and check it against the quilt. Can you locate A2, identify the person who quilted it and find the care notes? Give the recipient a readable saved or printed copy, then keep the private contact and permission details with the coordinator. The quilt and the record should tell the same story.
Plan your next quilt
Lay out blocks and try colors in QuiltLab's grid editor before you cut.
Free forever, no card needed.
Explore shared quilt planningGet quilting tips by email
QuiltLab updates, tips and quilting inspiration. Unsubscribe anytime.
Related posts

Group Memory Quilt Instructions Contributors Can Use
Tell contributors what to send, what may be shared and how their materials will be returned. A sixteen-entry map keeps each memory tied to its maker.

Choose One Piecing Skill for Mini Quilt Practice
Practice four-patch intersections in an eighteen-inch mini. Check the cut squares, pressed rows and blocks before joining the nine-block top.
Build a Quilt Along Schedule from the Unit Count
Count the work in each release and leave time after the last block. A twenty-four-block example separates six block weeks from assembly and finish.