Quilt Backing Overhang: Check All Four Edges
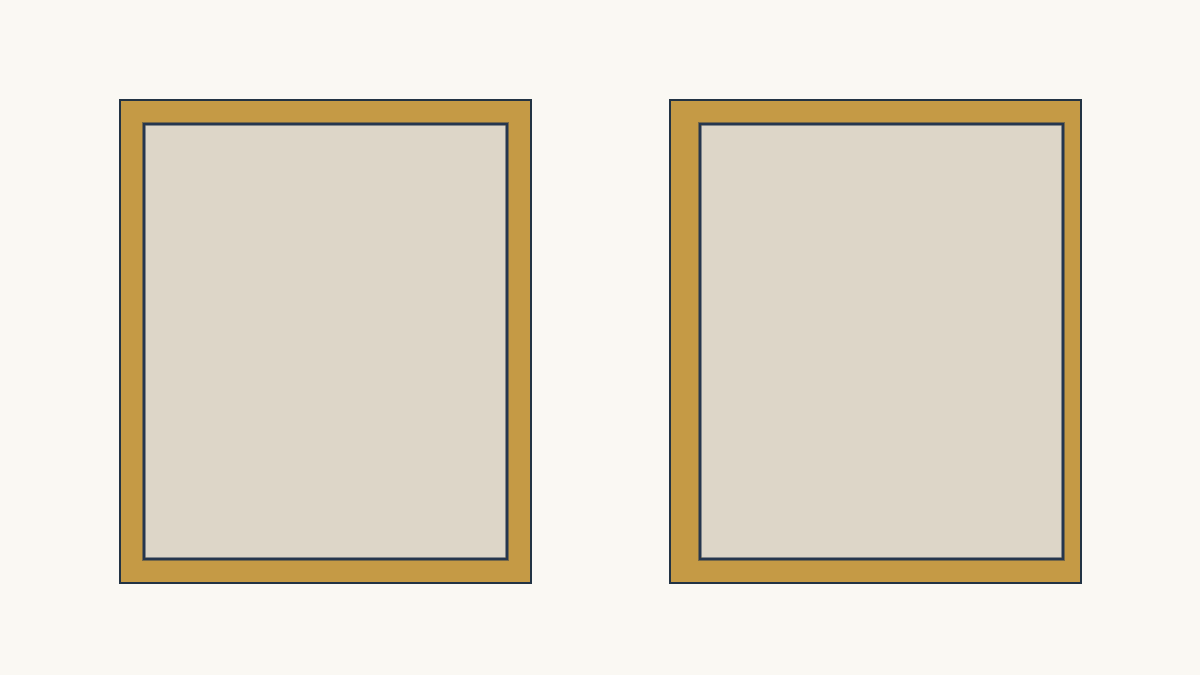
For a longarm service asking for 4 inches of backing beyond every edge, add 8 inches to the measured top's width and height. The Quilting Studio uses that requirement. Then check the overhang on all four sides: those totals leave 4 inches per edge only when the top is centered.
A one-inch shift can turn the left and right margins into 5 inches and 3 inches. The back is large enough overall, but one edge is short. Use your own quilter's required margins in the same check.
Translate the requirement into four margins
Keep the preparation instructions beside your measurement sheet. For The Quilting Studio, that also means leaving the layers separate.
Angela Clark's APQS preparation article asks for 6–8 inches beyond each side. It is a different published instruction. Do not turn either service's figure into a universal allowance.
Write the selected service's words on the plan, then convert them into the width, height and edge checks you need. If instructions say only "larger than the top," ask whether the figure describes a total dimension or each edge.
Our longarm-preparation guide covers the broader handoff. Here, the job is verifying that no individual margin has been overlooked.
Calculate a centered example
Suppose your completed top measures 60.5 by 72.5 inches from raw edge to raw edge. Under a 4-inch-at-each-edge requirement, the minimum centered backing rectangle is 68.5 by 80.5 inches.
The arithmetic adds the two opposing margins:
60.5 + 4 + 4 = 68.5 inches wide.
72.5 + 4 + 4 = 80.5 inches high.
Place the top's upper-left corner at (4, 4), measured from the backing's upper-left corner. That leaves 4 inches on the left and top. Subtract the top and those starting margins to check the right and bottom.
| Edge | Calculation | Margin |
|---|---|---|
| Left | Starting x position | 4 in |
| Right | 68.5 - 4 - 60.5 | 4 in |
| Top | Starting y position | 4 in |
| Bottom | 80.5 - 4 - 72.5 | 4 in |
All four meet the example requirement. Keep the top's measured dimensions in the calculation, including its raw outside allowance. Using a pattern's finished size would miss that fabric at the edges.
For your own rectangle, measure the left and top margins first. Find the right margin by subtracting the left margin and quilt top's width from the backing width. Find the bottom margin by subtracting the top margin and quilt top's height from the backing height. Compare each result with the requirement for that particular edge.
Move the top and check again
Now place the top's upper-left corner at (5, 4). The back has not changed size. The top is simply one inch farther right.
The left margin becomes 5 inches, but the right margin is 68.5 - 5 - 60.5 = 3 inches. The top and bottom remain 4 inches each.
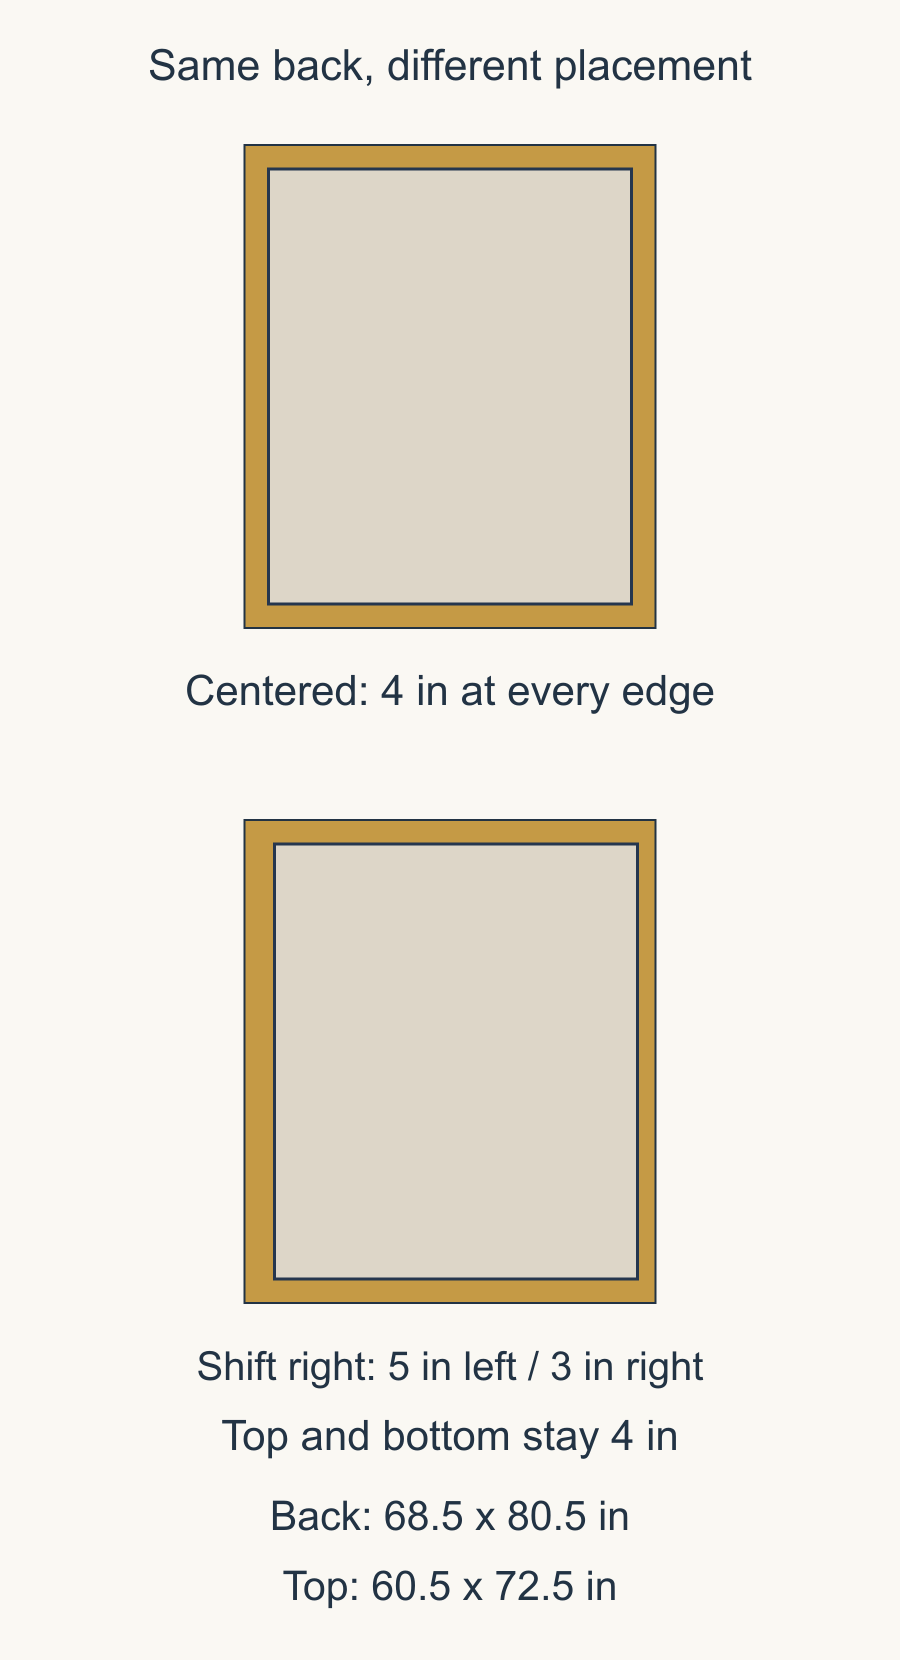
A width-and-height-only check would accept both drawings. The four-edge audit catches the short right margin in the shifted version.
Plan deliberate placement room
Suppose your design intentionally allows the top to sit one inch left or right of the backing center, while still requiring at least 4 inches at either side.
Begin with 5 inches nominally on both sides. The backing width becomes 60.5 + 5 + 5 = 70.5 inches. At a one-inch shift, the margins become 6 and 4 inches.
That extra width gives the plan one inch of movement in either direction: 4 and 6 inches one way, or 6 and 4 the other. The 80.5-inch height still has exactly 4 inches at the top and bottom; the extra width hasn't bought any vertical room.
The Quilting Studio also says centering a pieced backing cannot be guaranteed. Discuss any motif-alignment goal before building the back around it. Choose a composition that can tolerate movement while the required margins remain available.
Check the true usable rectangle
Use the backing area that is actually suitable for the handoff. Uneven cuts, damaged fabric or selvages can make a listed outside dimension less useful than it appears.
Lay the backing flat and check it at several positions. Measure the top and bottom as well as the middle, and inspect both sides along their length. If it narrows at one end, repeat the margin check there. The narrowest usable edge is the one that can fail the handoff.
If you piece the back, use the completed joined measurement. Seam take-up reduces the assembled dimension. Our backing-yardage guide explains that cut-panel calculation separately.
Also check whether the service needs a particular direction or preparation for a backing seam. Those requirements belong beside the size audit, not in a note discovered after the layers are packed.
Understand why extra fabric is requested
Gammill's layer-preparation guidance describes rollers and side clamps and explains that excess backing and batting keep the clamps away from the machine's working area. Its tip is expressed as 8 inches larger than the top.
Read that advice in its frame-system context. It does not replace the written instructions of the person actually quilting your project, especially where wording about total size and individual edges differs.
For the same reason, do not trim useful excess away immediately before handoff because the top looks centered on a floor. The service still needs to load and work the layers using its method.
Write the batting measurements separately. A sufficiently large back does not establish the batting dimensions or preparation your service needs. Keep both requirements with the handoff so excess in one layer cannot conceal a short edge in another.
Record a pass or a specific fix
Put these four items on the handoff sheet:
- The top's measured raw-edge width and height.
- The usable backing width and height after preparation and joining.
- The required left, right, top and bottom margins.
- The four margins at the proposed placement, with any short edge circled.
If one edge fails, name the fix: recenter within the available rectangle, add backing width, change the proposed placement or ask the quilter about an alternative. Do not conceal a short side by averaging it with an extra-wide opposite side.
Recheck after any new backing join or trimming. Keep the layers separate if the service requests that, and include the final measurements with the project.
Begin with the smallest margin today. If it falls short, fix the placement or backing before packing the layers. When all four margins pass, include the measurements and your quilter's preparation sheet with the project.
Plan your next quilt
Lay out blocks and try colors in QuiltLab's grid editor before you cut.
Free forever, no card needed.
Get quilting tips by email
QuiltLab updates, tips and quilting inspiration. Unsubscribe anytime.
Related posts
How to Reduce Quilt Backing Seam Bulk
Overlay front and backing seam positions to spot long coincidences, then discuss the actual construction with your quilter.
Write Quilt Pattern Cutting Instructions That Add Up
Separate strip capacity from required pieces, trace every label into assembly, and catch quantity mismatches before testing the pattern.
Make Your Quilt Pattern PDF Fit Letter and A4
Check both paper formats, margins and every exported page. A real two-page example shows why changing page size differs from shrinking the print.