Group Memory Quilt Instructions Contributors Can Use

Give every contributor the same short guide: what to send, its size or file requirements, the deadline, sharing choices and what happens to originals. Assign an ID to each contribution and keep its story with it. For a first group memory quilt, use one coordinator and one confirmed set of instructions so contributors do not receive conflicting answers.
Start with the intended recipient and the kind of memories the group wants to gather. A quilt of printed photographs, a quilt of sewn blocks and one using meaningful clothing need different material instructions. Choose the making method before asking someone to cut an irreplaceable item.
Agree on what the group is making
Write one sentence everyone can use: "We are collecting two memories from each of eight contributors for one shared quilt." Say whether a memory means a sewn block, a photograph, a story or a combination.
The Quilters' Guild's group-quilt planning advice asks organizers to settle participants, time, finishing, budget and dimensions. Those decisions belong near the start of a memory project too. Someone still needs to assemble, quilt and finish the work after the contributions arrive.
Name a coordinator and an assembler. They can be the same person, but make the responsibilities clear. The coordinator handles questions and incoming records; the assembler decides whether the actual material fits the agreed method and layout.
Our group quilt overview compares contribution quilts, bees and round robins if the group hasn't chosen its format yet. The guide here assumes several people are contributing to one shared keepsake.
Confirm the making method before setting dimensions
If contributors are sewing blocks, provide the actual pattern or agreed construction method, its credit, and the required raw measurement. Include a clear example of where the important design should sit. Ask people to wait for that confirmed brief before cutting.
If the assembler will print photographs, give the file and image-area requirements from the chosen print process. Ask for the best available source file and retain a copy of its identifying information. Printing a tiny screenshot at a larger size won't recover detail the file doesn't contain.
For clothing or other meaningful fabric, first ask for a description and photograph. Explain whether the assembler needs the whole item or a specific measured area. Get permission before cutting, fusing, washing or discarding any part of it.
Dimensions are specific to a project. The historical Missing People Memory Quilt instructions, for example, asked for a 15-inch raw square with a 12-inch design area. That leaves 1.5 inches on each side. Those are that program's requirements, not a universal seam allowance or a promise that the program is accepting contributions now.
Keep a copy of the exact instructions you issued. If the method or dimensions change, send a dated correction and ask contributors to confirm which version they are using. A contributor should never have to decide whether an old message or a new sketch contains the cutting size.
Put the essentials on the contributor's first page
A short guide is easier to follow when the practical answers stay together. Use these headings and fill them with your project's decisions:
- Your contribution: how many entries to send and whether each is a sewn block, image, story or named combination.
- The making instructions: the credited pattern or printing method, its current version, and the required raw size or file specification. Show the area that must remain clear around the design.
- Your IDs: which code goes on each file, envelope and accompanying story.
- Delivery: the person receiving it, how to send it and the date it must arrive. Allow for postage before that date.
- Handling and return: what the assembler may change, what must stay intact and which originals or unused pieces come back.
- Your reply: the name to use, the short story, sharing choices and a way for the coordinator to ask questions privately.
Put the coordinator's contact details on that guide. Keep contributors' addresses in the private working record. A useful first page helps someone prepare a contribution without exposing the rest of the group.
Ask permission in separate, plain choices
Permission to include a memory in the quilt is different from permission to show it publicly. Ask those questions separately.
A contributor may happily share a family photograph with the recipient while wanting it kept off a website. Another may allow a quilt photo but prefer their name to remain private. Record those choices where the coordinator can find them before sharing progress.
Use questions people can answer directly:
- May this material or image be included in the quilt?
- What name or wording should identify the contribution?
- May the story and image appear in a private book for the recipient?
- May the finished quilt or this detail be photographed for public sharing?
- Does anything need to be returned, and to whom?
Ask the contributor to confirm that they have permission to supply images or writing that belong to someone else. Leave a place for questions and restrictions. If permission is unclear, pause that use and resolve it with the relevant person.
Give every memory its own ID
For our proposed eight-contributor project, assign the contributors A through H. Each sends two memories, so the expected entries are A1, A2 through H1, H2: eight people times two entries, or sixteen records.
Use the same ID on the incoming envelope or file name, the story record and the placement map. When a contributor sends two different photographs, A1 and A2 keep their stories from being exchanged accidentally. Keep the untouched source file alongside any crop or edited copy, with the ID in both names.
The map below is a drawing for this planning example. It doesn't prescribe a sewn block, print process or cutting size.
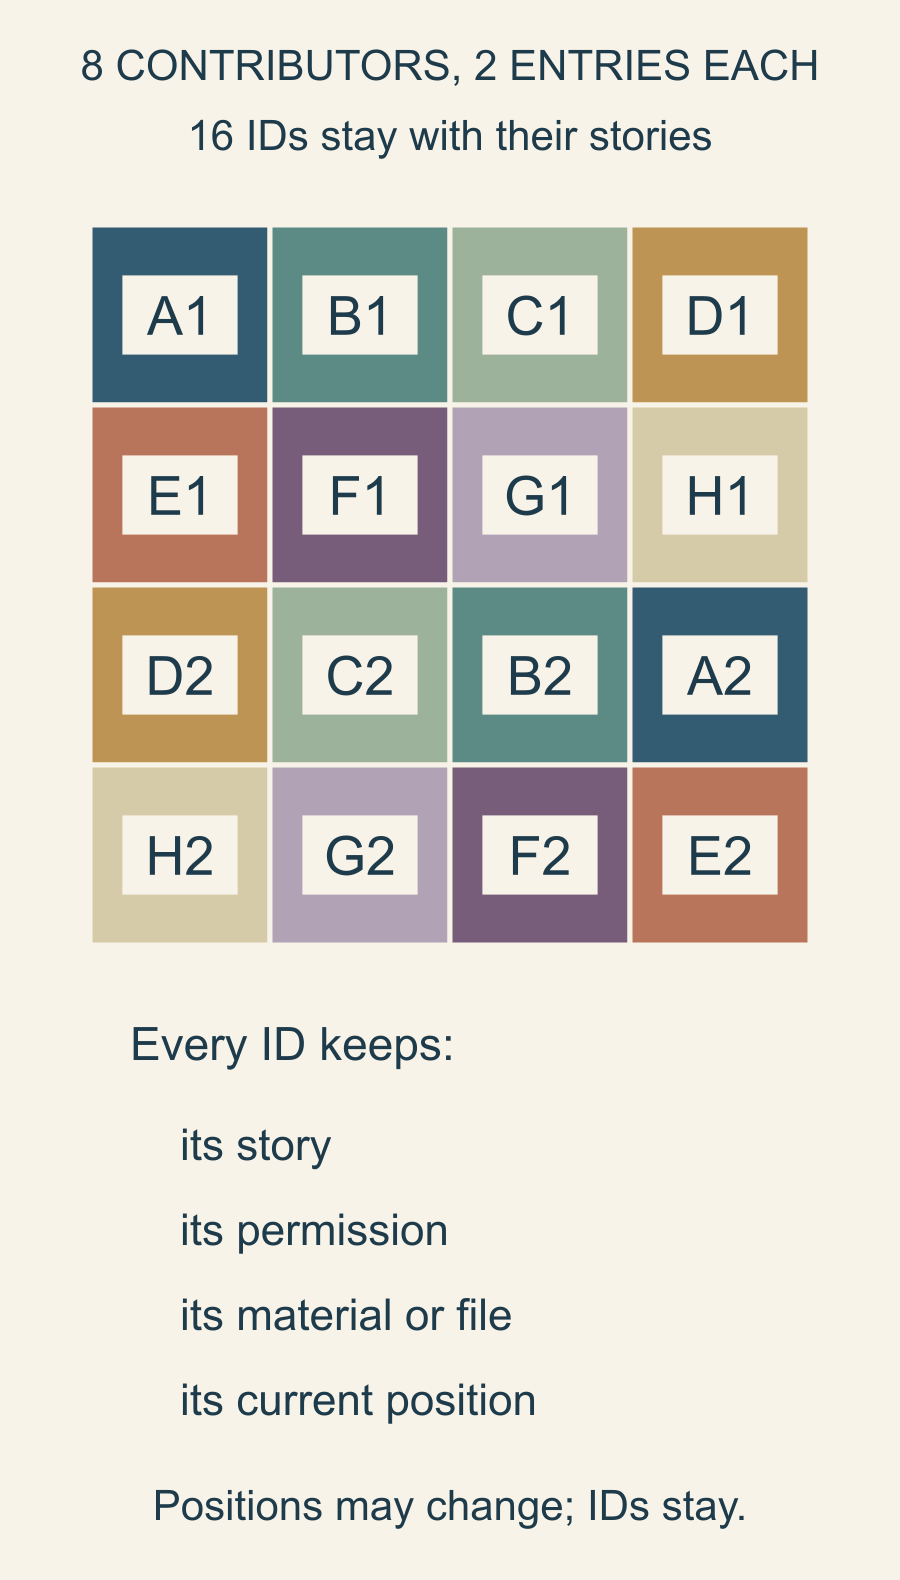
The first row holds A1, B1, C1 and D1. The second holds E1 through H1. The lower rows return through D2 to A2, then H2 to E2. Every contributor appears twice, and every entry appears once.
Those positions are provisional. You can rearrange them when the actual materials arrive while keeping the IDs attached. Moving A2 on the map doesn't change who supplied it or what may be shared.
Keep a receipt record beside the materials
Create one row per expected entry before the deadline. A missing item then stays visible instead of disappearing into a pile of envelopes.
For the example, three of the sixteen rows might read:
| Entry | Arrival check | Agreed use | Status or next action |
|---|---|---|---|
| A1 | Material and story checked | Quilt and recipient's private book | Ready |
| A2 | Material and story checked | Quilt; no public detail photo | Ready |
| H2 | Nothing received | Not yet confirmed | Contact H about delivery |
Create the other thirteen rows too. A row can stay open even after its envelope arrives; record the missing story, file or decision instead of marking the whole entry ready.
Mark a contribution complete only when its material, story and necessary permission are all present. "Envelope arrived" doesn't establish that the image file opens or that the story identifies the right person.
If H2 is missing and the other fifteen entries are complete, you have fifteen usable entries. Contact H about that gap before assembling the top. A different layout, a deliberately blank space or an agreed replacement may work. Record the chosen solution so the assembler does not quietly substitute a memory on someone else's behalf.
Keep the story short enough to use
Ask for the person's name as they want it shown, the memory's date or approximate period, and two or three sentences about why it matters. Mark a remembered date as approximate rather than turning it into an exact historical claim.
The Quilt Alliance's documentation guide connects a quilt's label, photographs and story. Its prompts are useful for deciding what context to preserve while contributors are available to explain it.
You might keep a brief public caption and a longer private account under the same ID. Ask the contributor to check edited wording, especially names, relationships and a story that has been shortened.
Our quilt-label guide helps choose the final label wording. Keep the full contribution record separately so that a small label doesn't have to carry sixteen complete stories.
Explain the handoff and return plan
Before people send anything, name the delivery method, recipient, deadline and how receipt will be confirmed. Explain who pays postage and whether the group has a plan for delayed or damaged packages.
For irreplaceable originals, agree on a safer source-copy or in-person option where practical. Record what was supplied, what the contributor allowed to change, and which unused pieces must be returned. Don't assume offcuts have no meaning to their owner.
Prepare the guide before inviting the full group. Ask one contributor to read it and explain what they would send, how they would label it and what they expect back. Compare that answer with the assembler's plan. Fix any mismatch, then issue the same guide and the sixteen contribution IDs to everyone.
Plan your next quilt
Lay out blocks and try colors in QuiltLab's grid editor before you cut.
Free forever, no card needed.
Get quilting tips by email
QuiltLab updates, tips and quilting inspiration. Unsubscribe anytime.
Related posts
Documenting a Group Quilt from Contributions to Credits
Connect contribution IDs, makers, design decisions and care notes in one record. A sixteen-unit example keeps credits separate from the head count.

Choose One Piecing Skill for Mini Quilt Practice
Practice four-patch intersections in an eighteen-inch mini. Check the cut squares, pressed rows and blocks before joining the nine-block top.
Build a Quilt Along Schedule from the Unit Count
Count the work in each release and leave time after the last block. A twenty-four-block example separates six block weeks from assembly and finish.