How to Reduce Quilt Backing Seam Bulk
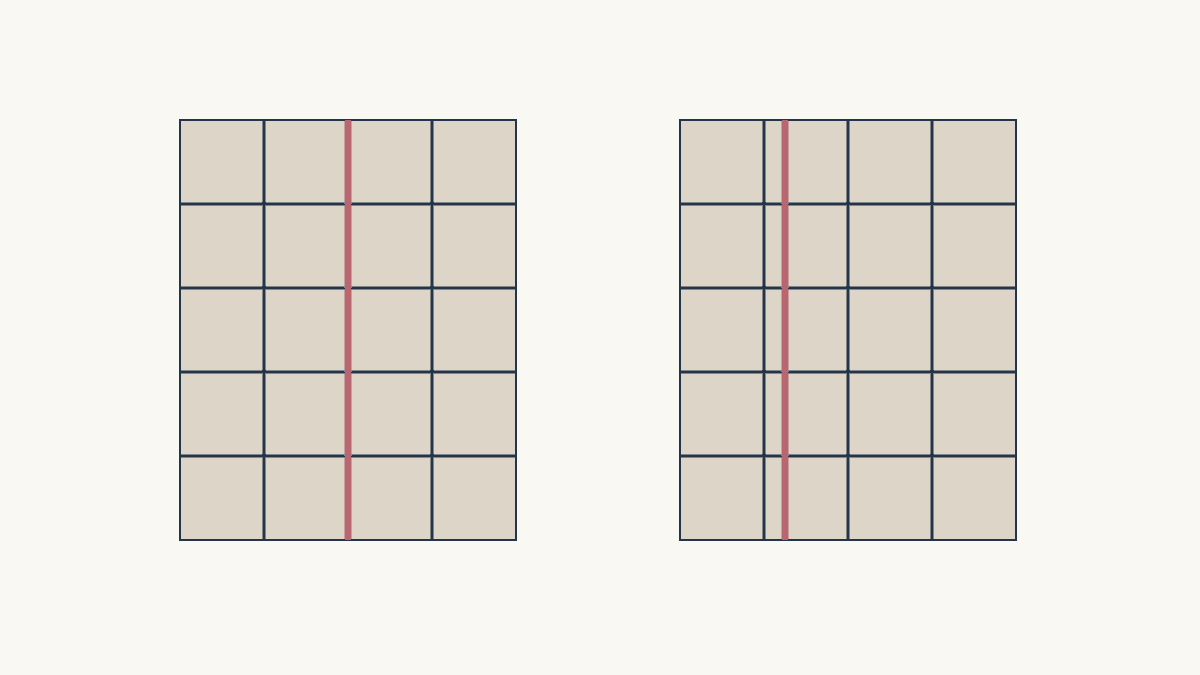
Keep backing joins simple, press new panel seams open, and avoid placing a join directly behind a long seam in the top. Dawn Cavanaugh's APQS backing guidance recommends half-inch allowances and open pressing for new backing joins. Confirm those choices with your quilter before sewing.
Then compare the front and backing seam maps from the same front-facing view. Moving a join can remove a long shared seam path while leaving shorter crossings to inspect. The example below shows exactly what changes when a centered join moves to one side.
Start with the top you have
Our example top is 48 by 60 inches. Its vertical seams run at 12, 24 and 36 inches from the left edge. Horizontal seams run at 12, 24, 36 and 48 inches from the top.
This grid gives us a clear way to compare a backing join. Your top may contain many more seams within each block, so include the important internal seams and any bulky intersections in the real map.
Jen Strauser limits patchwork in her backs partly because seams that line up on the front and back are difficult to avoid during longarm quilting. For a heavily pieced top, start with broad backing panels and a few joins. Each added backing seam creates another path to check.
A photograph with a few measured reference lines can be enough for the first comparison. Keep its top and left edges identified.
Put the backing seam in the same view
A backing drawing viewed from its own right side can reverse left and right relative to the quilt front. For this overlay, show where the backing seam lies as seen through the top from the front.
Label that view before comparing an off-center join. Otherwise, a seam intended at 15 inches from the quilt front's left edge may appear on the opposite side when the pieces are physically assembled.
Keep the intended top edge labeled on both drawings. If the backing print is directional, add its orientation to the handoff note too.
Our backing seam-direction article covers the broader relationship between a join and a quilting setup. This closer map asks which top seams share the same path.
Compare a centered join with an offset
Place a planned vertical backing join at x = 24 inches. It coincides with the top's center vertical seam for the full 60-inch top height.
Now move that join to x = 15 inches. It no longer lies on any of the top's vertical seams at 12, 24 or 36. It still crosses the four horizontal seams.
| Backing join | Parallel top-seam coincidence | Horizontal crossings |
|---|---|---|
| x = 24 in | 60 in along the center seam | 4 |
| x = 15 in | None in this drawn grid | 4 |
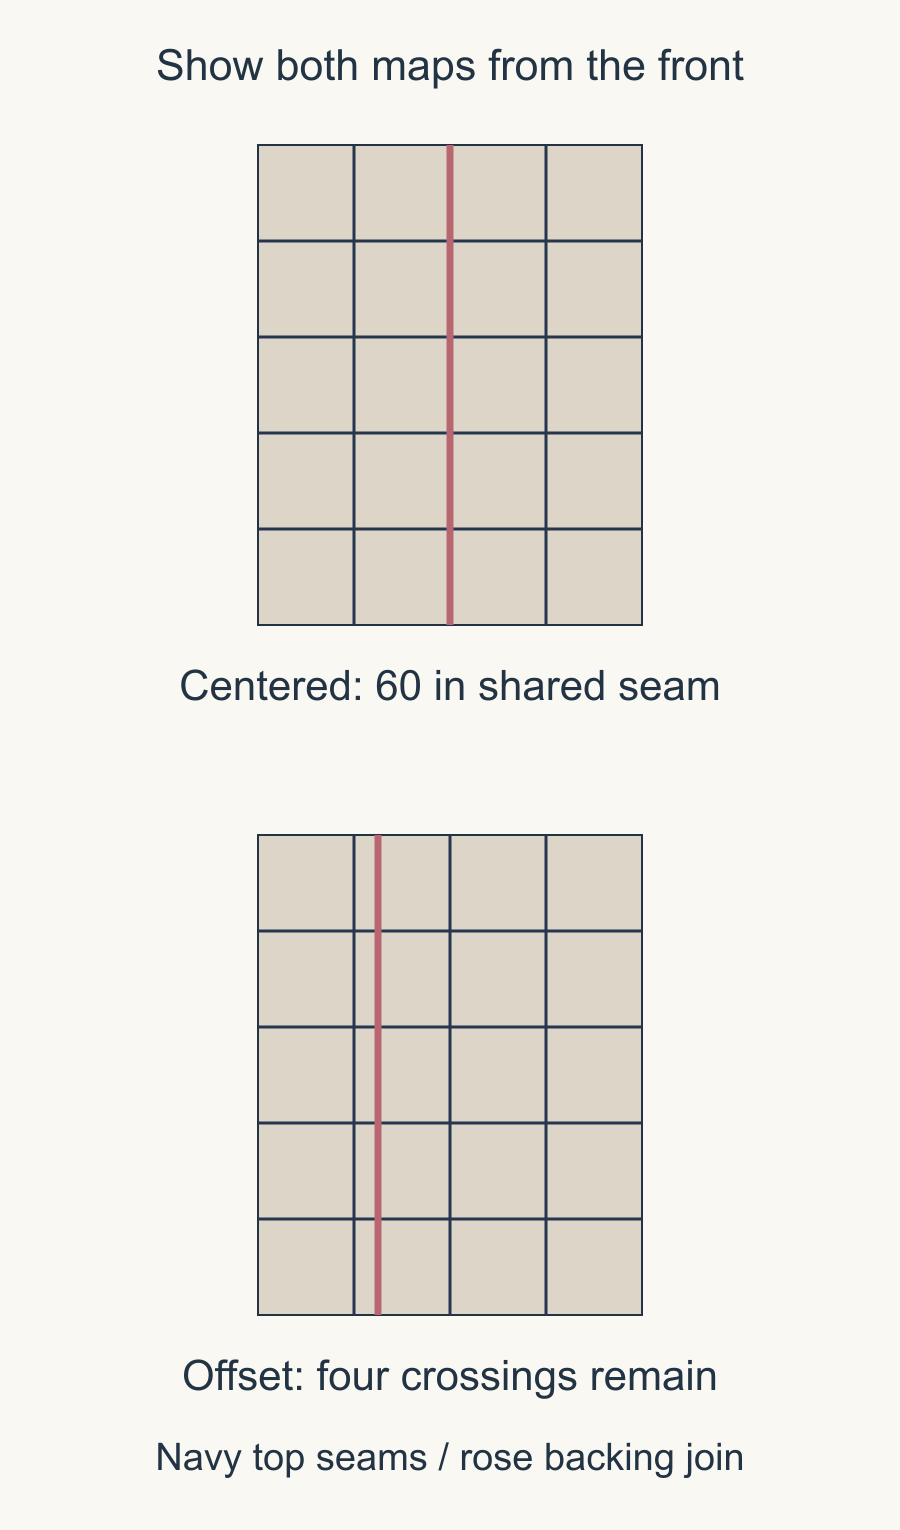
For this drawn grid, choose the offset if the fabric layout and quilter's loading plan allow it. You avoid a 60-inch shared line and have four specific crossing locations to examine. Add the block's internal seams before applying that conclusion to a real top.
Include the allowances and pressing
The stitching line is only part of the seam. Its allowances occupy fabric beside it, so draw those too. For the new half-inch backing join at x = 15, open allowances occupy the band from 14.5 to 15.5 inches across the front-view map.
Show the top's quarter-inch allowances separately. If they are pressed open, each extends a quarter inch from its stitch line. If they are pressed to one side, draw both on that side and add a pressing arrow. Two stitch lines can miss each other while their allowances still overlap.
Apply the half-inch plan to new backing-panel joins. If a backing section contains leftover blocks with existing quarter-inch seams, record those as they are. Check with the quilter whether that pieced section is suitable before adding surrounding panels.
Press each new join open and inspect the actual fabric for folded allowances or a section that won't lie flat. Use the map to locate a possible overlap, then use the layers themselves to judge it.
Inspect crossings in the real layers
At the offset line, x = 15 inches, the four horizontal crossings occur at 12, 24, 36 and 48 inches down the top. Mark those locations on the paper plan.
Then examine the corresponding areas on the actual top. A crossing through a simple two-piece seam differs from one beside several meeting points or an added embellishment.
If the quilting route also follows a seam, note that relationship. The quilter can use those details to assess the proposed path alongside the actual construction.
Our pressing comparison explains why pressing choices have their own tradeoffs. Avoid changing a completed top's pressing plan solely to make a simplified overlay look cleaner.
Ask how precisely the service can place it
A planned offset is not a guarantee that the backing seam will align at an exact distance under every part of the top. Loading, quilting and the service's working method matter.
The Quilting Studio's preparation page explicitly says it cannot guarantee centering a pieced backing. That is a useful limit to discuss before designing a seam whose success depends on exact front/back registration.
Show the quilter the map and ask whether the proposed join direction, position and allowances suit their setup. If they request a change, revise the backing pieces while they are still separate.
Keep sufficient backing size as a separate requirement. Moving a seam should not quietly reduce the overhang needed for loading.
Make a useful handoff sheet
Record the top size, front-view orientation, major seam positions and planned backing join. Add the actual allowance and pressing notes, plus any location with unusually dense piecing.
Attach a photograph of the back of the top if it helps explain the layers. A simple marked image can communicate more than a statement that the back is "off-center."
Choose the arrangement that avoids an unnecessary long coincidence while still meeting the quilter's requirements and the fabric's practical cutting plan. Then inspect the remaining crossings in the actual materials.
Start with the longest top seam today. Draw the proposed backing join over it, try one measured offset and mark the crossings that remain. Take that map and the actual layers to your quilter before cutting or joining the backing panels.
Plan your next quilt
Lay out blocks and try colors in QuiltLab's grid editor before you cut.
Free forever, no card needed.
Get quilting tips by email
QuiltLab updates, tips and quilting inspiration. Unsubscribe anytime.
Related posts
Group Memory Quilt Instructions Contributors Can Use
Tell contributors what to send, what may be shared and how their materials will be returned. A sixteen-entry map keeps each memory tied to its maker.
Documenting a Group Quilt from Contributions to Credits
Connect contribution IDs, makers, design decisions and care notes in one record. A sixteen-unit example keeps credits separate from the head count.
Choose One Piecing Skill for Mini Quilt Practice
Practice four-patch intersections in an eighteen-inch mini. Check the cut squares, pressed rows and blocks before joining the nine-block top.