How to Print Applique Templates at Actual Size
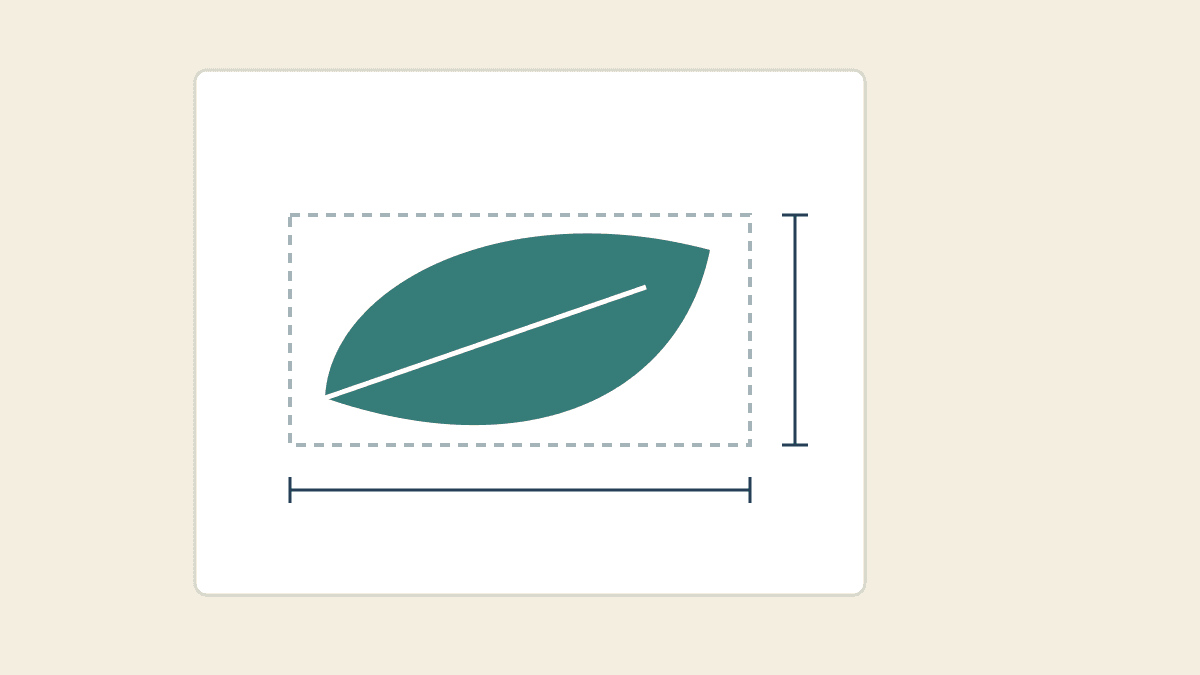
Print a supplied applique PDF at Actual size, then measure its reference shape across and down before printing more copies. Unless the pattern specifies another scale, start at 100%. A correct width alone doesn't confirm the height, and a complete shape on the page can still be the wrong size.
Start with the template's stated dimensions
Open the saved PDF itself. Find the page labeled as the template and read its printing notes. A small picture in the instructions may be a placement guide rather than the full-size outline you should trace.
Wendi Gratz's digital-pattern guide recommends printing at 100% unless the instructions say otherwise. She also points out that the scale controls look different on different computers and printers. Follow the maker's intended dimensions first; use the setting that preserves them.
Look for a labeled test square, rectangle or known horizontal and vertical spans in that file. Write down what each should measure. A box marked one inch needs a one-inch result, even if another pattern you used had a two-inch box.
If there are no stated measurements, ask the designer which feature to check. The apparent size on your screen gives you no reliable paper dimension. Enlarging a screenshot until it looks right also loses the connection to the supplied PDF's intended size.
Choosing which way the applique faces is a separate decision. Our applique mirroring lesson covers front views and wrong-side transfers. Settle that using the pattern's instructions, then check scale on the version you will actually print.
Choose the PDF's actual-size print option
For a concrete example, Adobe's current desktop Acrobat instructions name these controls:
- Open the document and select Print this file.
- In the Print dialog, choose Size under Page Sizing & Handling.
- Select Actual size for an unscaled copy.
- Select the page you need to check, review the preview and print that page first.
The neighboring choices do different jobs:
| Option | Effect on the PDF |
|---|---|
| Actual size | Preserves scale; content outside the paper can be cropped |
| Fit | Enlarges or reduces the page to the printable area |
| Shrink oversized pages | Reduces large pages, leaving smaller pages unexpanded |
| Custom Scale | Applies the percentage you enter |
For a supplied full-size template, start with Actual size. A 100% screen zoom controls your view, not the print scale. Check the print dialog even when the page looks comfortably sized on screen.
Measure two directions on the paper
Lay the printed page flat and use a ruler with clear markings. Measure the maker's reference between the stated endpoints. Keep your measuring convention consistent if a thick outline makes an edge ambiguous; ask the designer which edge is intended when necessary.
Check the horizontal span, then the vertical span. Record both before deciding whether to continue. For a square, equal sides are part of the check, not a reason to skip the second direction.
Sulky of America's eight-inch circle template, for example, includes a square explicitly labeled to measure one by one inch after printing. That reference belongs to that PDF. Use your own template's printed reference rather than assuming the size of an unrelated box.
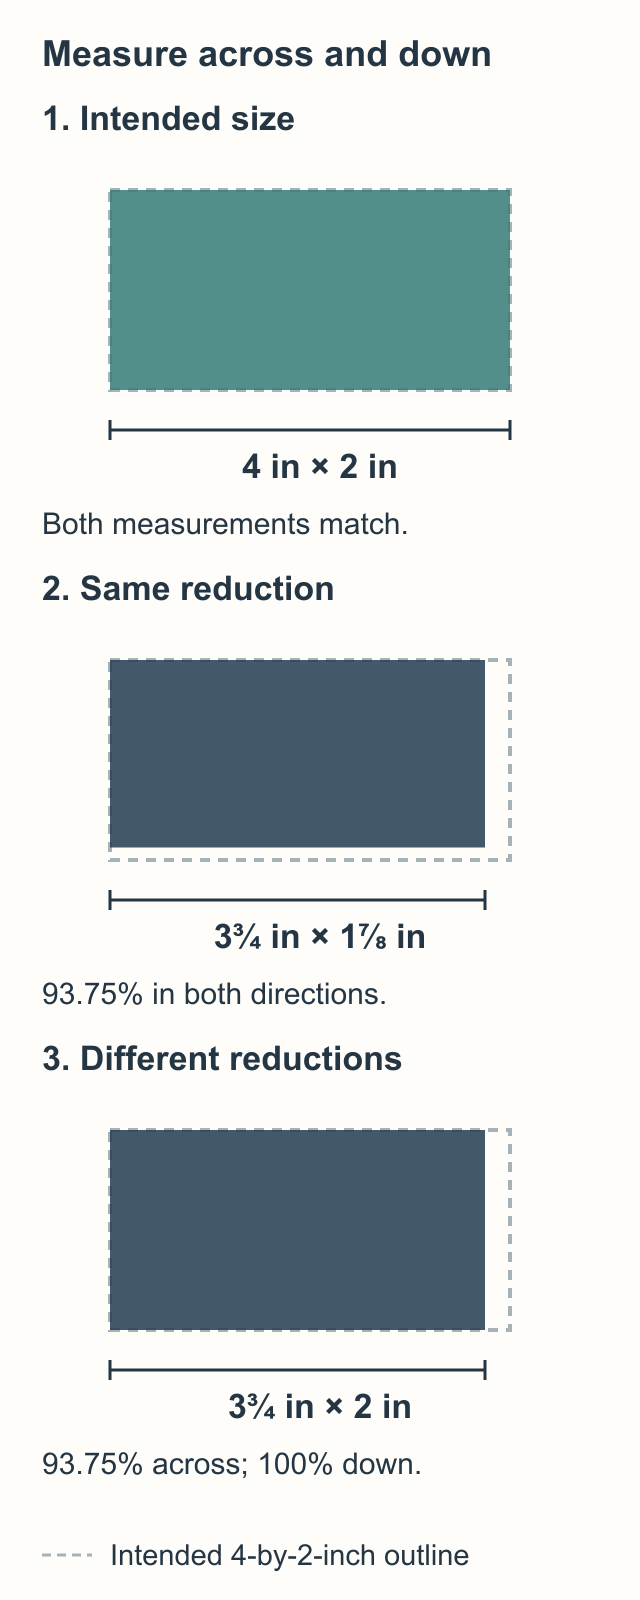
The example below uses a four-by-two-inch reference rectangle so the two directions are easy to distinguish. We drew these examples for this lesson; they aren't physical print tests or cutting templates.
Work through a copy that prints too small
Suppose the reference should measure 4 inches wide and 2 inches high. Your ruler gives 3-3/4 inches wide and 1-7/8 inches high.
Both directions have the same reduction:
- Width: 3.75 divided by 4 is 93.75%.
- Height: 1.875 divided by 2 is 93.75%.
The proportions are right, but the size is wrong. In this example the reference is a quarter inch short across and an eighth inch short down. If you centered it over the intended rectangle, that would leave an extra eighth inch at each side and a sixteenth at top and bottom.
First return to the PDF print settings and check for an active fit, shrink or custom percentage. Choose Actual size, print one page again and measure both spans again. Keep the source file, app and printer the same while you change the setting, so you can tell which change helped.
If the new result still misses the stated dimensions, keep the two measurements with your settings notes. Recheck the file's intended dimensions with its maker and consult the printer's documentation for additional scaling controls. Printing more copies repeats the unresolved result.
What if only one direction matches?
Now suppose the same four-by-two-inch reference prints 3-3/4 inches wide but 2 inches high. The horizontal ratio is 93.75%, while the vertical ratio is 100%.
A single enlargement percentage cannot correct both. Enlarging enough to restore the four-inch width would make the height about 2.13 inches. You would fix one measurement while spoiling the other.
Go back through the check in order:
- Confirm that you measured the correct horizontal and vertical reference spans.
- Recheck the intended dimensions in the supplied file.
- Print again with the documented unscaled setting.
- If the axes still disagree, bring the PDF, measurements and settings to the designer or printer support.
These numbers describe the mismatch; they don't identify a particular hardware fault. Avoid stretching the artwork in one direction just to make the box pass. That changes the template's shape and can change how its pieces meet.
Keep clipping separate from scaling
An actual-size copy can measure correctly and still have part of the template missing near an edge. Adobe documents that content which doesn't fit the paper can be cropped at Actual size. Selecting Fit may reveal the missing part by reducing the whole page, which would change the dimensions you just checked.
Inspect the full outline as well as the reference. Are all points, labels and any required alignment marks present? A correct central check box doesn't restore a clipped leaf tip.
If the complete template won't fit, use the designer's instructions for the correct file or larger-sheet printing. Tell a print shop the intended dimensions and ask to check the first copy. Resolve the template's size and completeness before cutting it out.
Keep the confirmed copy with its settings
Once both axes match and the outline is complete, label the paper with the template name and intended size. Note the PDF version, app, printer and scale choice. Keep that checked copy beside the remaining prints so you can compare them before transferring the shapes.
Recheck when you change the file or printing setup. A measurement from yesterday's PDF doesn't confirm a different download today.
If you are still turning a photo into a simplified outline, our photo-to-applique guide covers that earlier design work. For a template you already have, start with one page now: choose Actual size, measure across, measure down, and confirm the complete outline before moving to fabric.
Plan your next quilt
Lay out blocks and try colors in QuiltLab's grid editor before you cut.
Free forever, no card needed.
Get quilting tips by email
QuiltLab updates, tips and quilting inspiration. Unsubscribe anytime.
Related posts
Rounded Quilt Corners: Will Your Motif Survive?
Compare two corner radii against nearby motifs before trimming, then plan a consistent curve and suitable binding method.
Lightweight Quilt Batting: Check Care First
Write the coverlet’s care requirements, check the exact batting limits, and test the finished combination before calling it lightweight.
Quilting Negative Space: Extend, Fill or Echo
Compare three quilting approaches on one fixed quilt layout, then count the lines and check the open areas.