How to Rotate and Flip Quilt Blocks
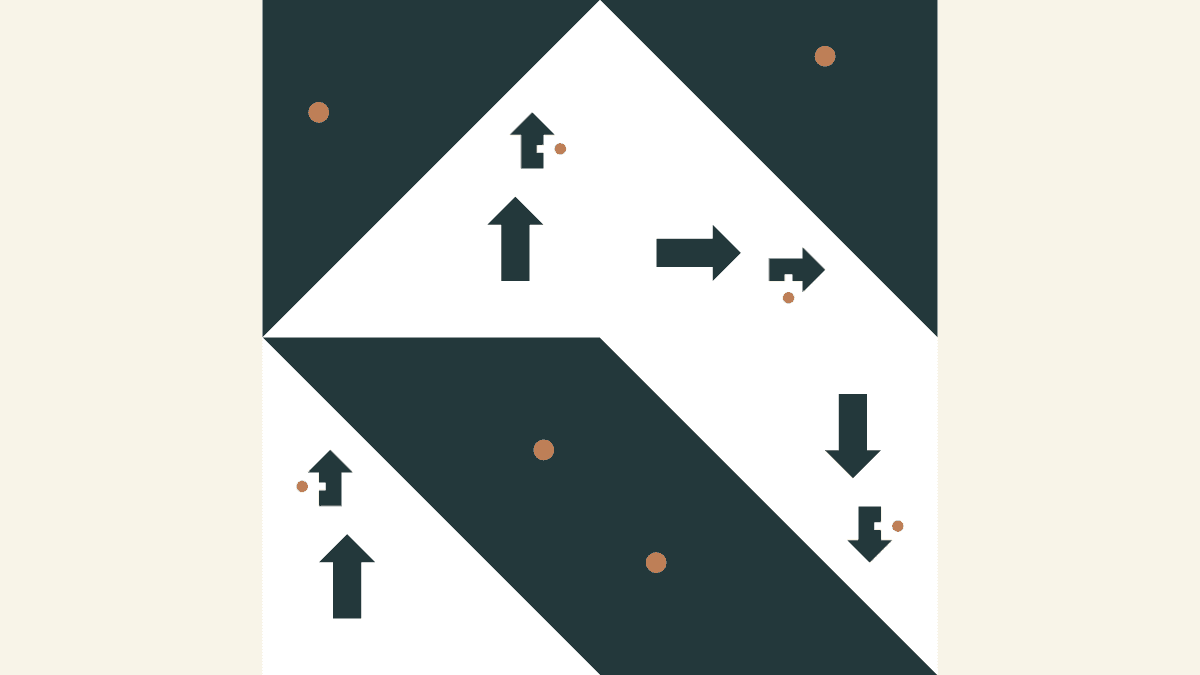
Rotate a quilt block when you want to turn its design. Flip it when you want a mirror image. A quarter-turn changes which way an arrow points; a horizontal flip can leave that arrow pointing up while moving its notch from right to left. For an asymmetric block, compare both a direction and a side detail before choosing the operation.
Start with one selected block and one change. That makes it easier to spot an unintended reflection before repeating the arrangement across a quilt.
Give yourself two details to follow
A centered square looks the same after many turns and flips. Even a plain upward arrow hides part of the difference: a horizontal reflection leaves it pointing up. Add a mark on one side and the mirror becomes visible.
Dartmouth's mathematics and art lesson on symmetry distinguishes rotation, which turns a motif, from reflection, which reverses it like a mirror. Its printing exercise deliberately starts with an asymmetric design. That is useful advice for checking a quilt layout too.
Our October 24, 2026 digital check used one six-inch block in four positions. The block contained a navy triangle, a warm round mark and a large navy arrow. Its background carried a separate small upward arrow with a notch on the right and a rust dot beside it. We authored that directional image for this example; it is not a fabric photograph or a sewn sample.
Follow the small arrow's point and its dot. Then check the larger arrow and the triangle separately. This reveals whether you changed the whole block or only something inside it. We repeated the three placement controls on November 5 with the same directional image in a fresh asymmetric practice block; its reopened export kept all four orientations.
Read the four saved results
We placed four copies in a two-column, two-row Quilt Editor layout. At six inches per block, the finished design field was 12 by 12 inches. Each altered placement started from the same baseline; the operations were not accumulated on one copy.
| Position | One change from baseline | Small arrow points | Dot sits |
|---|---|---|---|
| Top left | None | Up | Right |
| Top right | Clockwise quarter-turn | Right | Below |
| Bottom left | Horizontal flip | Up | Left |
| Bottom right | Vertical flip | Down | Right |
The horizontal flip is the easiest one to miss. Its small arrow still points up, but the notch and dot have moved to the left. The triangle and larger arrow also mirror across the block's vertical centerline.
The vertical flip exchanges top and bottom. Its small arrow points down, with the dot still to its right. That differs from an ideal half-turn: turning the original arrow 180 degrees would put the dot on the left. An arrow's direction alone cannot identify every transformation.
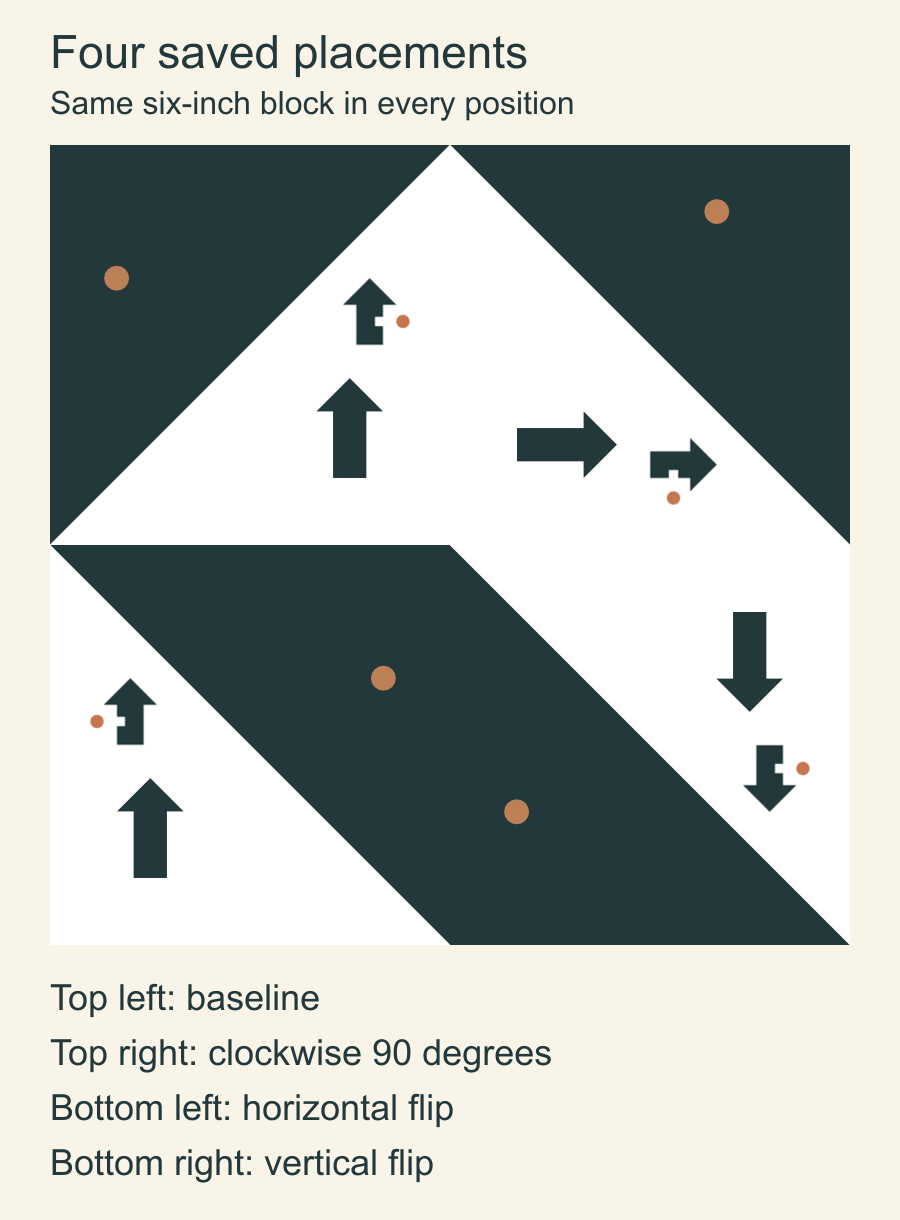
The exported pattern images decoded to the exact pixels of our input. The saved layout, reopened canvas and exported drawing agreed on all four orientations. This checks this directional example; it does not decide which arrangement suits your own quilt.
Use a six-inch point check when the picture feels ambiguous
You can track one point without mentally turning the whole block. Put the origin at the block's upper-left corner. Measure x to the right and y downward, in finished design inches.
The warm mark in our block is centered at (1, 2): one inch from the left and two inches from the top. A six-inch square gives these ideal mappings:
| Change | Point rule | New point | What stays fixed |
|---|---|---|---|
| Clockwise 90 degrees | (6 - y, x) | (4, 1) | Distance from center |
| Horizontal flip | (6 - x, y) | (5, 2) | Height from top |
| Vertical flip | (x, 6 - y) | (1, 4) | Distance from left |
For the quarter-turn, the original two-inch distance from the top becomes a two-inch distance from the right: 6 - 2 = 4. The original x distance becomes the new y distance, so the point lands at (4, 1).
For a horizontal flip, one inch from the left becomes one inch from the right: 6 - 1 = 5. The height stays two inches. A vertical flip instead keeps x at one and changes y to 6 - 2 = 4.
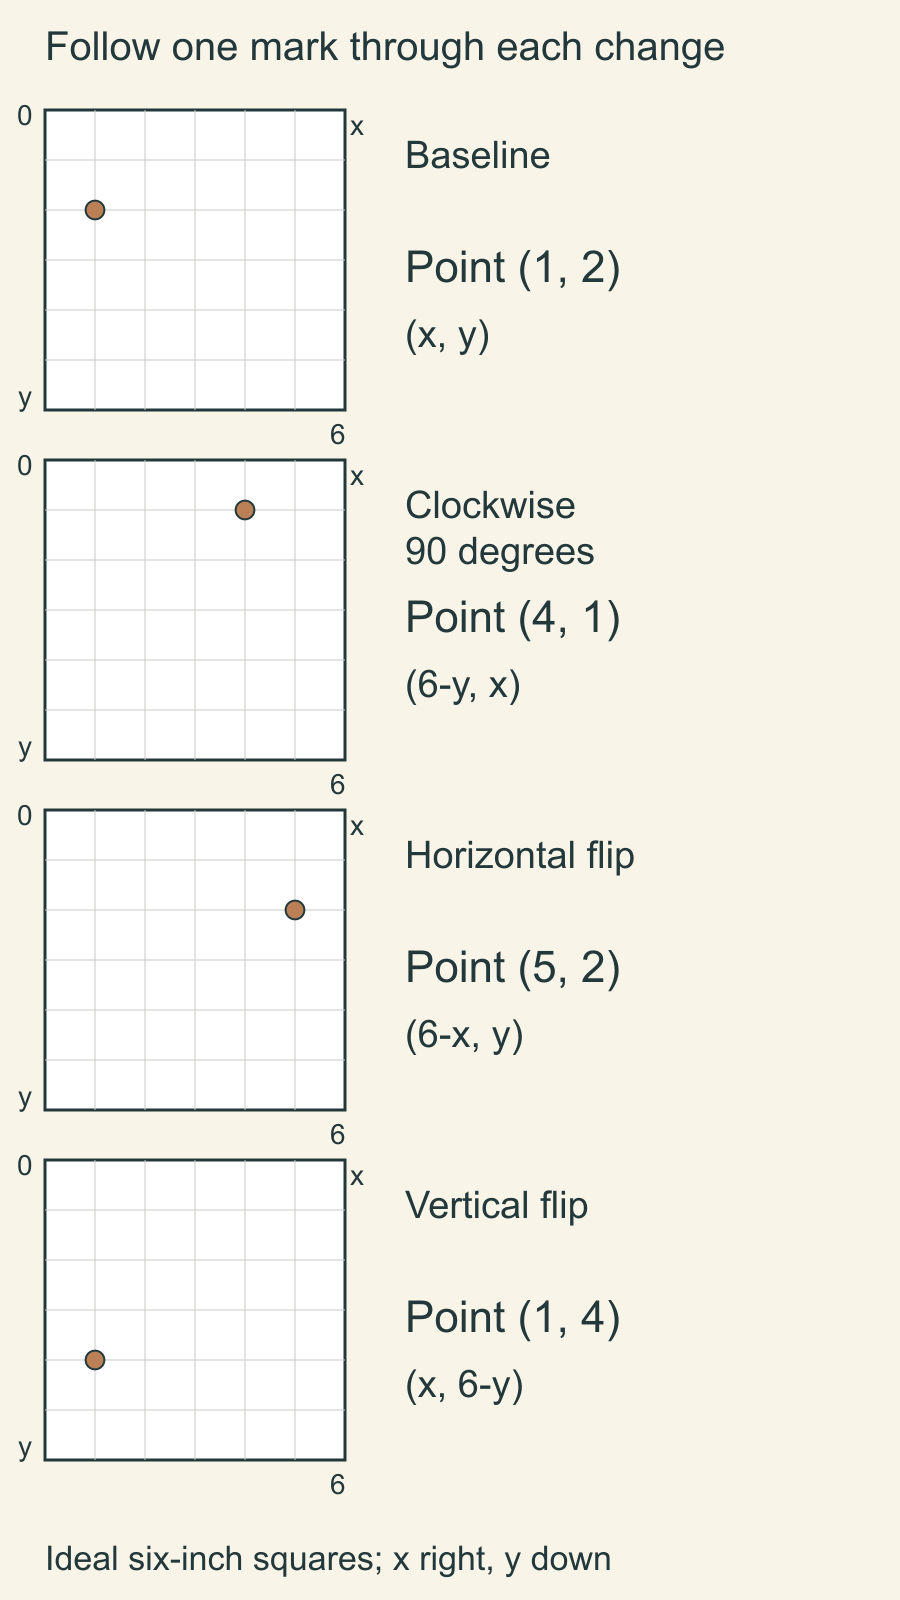
Use a point away from both centerlines. A mark at (3, 3) stays in the center under all three operations and tells you very little. For another block size, replace six in the rules with that square's side length.
Select a placed block before using Transform
In QuiltLab, open the layout and select one placed block. In Properties, find Transform, then choose Rotate clockwise, Flip horizontal or Flip vertical. Our quarter-turn used one Rotate clockwise action; the flips each used one action on their own baseline copy.
These are Quilt Editor placement controls. The Block Editor's Draw panel has separate buttons for rotating selected shapes by 15 degrees. Moving a piece inside a block answers a different question from turning the complete block in a layout. The Block Editor guide explains preparing and reusing the source block.
Check the selection before every change. Working with one block keeps this comparison about its orientation. Once you understand the result, decide whether to repeat it elsewhere.
Save the quilt, wait for Saved, and reopen the same named design. Look at the full layout again. Our Quilt Editor guide covers the grid and saving workflow. A saved badge is useful; the reopened arrangement is the view you will use for the next decision.
Check the print separately from the block outline
Maria at Scissortail Quilting describes a directional print as a design that visibly faces one way. Turning it can leave the motif sideways or upside down. That is why a correct triangle arrangement can still contain an unexpected print direction.
In our example, the background image follows the placed block through the turn or reflection. The small arrow and its dot change along with the larger geometry. If you want a motif to remain upright while a block turns, plan that motif's starting orientation separately. Our directional-fabric cutting guide works through that task with actual cutting choices; it is a separate step from choosing a mirror-image block layout.
After checking individual blocks, step back and look at the whole field. The Canadian Quilters Association's design principles connect motif direction with the quilt's overall orientation, while allowing exceptions. Decide whether your motifs should point inward, follow a path or remain upright. Then use the transformation that produces that choice.
For arrangements built only from half-square triangles, our HST layout maps show how repeated corner orientations make pinwheels, chevrons and diamonds. Here the notch and dot add the information a simple two-color triangle cannot show.
Keep one baseline picture beside your preferred variation. Record the block position and the exact turn or flip, then compare both its outline and its directional details. Before cutting a mirrored version, make sure the pattern's piece layout and construction instructions match the design you chose.
Plan your next quilt
Lay out blocks and try colors in QuiltLab's grid editor before you cut.
Free forever, no card needed.
Get quilting tips by email
QuiltLab updates, tips and quilting inspiration. Unsubscribe anytime.
Related posts
Make Your Quilt Pattern PDF Fit Letter and A4
Check both paper formats, margins and every exported page. A real two-page example shows why changing page size differs from shrinking the print.
How to Sell Quilt Patterns as PDFs Without Mix-Ups
Start with PDF downloads. List exactly what buyers get, test the download as a buyer, and keep one place for corrections, with a three-file worked example.
How to Write a Quilt Pattern Someone Else Can Sew
A pattern needs a finished size, materials, cutting, block steps and assembly. Plan the pages, check the math, draw each step and test it before release.