


Two-Color Quilt Design: Which Color Should Be the Background?
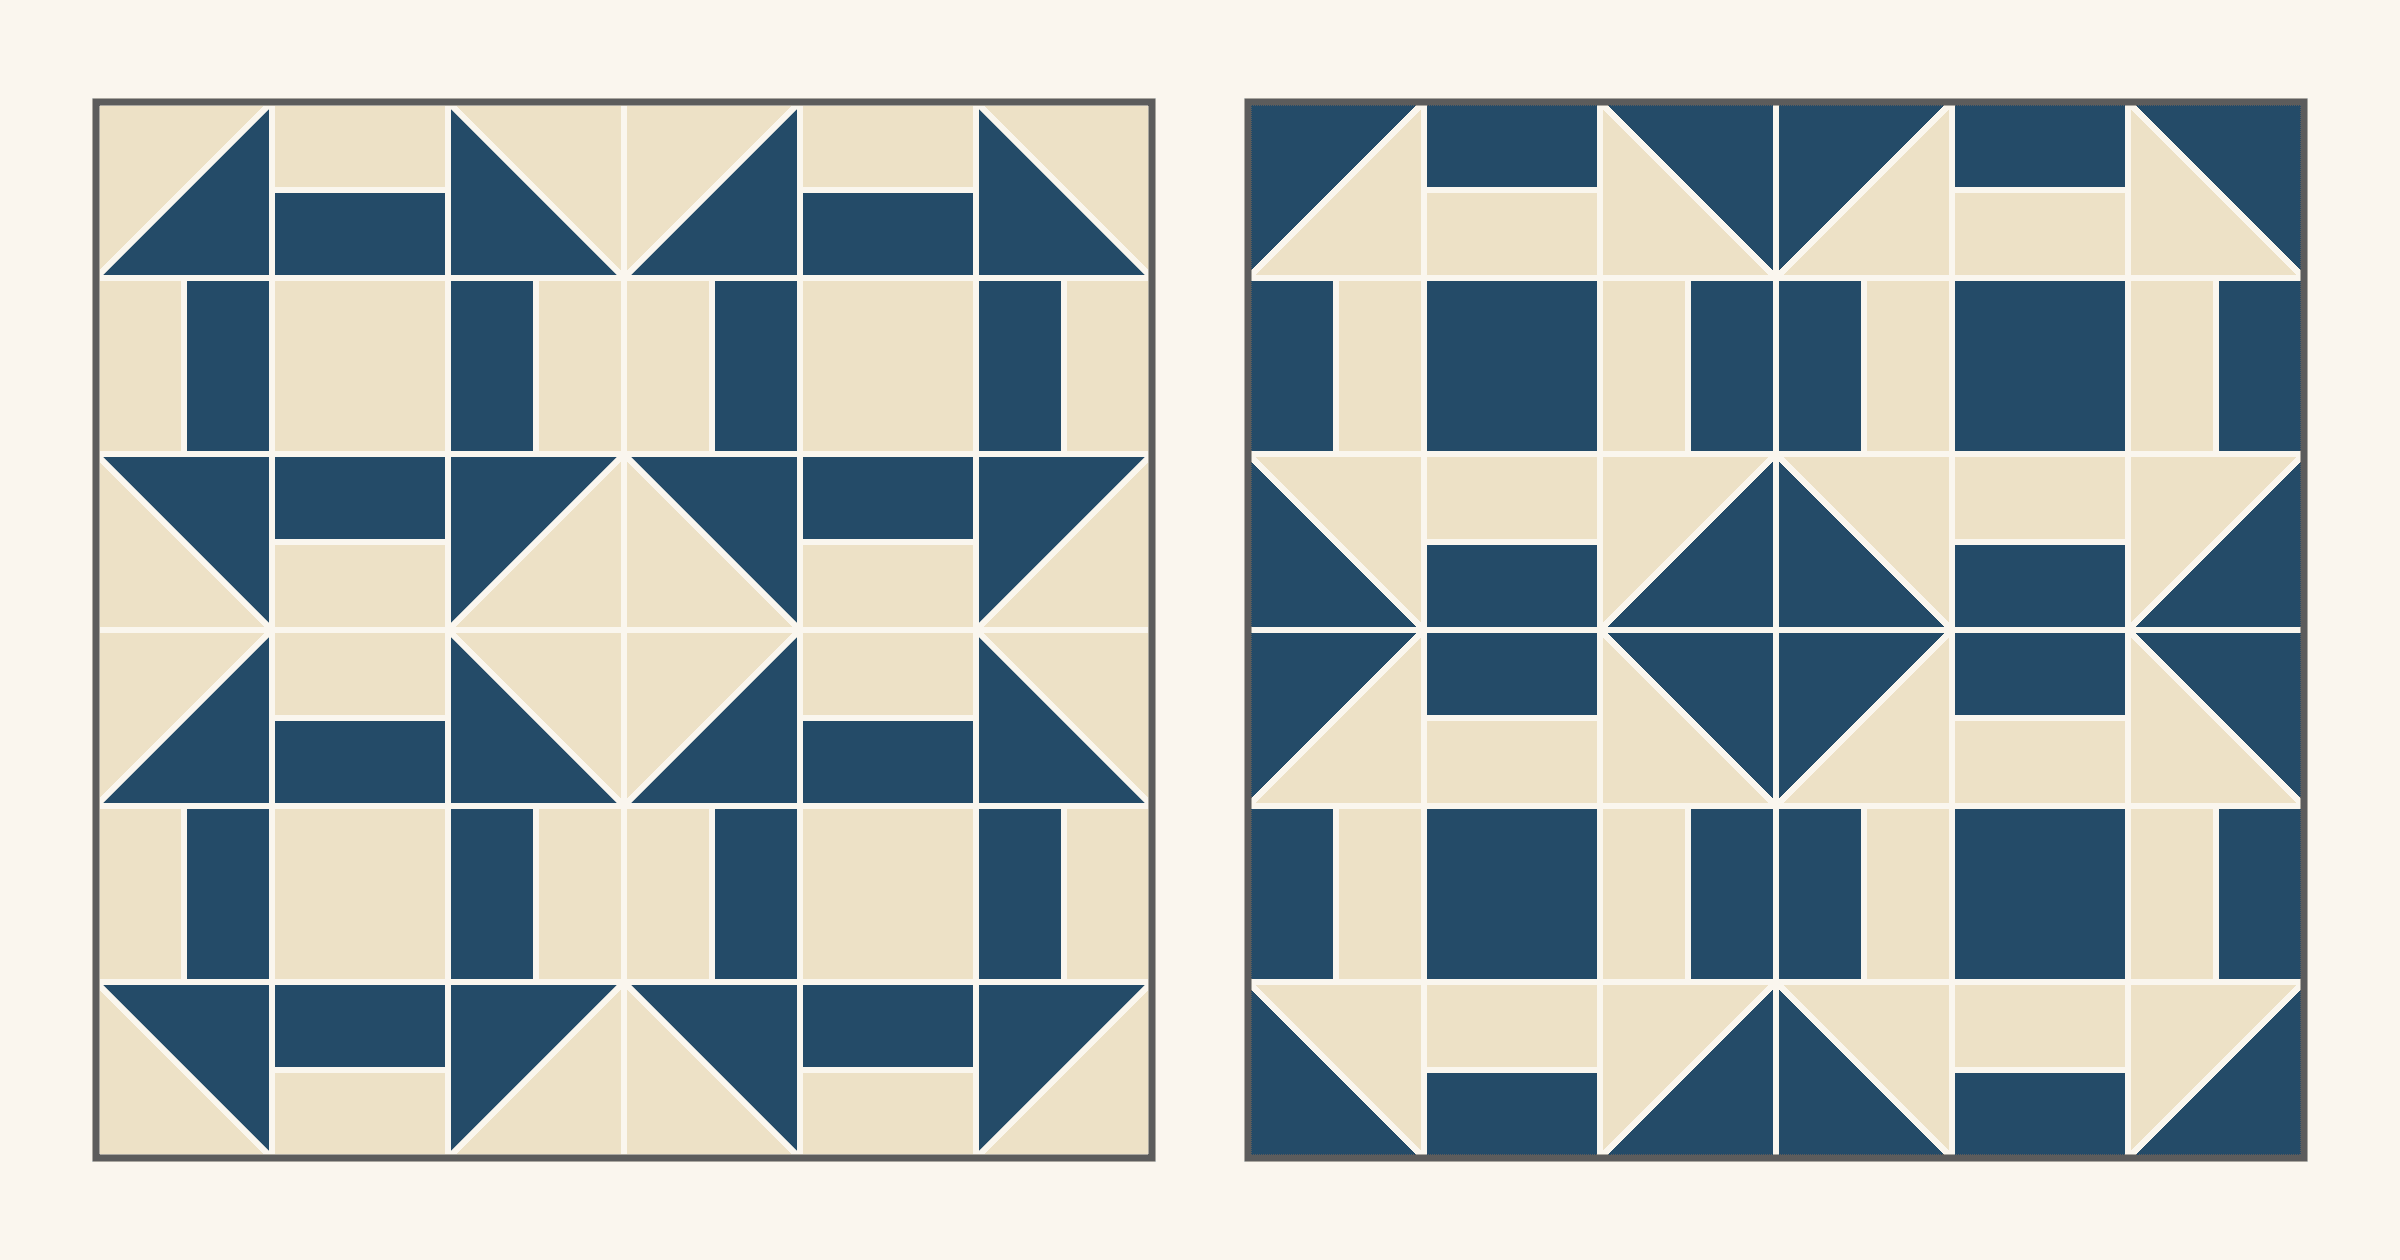
In most two-color quilts, the lighter fabric is the background and the darker one draws the pattern. That's the classic arrangement. The Briscoe Center for American History describes two-color quilts as "usually made with pieces of a single solid-color fabric sewn onto a white background," and names blue-and-white and red-and-white as the two most popular pairs.
For a first two-color quilt, put the lighter fabric in the background. Our rule of thumb is to keep the two fabrics at least 4 steps apart on a 0-to-10 value scale, where 0 is black and 10 is white. Swap the two roles and the same blocks make a different quilt, so it's worth comparing before you cut. Below, one 12-inch Churn Dash block in a 48-inch quilt shows three ways to assign the roles and four ways to space the values.
Two colors, two jobs
Every two-color quilt has two jobs to fill. One fabric makes the figure, the shapes you want people to see. The other makes the background around them. Most of the design decisions come down to which fabric gets which job and how strongly the two separate.
The example block is a Churn Dash. QuiltLab's block library describes it as a nine-patch with half-square-triangle corners and two-strip side units. The dark halves turn toward a light center square and form a square frame with pointed corners. At 12 inches finished, each of the nine units is 4 inches, and each side unit is two 2 x 4-inch strips.
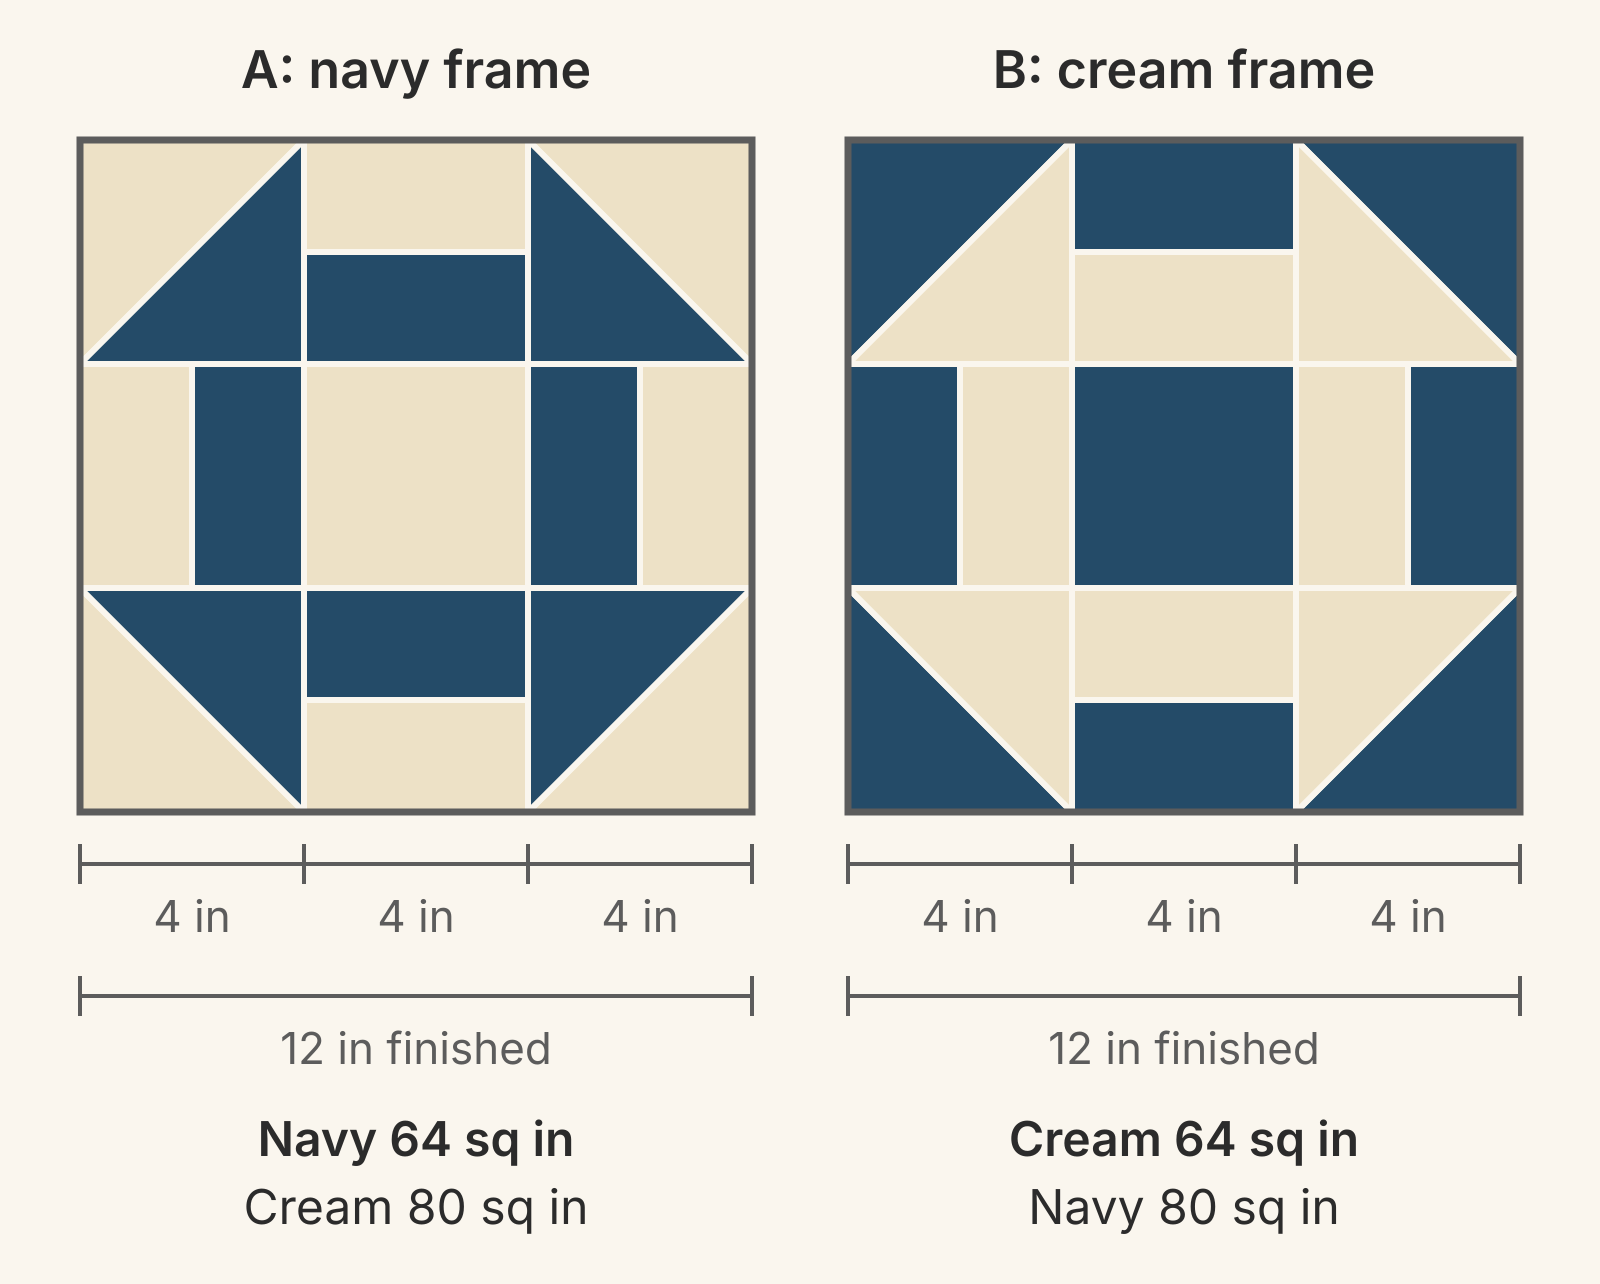
We drew these diagrams for this article and haven't sewn them. They use screen colors, so your fabrics will look different in daylight.
A two-color quilt doesn't have to use only two fabrics. A blue-and-white quilt can use a dozen blues from your scrap bin, as long as each role holds together. If you mix several blues for the figure, keep them close in value to each other and well away from the background. Our low volume fabric guide sorts a pile of light prints into background and shape groups the same way.
What changes when you swap the roles
Two colors leave plenty of room. In 2011, more than 650 of Joanna S. Rose's red-and-white quilts filled the Park Avenue Armory in New York for "Infinite Variety: Three Centuries of Red and White Quilts," according to the International Quilt Museum, which now holds the collection. Block, setting and role assignment do the work a large palette does in other quilts.
Here are three plans for the same 16 blocks set 4 x 4, with no sashing or border, for a 48 x 48-inch top. The table adds up each plan's areas and notes what stood out to us in each drawing.
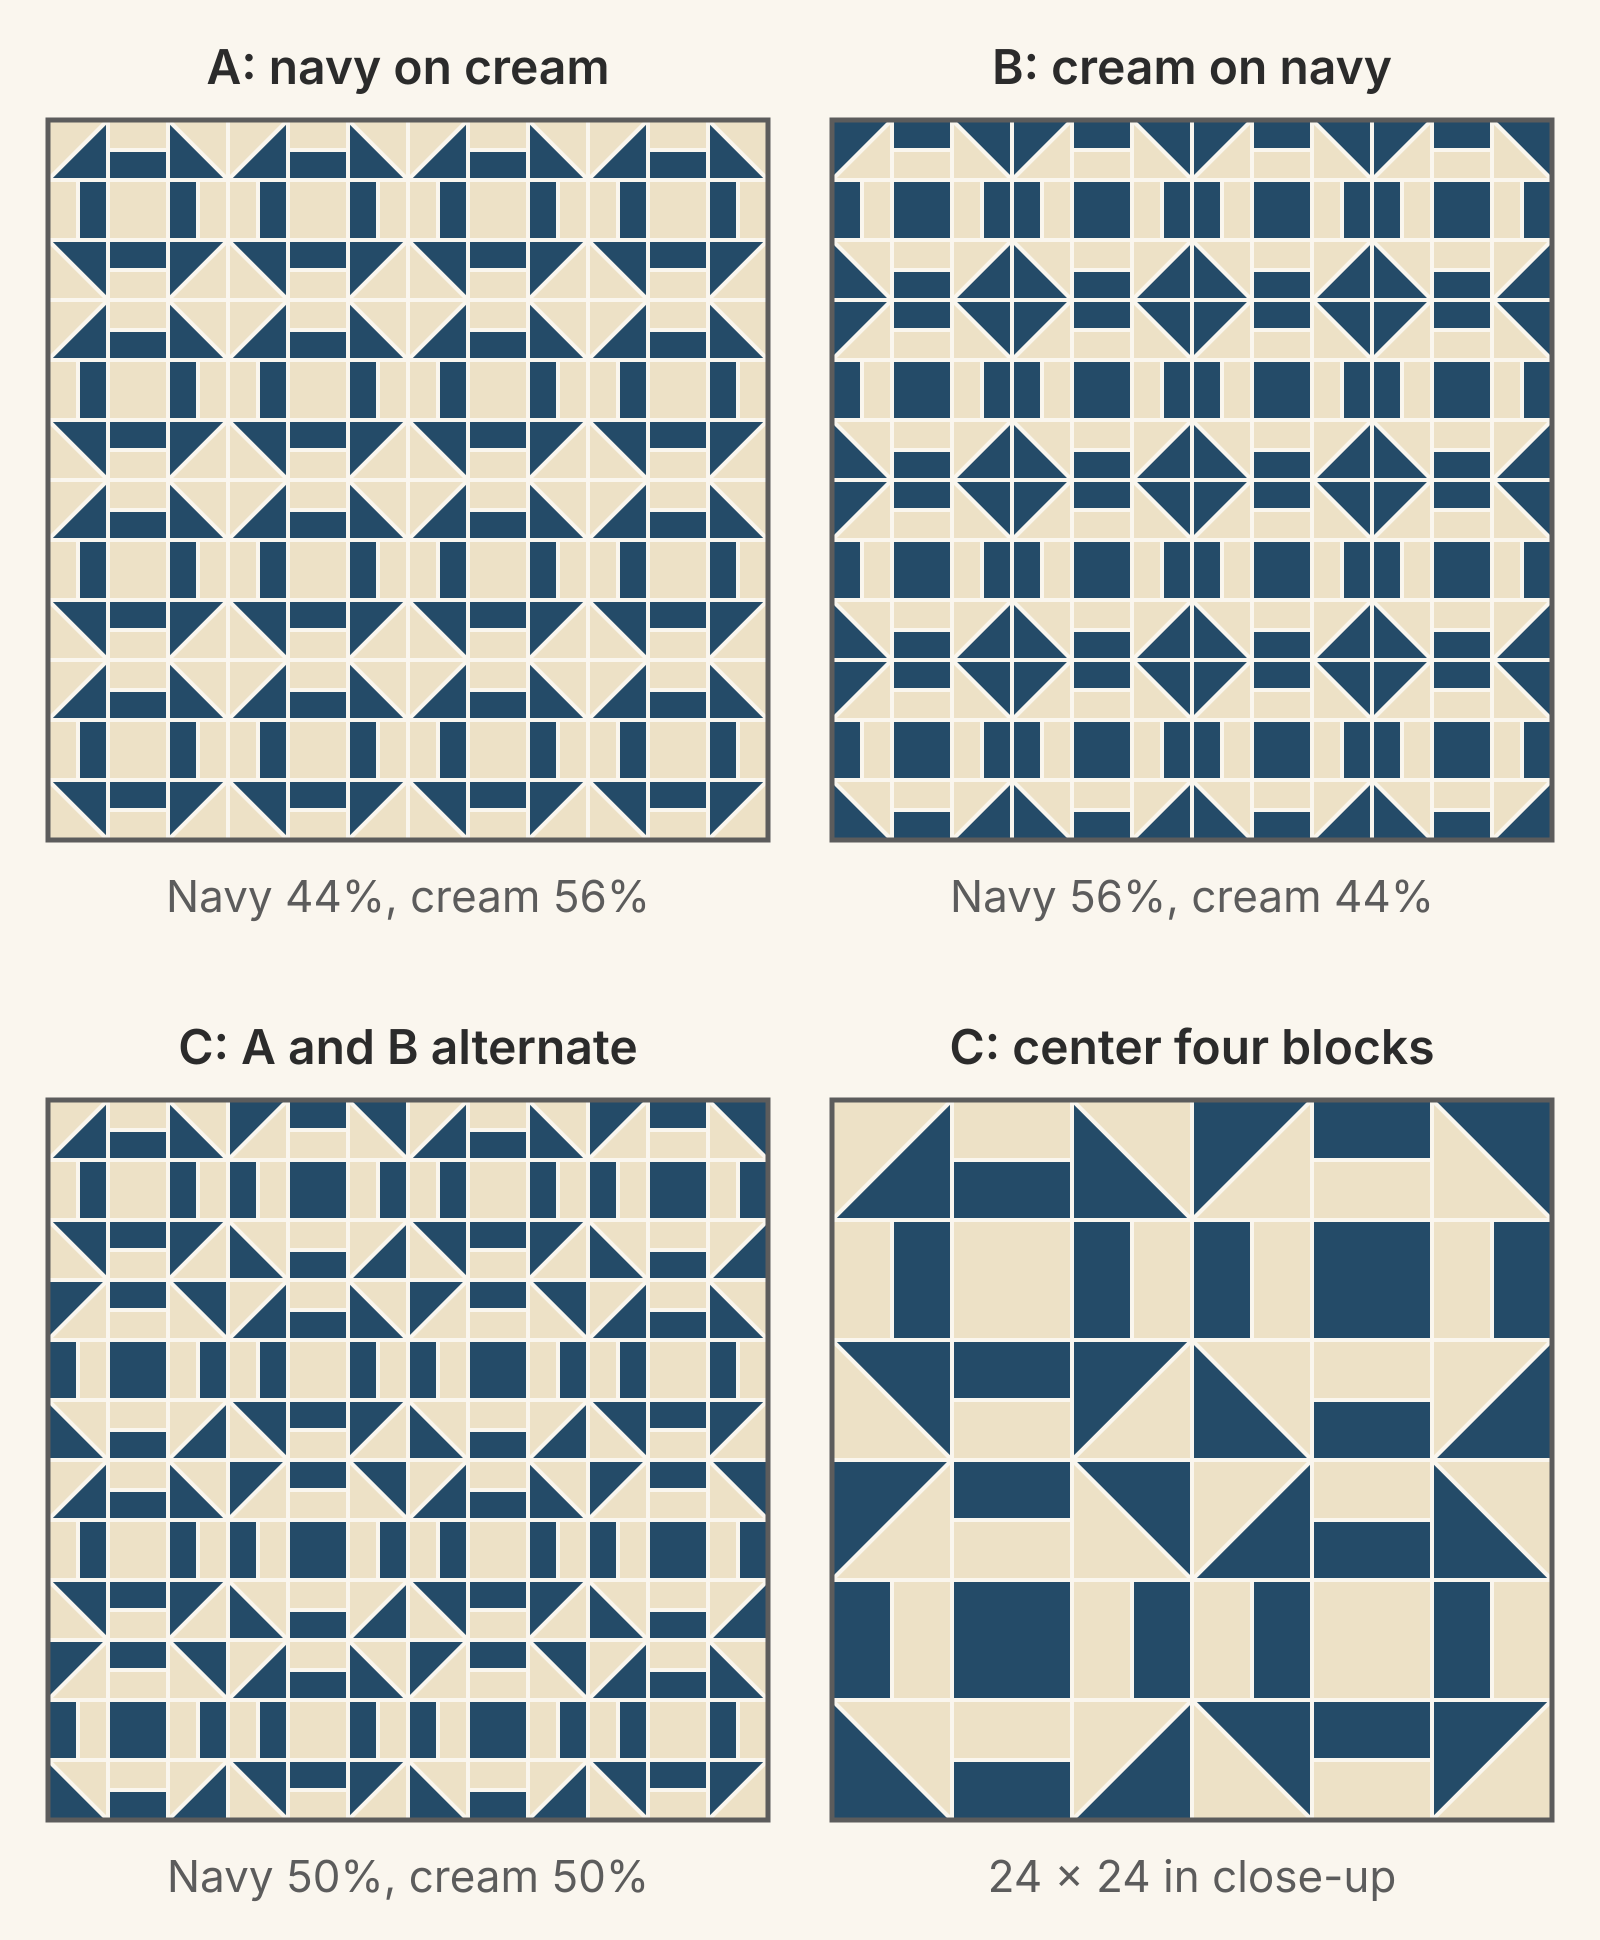
| Plan | Navy area | Cream area | What reads first |
|---|---|---|---|
| A: navy frames | 1,024 sq in (44%) | 1,280 sq in (56%) | Navy frames on a cream field |
| B: cream frames | 1,280 sq in (56%) | 1,024 sq in (44%) | Navy diamonds and squares between the blocks |
| C: alternating | 1,152 sq in (50%) | 1,152 sq in (50%) | A light and dark checkerboard |
Plan A: dark figure on a light background
Every block edge is cream, so neighboring blocks merge into one cream field. Where four blocks meet, four cream triangles form a diamond, and two cream strips make a 4-inch square between frames. The navy frames sit on top of that field. This is the safest plan for a first two-color quilt. The American Quilter's Society blog puts it simply: "Create focus in a quilt by using a light value background fabric."
Plan B: light figure on a dark background
Nothing moves but the colors. Navy now covers 56% of the top, and the background shapes from plan A turn navy: diamonds where four blocks meet, squares between blocks, a square in every center. Those shapes can read before the cream frames do.
That switch has a name. The International Quilt Museum's World Quilts: The 1971 Story describes value contrasts that create "figure/ground reversals, in which the foreground and background seem to switch back and forth."
The amount of each color matters too. Jinny Beyer writes that "a quilt will look very different depending how much of each color is used." She cut her "Day" and "Night" quilts from the same strip-pieced fabric sets, set one on a light background and one on a dark, and adds that "the background can also affect how the colors look."
Choose plan B when you want a dark quilt, or when you like the shapes that form between the blocks more than the blocks themselves.
Plan C: alternate the two blocks
Alternate A and B blocks in a checkerboard and the area splits exactly 50/50. Each block now has a cream or a navy edge, so the 12-inch squares read as a checkerboard of light-edged and dark-edged blocks. Where four blocks meet, two cream and two navy triangles meet. Neither fabric is clearly the background, so the top reads as an allover pattern. Pick plan C when you want energy; skip it when you want a calm quilt.
Sew the units first, then choose a plan
Blocks A and B use identical units. Turn a half-square triangle (HST) or a two-strip unit 180 degrees and its navy half moves from the inside of the block to the outside. Only the center square changes color.
That means you can make every unit before you commit. Sew all the HSTs and strip units, lay out plans A, B and C on a design wall, and cut the 16 center squares last.
For the 48 x 48-inch top, you need 64 HSTs, 64 two-strip units and 16 centers. QuiltLab doesn't calculate cut sizes or yardage, so these are our numbers, using quarter-inch seams:
| Piece | Cut size | Navy | Cream |
|---|---|---|---|
| HST starting squares | 5 x 5 in | 32 | 32 |
| Side-unit strips | 2 1/2 x 4 1/2 in | 64 | 64 |
| Centers for plan A | 4 1/2 x 4 1/2 in | 0 | 16 |
| Centers for plan B | 4 1/2 x 4 1/2 in | 16 | 0 |
| Centers for plan C | 4 1/2 x 4 1/2 in | 8 | 8 |
Each navy and cream pair of 5-inch squares makes two HSTs. Trim them to 4 1/2 inches for a 4-inch finished unit. We use the oversized rule (finished size plus 1 inch, then trim) because it leaves room to square up every unit. If you'd rather not trim, cut 4 7/8-inch squares instead, the usual finished-plus-7/8 rule. Our two-at-a-time HST guide compares the two. Two 2 1/2 x 4 1/2-inch strips sewn along their long edges make a 4 1/2-inch side unit.
How far apart should the two values be?
Roles only work when the two fabrics separate. To compare pairs, we converted each screen color to its CIELAB lightness, which runs from 0 for black to 100 for white, and divided by 10. A "step" is one point on that 0-to-10 scale.
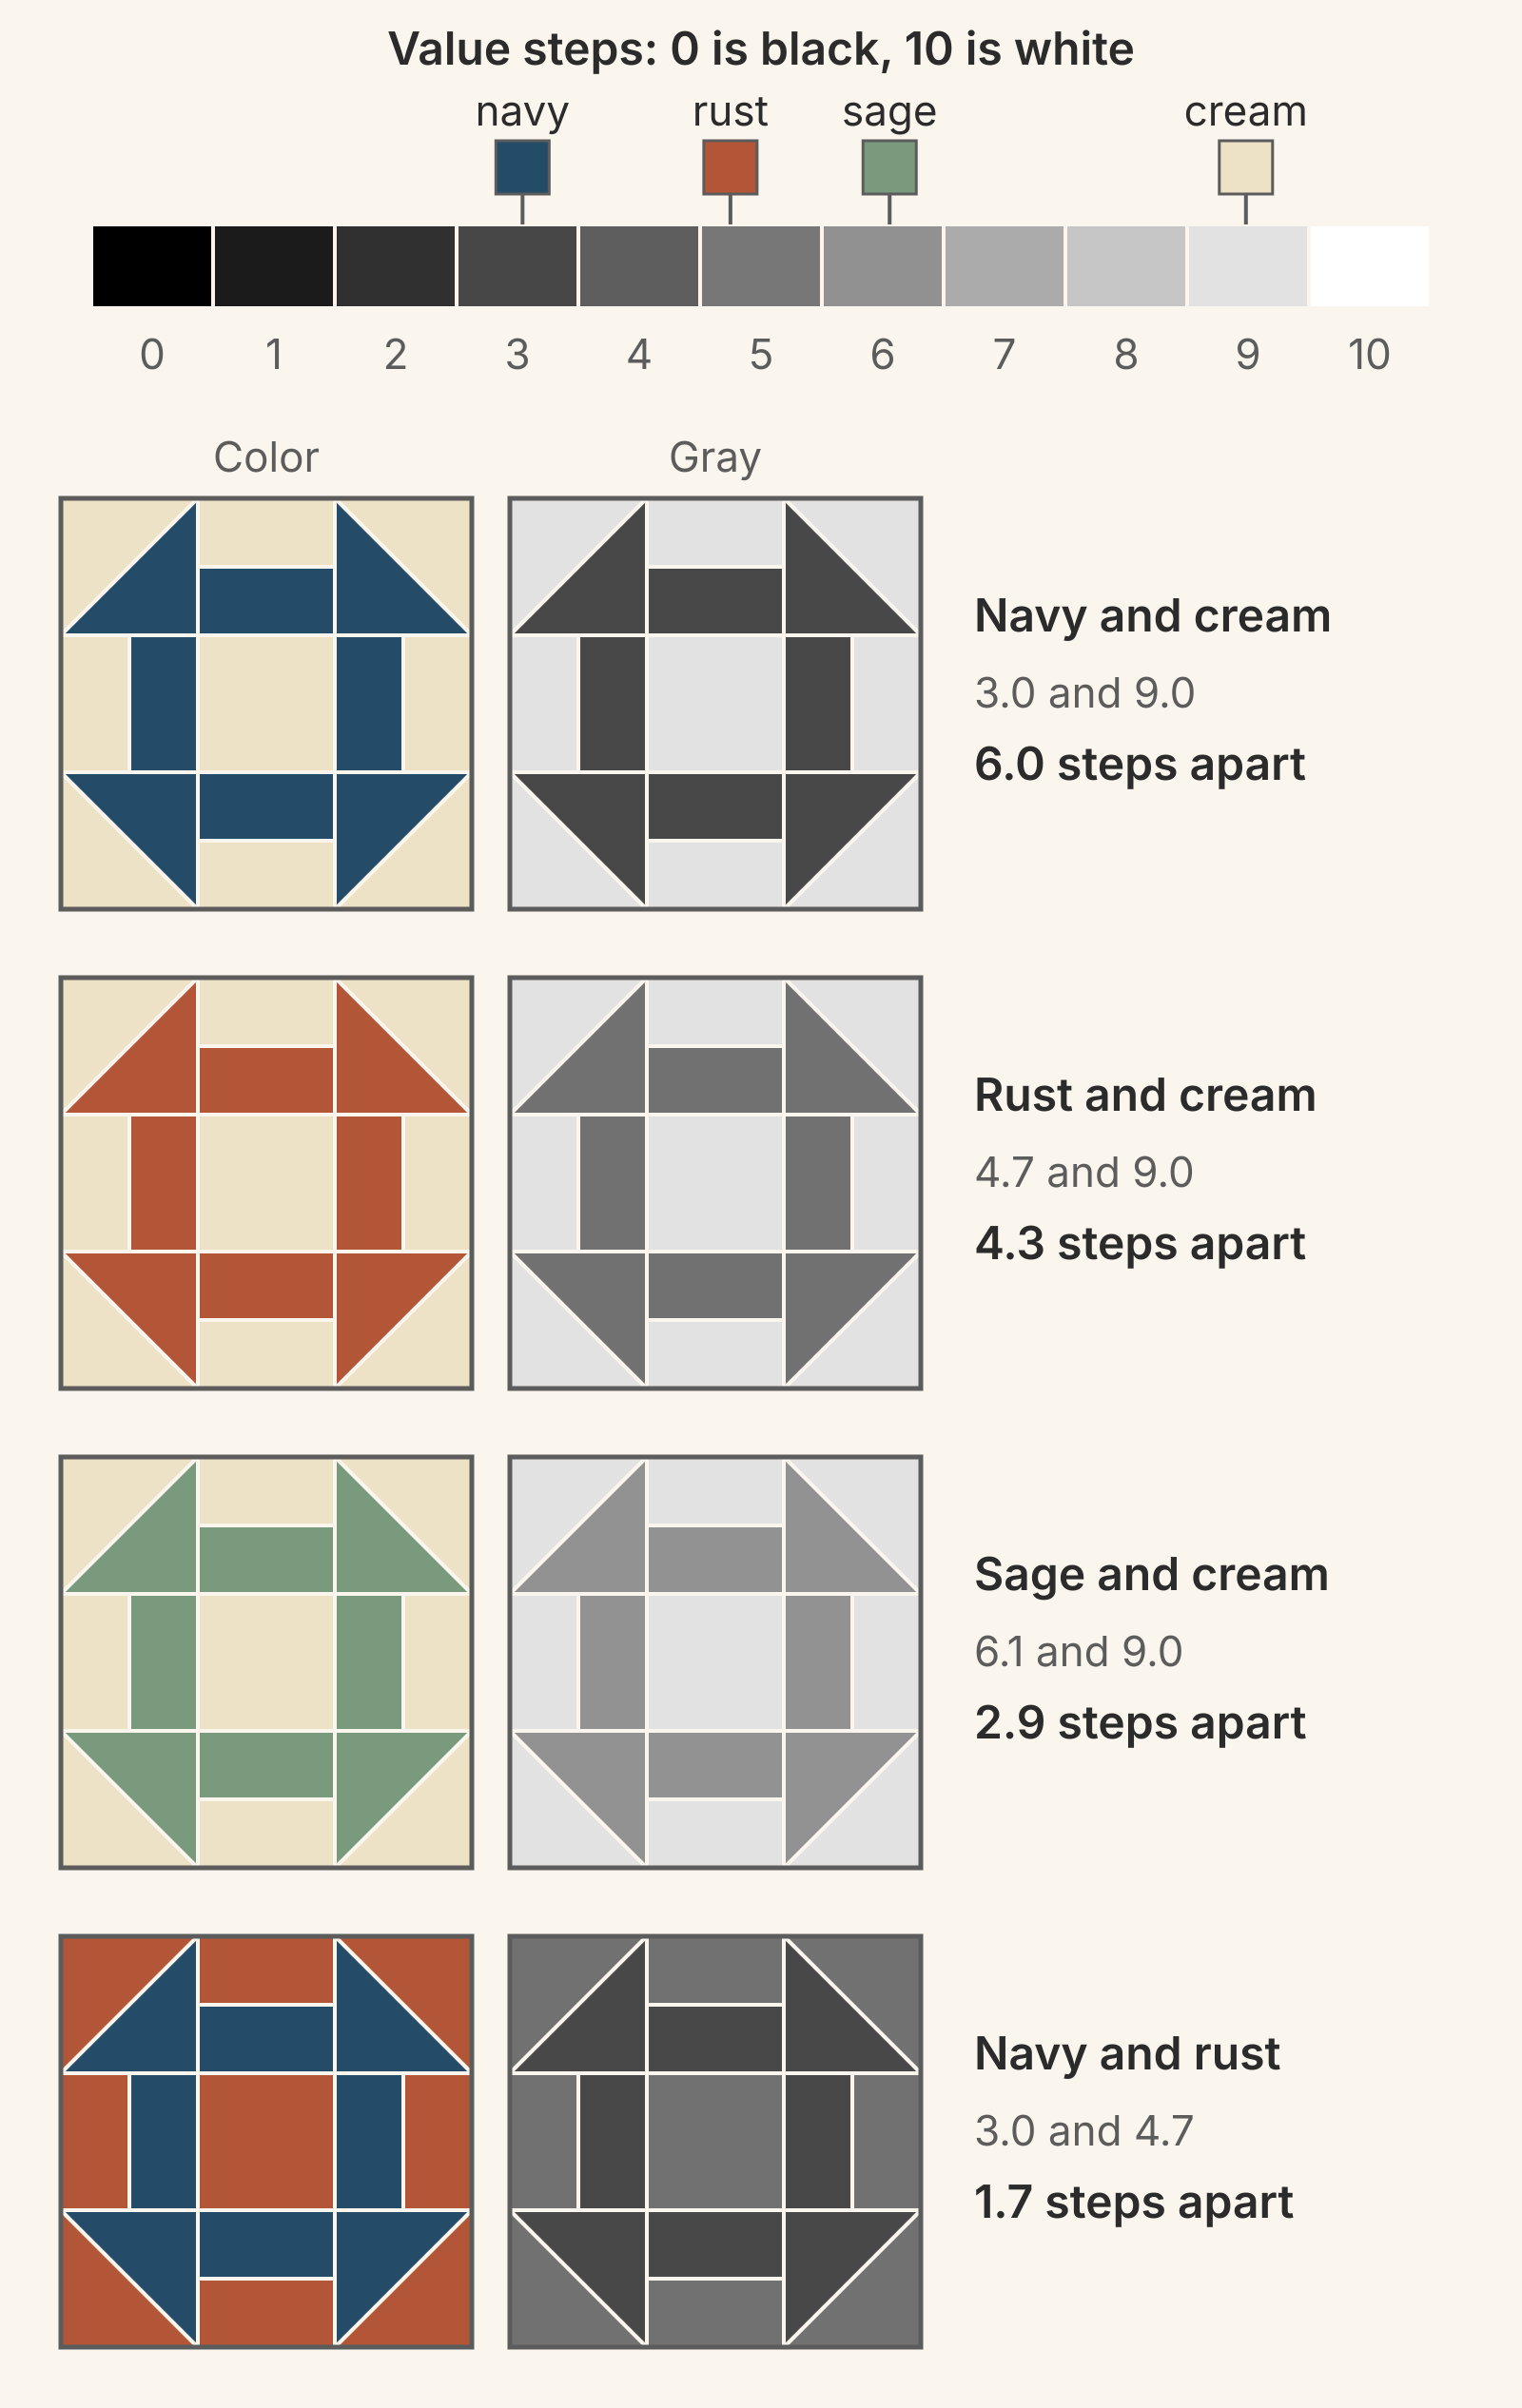
- Navy and cream, 6.0 steps. The frame is crisp in color and in gray. This is the blue-and-white family.
- Rust and cream, 4.3 steps. Still clear. Rust is lighter than navy, so the gap narrows against the same cream.
- Sage and cream, 2.9 steps. The frame is visible but soft, so the block reads quieter.
- Navy and rust, 1.7 steps. These hues sit almost opposite each other on the color wheel, so the color version looks lively. In gray it's a dark gray on a mid gray, and the frame is held mostly by hue.
Start at about 4 steps if you want the block to read clearly. Choose 2 to 3 steps on purpose when you want a softer quilt. Below 2 steps, the design depends on hue, and most of its contrast is gone in a black-and-white photo. As the AQS blog puts it, "The stronger the value contrast the more the drama."
Fabric doesn't come with a lightness number. Lay your two fabrics beside a printed gray scale, or take a black-and-white photo of them side by side. Our color theory guide covers these checks and why value is relative.
The gap sets the contrast for every plan. Plan B's diamonds and plan C's checkerboard are drawn by the same two fabrics as plan A's frames, so a narrow gap softens them all.
To choose the background fabric itself, by undertone and print, see How to Choose Background Fabric for a Quilt. If you want more than two roles, our 20 quilt color combinations add support and accent colors. How Secondary Patterns in Quilts Form looks closer at shapes like plan B's diamonds, which form where blocks meet.
Try the three plans in QuiltLab
You can compare plans A, B and C before you cut the centers:
- In the Block Editor, open the Blocks tab, expand Templates, search for Churn Dash and choose Use template.
- Select the frame pieces and pick one fabric or color in the Fabric tab. Select the background pieces and the center and pick the other. Save the block.
- In My Blocks, open the block's actions menu and choose Duplicate. Open the copy and swap the two fabrics.
- In the Quilt Editor, choose File > New Quilt..., then Grid and Create grid quilt. In Properties, set the Block width and height (W and H) to 12, Cols to 4 and Rows to 4. Layout should read 48 x 48 inches.
- In the Blocks tab, choose block A and click every cell for plan A, then press Escape. Use block B for plan B, or alternate the two for plan C.
The Block Editor guide covers choosing fabric for selected pieces and saving blocks.
Your next step
Choose your two fabrics and check the value gap first: about 4 steps for a crisp quilt, 2 to 3 for a soft one. To see the plans on screen, set up the 4 x 4 grid in QuiltLab. Then sew the 64 HSTs and 64 strip units, audition the plans on your design wall, and cut the centers for the plan you like best.
Related posts
Grayscale Value Check: Which Quilt Fabrics Will Blend?
Photograph your fabrics in black and white and look for any two that turn the same gray. A worked Friendship Star shows why opposite colors can blend.
Irish Chain Quilt Colors: Which Fabric Goes Where?
Most Irish Chains put darker chain fabrics on a light background. Compare single and double chain value maps and see which fabric shapes the diamonds.
Low Volume Quilt Fabric: When Do Quiet Prints Need Contrast?
Light prints can blend in the background but need a value step wherever they form the design. Sort them into two groups and follow a 45 x 60 inch plan.