Build an Abstract Quilt Design from Three Shapes

Start an abstract quilt design with a sketch you own, choose the shapes that carry the idea, then draw how the background can join around them. For a first straight-seam study, keep three rectangles and extend horizontal divisions across the field. That makes the construction question visible without changing the arrangement into a picture of an object.
Keep the early sketch beside the seam map. The useful question is whether the planned pieces preserve the relationships you wanted, including the open spaces between shapes.
Give the sketch a clear job
Choose a relationship to explore: a tall shape against two shorter ones, uneven gaps or a quiet field around a compact group. You don't need a recognizable subject to begin.
Rebecca Bryan's guide to using graphic-design elements in quilts connects form, function and composition. Ask what you want the arrangement to do before filling the page with more shapes.
Write that aim in ordinary words beside your drawing. For this exercise, ours is: three separate colored shapes at different heights, with cream space between them. That sentence gives us something specific to protect while planning seams.
Make two or three quick sketches of your own. Choose one because its relationships interest you, then save the other ideas separately so they don't all crowd into this quilt.
Reduce the drawing to shapes you can name
Elizabeth Barton's written sketch-and-collage project describes exploring compositions with rough sketches, watercolor or collage using plain values. That is a useful way to investigate arrangements before committing to fabric.
Use your own marks or paper shapes for this step. Name each main form and decide which edges can become straight without losing the idea. Save the sketch before simplifying it, so you can compare the versions.
For our example, all three forms become rectangles. Their different proportions and positions carry the variation; there is no need to add a fourth form just to make the page busier.
We drew these composition and seam studies and haven't sewn them. All dimensions describe finished space; actual cutting sizes, allowances and construction samples come afterward.
Locate three forms in a twelve-by-sixteen field
Set a top-left origin on a 12-by-16-inch field. Measure across first, then down. Keep the shape names with the coordinates so you can return to the same layout.
| Shape | Upper-left corner | Finished size |
|---|---|---|
| A | 1 inch across, 1 down | 4 by 5 inches |
| B | 7 inches across, 6 down | 4 by 3 inches |
| C | 3 inches across, 11 down | 6 by 3 inches |
A occupies 20 square inches, B occupies 12 and C occupies 18. The colored total is 50 square inches. The whole field contains 192, leaving 142 square inches of cream.
Check the right and lower edges as well. A ends at five across and six down; B ends at eleven across and nine down; C ends at nine across and fourteen down. Each remains inside the field, and none overlaps another colored form.
Extend the seams around the arrangement
Draw horizontal divisions at 1, 6, 9, 11 and 14 inches down. These create six bands with heights of 1, 5, 3, 2, 3 and 2 inches. Their heights add to sixteen.
The first, fourth and sixth bands contain only cream. The other three each contain one colored rectangle with cream on its left and right. Keep the bands in top-to-bottom order:
| Band | Finished height | Widths from left to right | Pieces |
|---|---|---|---|
| 1 | 1 inch | 12 cream | 1 |
| 2 | 5 inches | 1 cream, 4 A, 7 cream | 3 |
| 3 | 3 inches | 7 cream, 4 B, 1 cream | 3 |
| 4 | 2 inches | 12 cream | 1 |
| 5 | 3 inches | 3 cream, 6 C, 3 cream | 3 |
| 6 | 2 inches | 12 cream | 1 |
All widths are inches of finished space. Each band totals twelve inches across; the six heights total sixteen inches down.
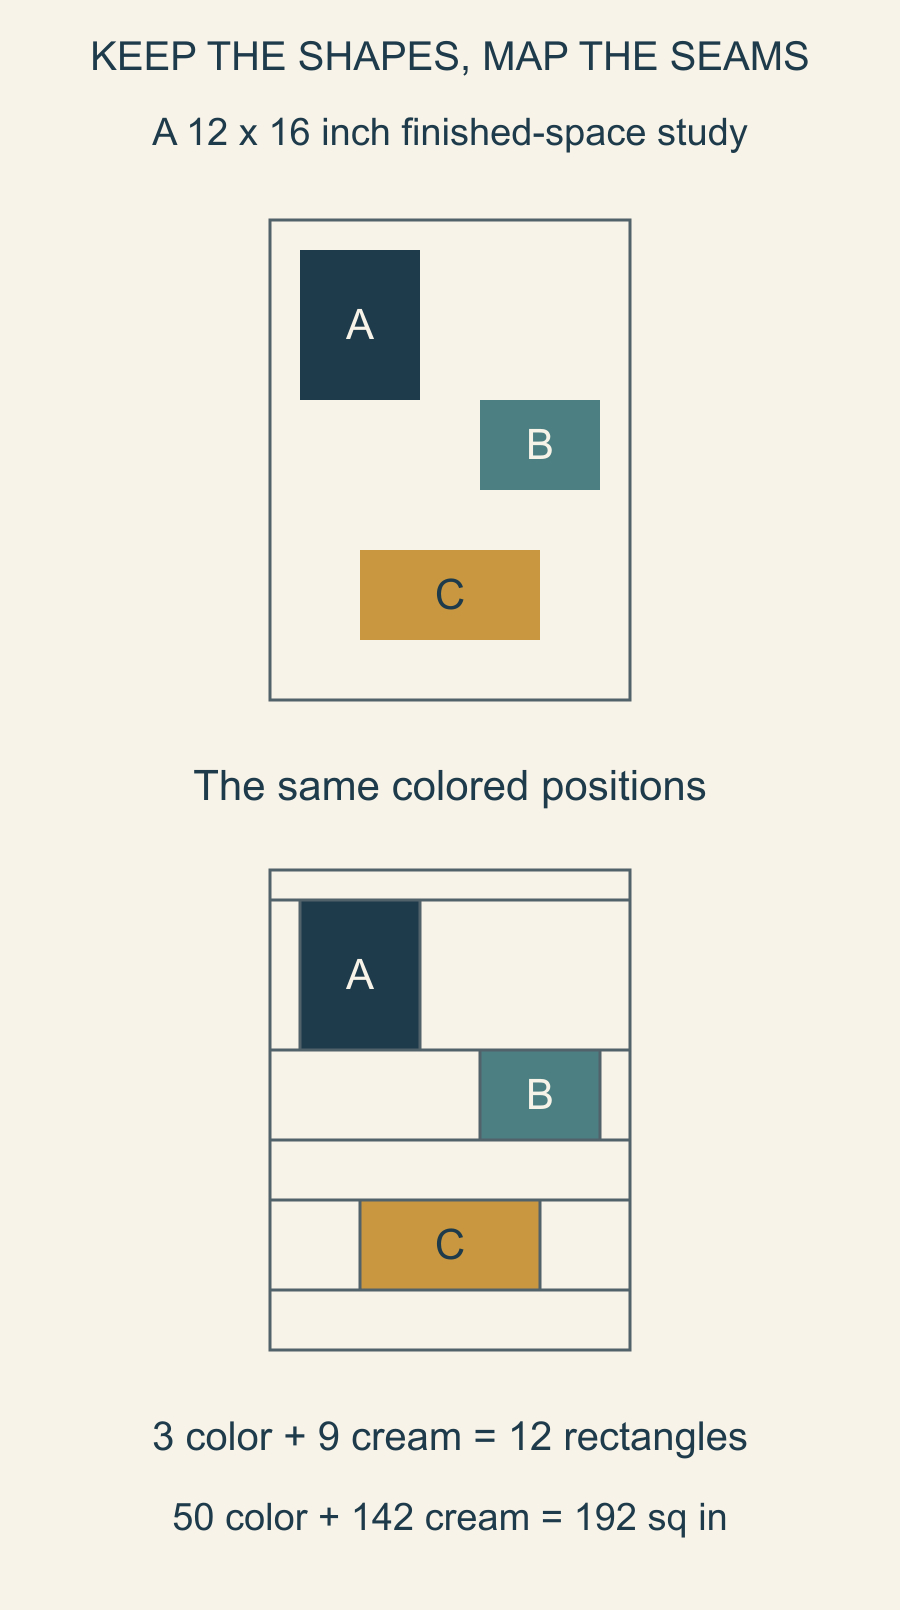
In A's band, the widths are 1 cream, 4 color and 7 cream. B's band has 7 cream, 4 color and 1 cream. C's band has 3 cream, 6 color and 3 cream. Each row adds to twelve.
There are twelve rectangles in the seam map: three colored and nine cream. The count includes the three full-width cream bands. A shape drawing and a piece inventory answer different questions, so keep both.
Audit the background as carefully as the color
The cream rectangles around A cover 40 square inches; those around B cover 24; those around C cover 18. Together they cover 82.
The full-width cream bands cover 12, 24 and 24 square inches. Add their 60 to 82 and the cream total returns to 142. Color plus cream returns to 192, matching the outside field.
This second check can expose a missing sliver or doubled piece even when the colored arrangement looks unchanged. Count from the actual divided drawing, rather than assuming the background will take care of itself.
The Canadian Quilters' Association's design-elements guide includes line, form, value and proportion. Use those terms to describe what the seam map preserves or changes as you compare it with your sketch.
Decide whether the new seams help the idea
Some joins will cross the cream field. Decide whether you are comfortable with those seam locations before planning the fabric cuts. A solid drawing doesn't tell you how a real seam or directional print will appear.
You could partition the background another way, but compare one alternative at a time. Save the same colored coordinates and inspect what happens to the background pieces and joining order.
Our modern and traditional quilt-pattern overview gives broader context for combining familiar piecing with different arrangements. You can use straight seams while making an abstract composition of your own.
Keep the map that best serves your aim and the construction approach you can explain. A smaller piece count is useful only if it preserves the relationships you wanted.
Turn the chosen map into a making plan
Label every rectangle, its finished dimensions and its neighbors. Plan the joins within the three colored bands first, then join all six completed bands in order. This map has two internal joins in each colored band and five joins between bands: eleven joins for twelve rectangles. Every join runs straight across the pieces being connected.
For a nominal quarter-inch allowance check on band A, its three raw rectangles would measure 1.5 by 5.5, 4.5 by 5.5 and 7.5 by 5.5 inches. Their combined width is 13.5 inches. Two joining seams consume one inch, leaving a 12.5-by-5.5-inch raw band. Julie Baird's straight-edged block-drafting lesson explains adding half an inch to each finished rectangular dimension.
Use that same accounting for the other bands, then verify it in a sample. Six raw band heights total nineteen inches; five joining seams use 2.5 inches. The nominal joined field is 12.5 by 16.5 inches raw, ready to finish at twelve by sixteen when its outside allowances enter seams.
Choose one row as a construction sample and check its pressed measurements before multiplying the plan. A fabric print, pressing choice or seam result may prompt a revision to the making instructions.
If the first drawing still feels crowded, our improv-constraints exercise can help you narrow the shape and color jobs. Start with your three-shape sketch, draw the background pieces and check that every part of the field is accounted for before choosing what to cut.
Free patterns to try
Printable PDF patterns with cutting charts and diagrams, free to download.
Plan your next quilt
Lay out blocks and try colors in QuiltLab's grid editor before you cut.
Free forever, no card needed.
Get quilting tips by email
QuiltLab updates, tips and quilting inspiration. Unsubscribe anytime.
Related posts

When Is an Improv Quilt Finished?
Stop changing a composition when it answers your current design question. A before-and-after study helps separate necessary fixes from new ideas.

Start a Damaged Quilt Assessment Before Repair
Record what you see, what you were told and what remains unknown before changing a damaged quilt. A simple condition map organizes the questions.
Plan an Improv Quilt with Two Curve Sizes
Compare two quarter-circle sizes in a twenty-four-inch composition, check where their edges meet and choose a sewing method that fits the shapes.