Joining Improv Quilt Sections of Unequal Size
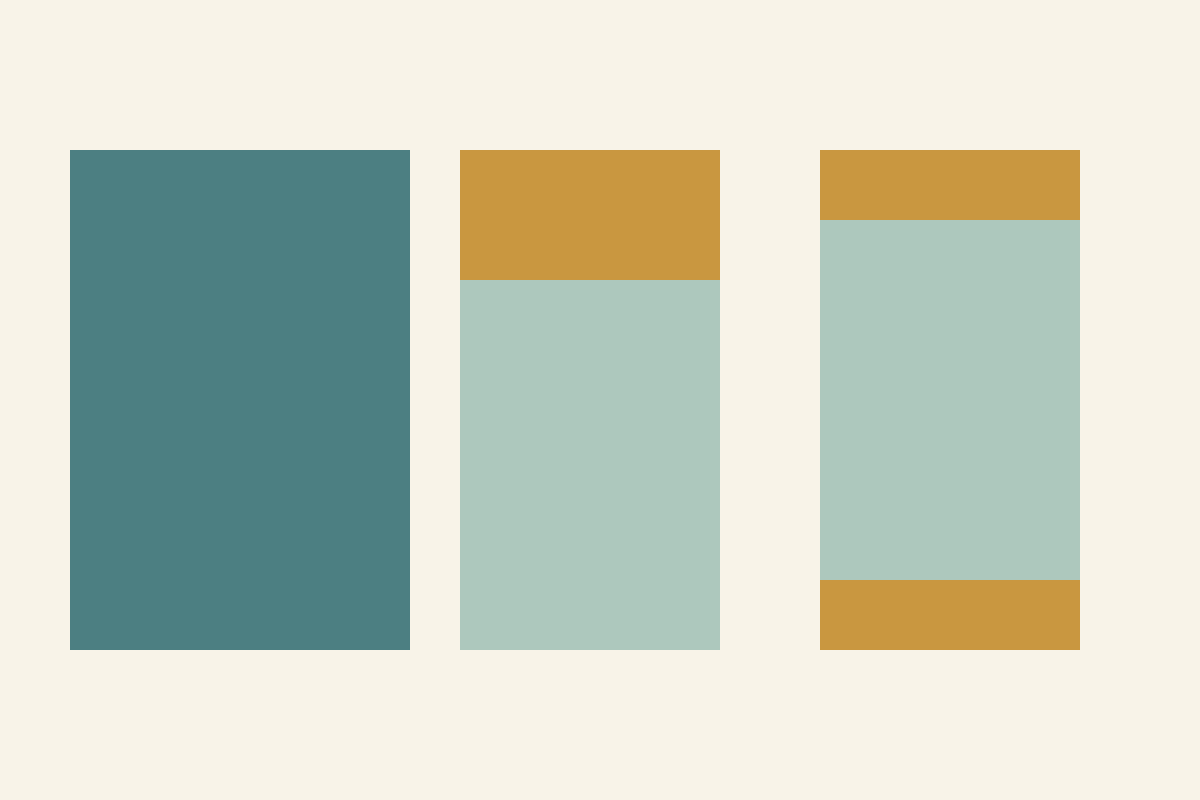
Measure the raw sections along the edges you want to join, then decide whether to add fabric to the shorter one or trim the longer one. Include the new seam allowances when cutting a spacer. A three-inch difference in raw height needs a 3.5-inch raw strip if one quarter-inch seam joins that strip to the short section.
That extra half inch is easy to miss when an improv top grows a piece at a time. Draw the proposed join, name the raw measurements and count the seams before cutting a favorite scrap.
Decide which edges should meet
Place the sections together and look at the whole composition. Which arrangement keeps the shapes or color relationships you want? Choose that relationship before forcing every section into the nearest rectangle.
In her Mod Mood Quilt joining lesson, Sherri Lynn Wood describes adding to a short section or subtracting from a long one to make the puzzle fit. The choice can help avoid an inset seam while giving the composition room to change.
Keep both options visible for a moment. Adding a strip preserves the existing shapes but introduces more fabric. Trimming avoids that addition but may cut into something you wanted to keep. Neither choice is automatically right for every section.
Take a layout photo before moving the pieces to measure them. A small note showing which edge goes at the top saves time when similar-looking sections return to the table.
Measure the section you actually have
Lay each section flat without pulling it into shape. Measure the joining edge and the opposite edge. If the sides differ, record both; don't average away a problem that will affect the join.
For the example here, imagine two already prepared rectangular sections:
| Section | Raw width | Raw height |
|---|---|---|
| A | 8.5 inches | 12.5 inches |
| B | 6.5 inches | 9.5 inches |
We drew this dimension exercise and haven't sewn it. It assumes consistent quarter-inch seams and rectangular raw edges; your actual sections need their own measurements.
The plan places B beside A. Their raw heights differ by 12.5 - 9.5 = 3 inches. B therefore needs three inches of net height before the long side seam can join the pair.
"Net" matters here. A strip's cut height isn't the amount it adds after its joining seam is sewn.
For straight horizontal additions with quarter-inch seams, use this check:
Combined raw strip heights = target raw height - current raw height + half an inch for each new joining seam.
Here the difference is three inches. One new seam calls for 3.5 inches of raw strip height; two call for four inches in total. The strip widths must also span B's actual 6.5-inch raw width.
Add one strip and count its seam
Cutting a strip three inches high would give B a raw height of:
9.5 + 3 - 0.5 = 12 inches.
The joining seam consumes a quarter inch from B and a quarter inch from the strip. That leaves B half an inch short of A's 12.5-inch raw height.
Instead, use a 3.5-inch-high by 6.5-inch-wide raw strip across the top or bottom of B:
9.5 + 3.5 - 0.5 = 12.5 inches.
The raw width stays 6.5 inches because the strip spans that width. Position it at whichever end suits the composition and leaves useful shapes intact.
Julie Baird's block-design guide explains the finished-size and seam-allowance relationship for straight-edged squares and rectangles. Here we are using the same nominal quarter-inch accounting on raw sections rather than drafting a whole block from scratch.
Compare two strips before cutting the first
You might prefer to divide the added fabric between the top and bottom. That introduces two joining seams, so two raw strips must together supply four inches:
9.5 + 2 + 2 - 0.5 - 0.5 = 12.5 inches.
Two strips, each 2 inches high by 6.5 inches wide, give the same final raw height as the single 3.5-inch strip. They require more cut fabric because there is another seam to consume it.
| Choice | Raw additions | Height after joining |
|---|---|---|
| One strip | One 3.5-inch strip | 12.5 inches |
| Two strips | Two 2-inch strips | 12.5 inches |
| Too short | One 3-inch strip | 12 inches |
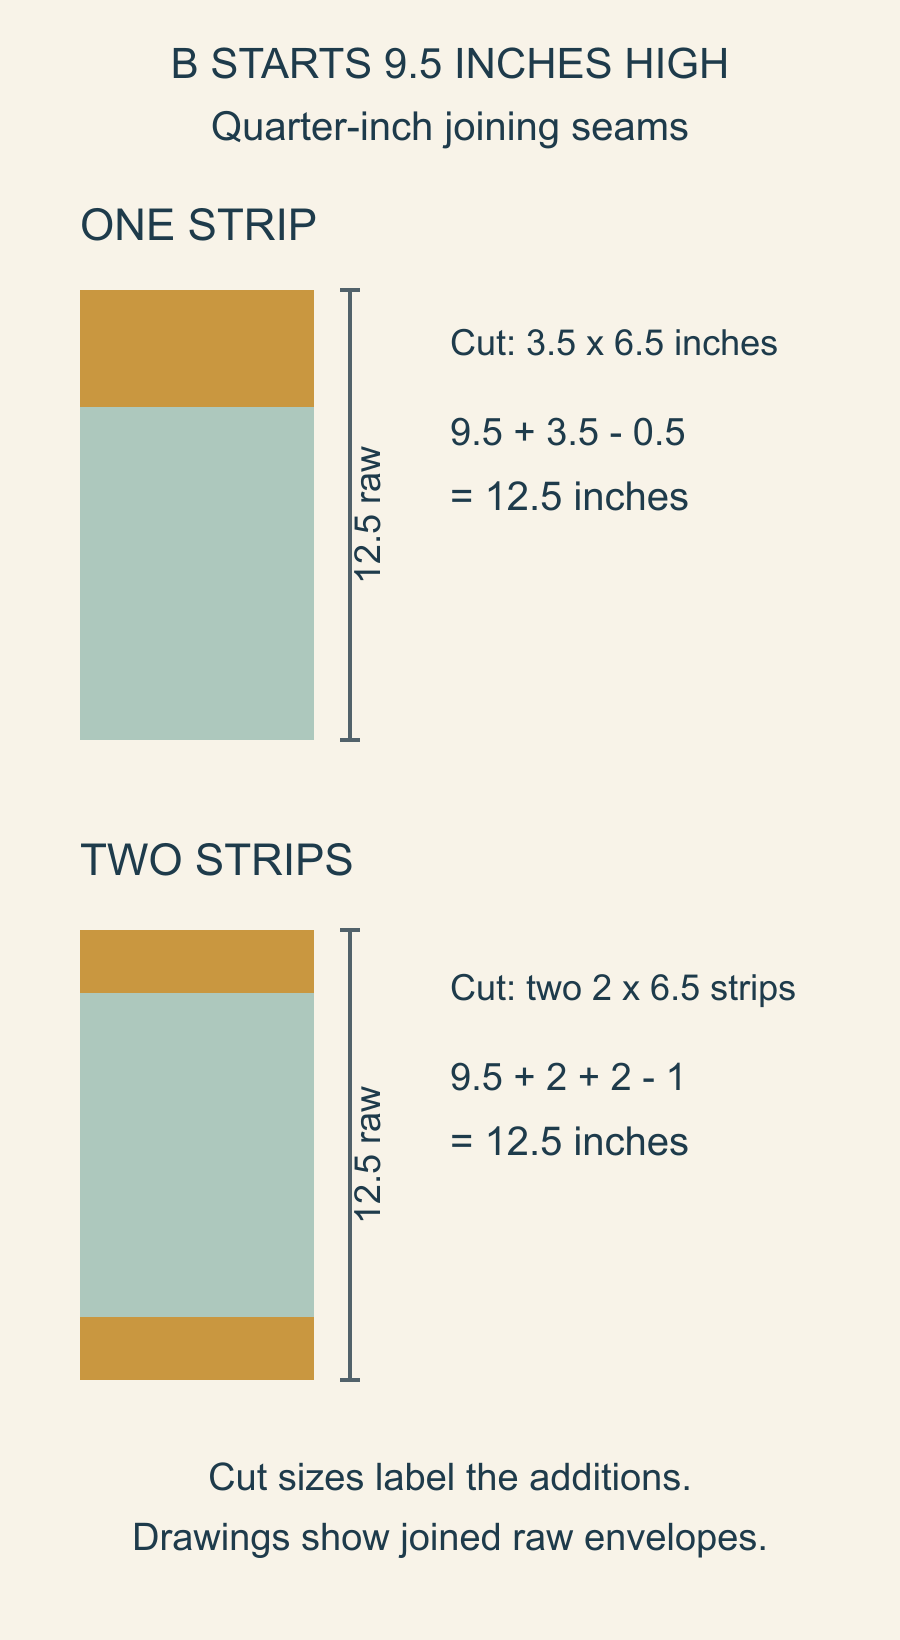
The split option gives you another design choice: equal strips make a centered frame, while unequal strips shift the section within its envelope. Their combined raw height must still account for both seams.
For example, a 1.5-inch strip and a 2.5-inch strip total four raw inches. With two half-inch seam losses, they also add three inches of net height. Sketch the difference before committing to the cut.
Join the matched sections and check the width
Once B measures 6.5 by 12.5 inches raw, place it beside A's 8.5 by 12.5 rectangle. The long vertical seam takes half an inch from the combined widths:
8.5 + 6.5 - 0.5 = 14.5 inches raw.
The joined rectangle therefore measures 14.5 by 12.5 inches raw. If its outside edges later enter quarter-inch seams, its nominal finished area is 14 by 12 inches.
The finished-space parts check that result. A contributes 8 by 12 inches, B's earlier field contributes 6 by 9, and the added band contributes 6 by 3. Their areas are 96, 54 and 18 square inches: 168 altogether, matching 14 times 12.
Those finished areas describe the composition. They aren't a fabric shopping total, because internal seams and the rest of the quilt still need material.
Compare the smaller result if you trim instead
Trimming A from 12.5 to 9.5 inches raw would match B without adding a spacer. The side-by-side join would then measure 14.5 by 9.5 inches raw, or nominally 14 by 9 inches finished after its outside seams. It is three inches shorter than the add-a-strip version.
Before choosing that option, mark the proposed trim on a photo or paper outline. Check which motif edges and outer allowances it would remove. Saving a strip is not useful if the trim cuts away the part of A that made you choose this arrangement.
Let the added fabric do a useful job
A spacer can continue an existing color, create a pause or separate two busy sections. Audition it at its finished contribution rather than looking only at the wider raw strip.
Mary-Ann of MA Quilts describes linking sections and adding fabric to make them fit, while continuing to change the composition as she works. That is a helpful way to view this stage: the addition becomes part of the design, rather than something to hide automatically.
If you want the strip to disappear, compare its value and print scale with the neighboring section. If you want it to read as a deliberate band, repeat a related line elsewhere only if the composition needs it. You don't have to add the same strip around every section.
Regular quilt sashing solves a different job, spacing equal blocks through a grid. Here each addition responds to the dimensions and relationships of the sections in front of you.
Recheck before extending the quilt
Sew a small seam sample with the intended fabrics, thread and pressing method. Our scant quarter-inch seam test shows why a nominal allowance still needs a measured check.
After adding a strip, press the join and remeasure the short section before joining it to the long one. Check both edges and the middle. If the result differs from the plan, check the starting measurement, cut strip and seam before copying the addition to another section.
Write the new raw width and height beside the layout photo. The next join starts from those actual numbers, rather than the dimensions the pieces had before sewing.
Choose one pair of sections now. Mark the intended shared edge, measure both raw heights and draw one addition or trim option. Count each new seam, audition the fabric, and make the smallest useful join before planning the next one.
Free patterns to try
Printable PDF patterns with cutting charts and diagrams, free to download.
Plan your next quilt
Lay out blocks and try colors in QuiltLab's grid editor before you cut.
Free forever, no card needed.
Explore freeform quilt designGet quilting tips by email
QuiltLab updates, tips and quilting inspiration. Unsubscribe anytime.
Related posts

When Is an Improv Quilt Finished?
Stop changing a composition when it answers your current design question. A before-and-after study helps separate necessary fixes from new ideas.

Build an Abstract Quilt Design from Three Shapes
Turn a sketch you own into a clear patchwork plan. Three colored rectangles show how to preserve a composition while extending a few straight seams.

Start a Damaged Quilt Assessment Before Repair
Record what you see, what you were told and what remains unknown before changing a damaged quilt. A simple condition map organizes the questions.