When Is an Improv Quilt Finished?

Stop revising your improv quilt design when you can point to how the layout answers your design question. If a fabric or seam choice could change that answer, check it before you cut. Save ideas that explore a different question for another study.
This decision closes the layout. Piecing, quilting and binding come next.
Write the question the composition should answer
Name the relationship you want to explore, using words specific enough to guide a decision. "Three tall bars with one small interruption" gives you more to inspect than "make it interesting."
An intention can change as you work. Record the new one when it does, so you can tell whether an addition develops this composition or begins a different question.
In the provider's transcript of Modern Quilting with Carole Lyles Shaw, on Lisa Woolfork's Stitch Please, Carole Lyles Shaw explains at 16:10–17:29 how she starts with an intention and lets an unexpected result emerge. She then decides what to keep and what to change.
Use that idea to stay responsive without requiring yourself to explore every possibility in one quilt. Your current question can give this particular study a stopping place.
Give each proposed change a job
Write one sentence that says what you would change and why. Point to the spot on the drawing and decide what kind of work it needs.
- Fix it on the drawing. If a bar crosses the finished edge, adjust its length or decide whether the outside size can change.
- Check it in cloth. If you can't tell whether the gold will stand out against the navy, lay the actual fabrics together at the planned proportions. Decide what result would make you switch one fabric.
- Save it for another study. If you're curious about adding a fourth bar, sketch it on a separate page. Keep the current layout while you consider whether to pursue the new idea.
Use the Canadian Quilters' Association's design-elements guide to put words such as line, proportion and rhythm to what you see. For example, name the gap that feels crowded and the change you want to try there.
Check one eighteen-by-twenty-four study
For our drawing, choose an 18-by-24-inch cream field with three navy bars. Each bar is two inches wide and sixteen inches high, starting four inches down. Their left edges sit at two, eight and fourteen inches across.
The three bars cover 96 square inches. Add a gold rectangle two inches across and three inches high inside the middle bar, beginning eight inches down. Because gold replaces navy there, it doesn't add another six square inches to the field.
Version A therefore contains 90 navy, 6 gold and 336 cream square inches. The total is 432, matching eighteen times twenty-four.
We drew these studies at finished proportions and haven't sewn them.
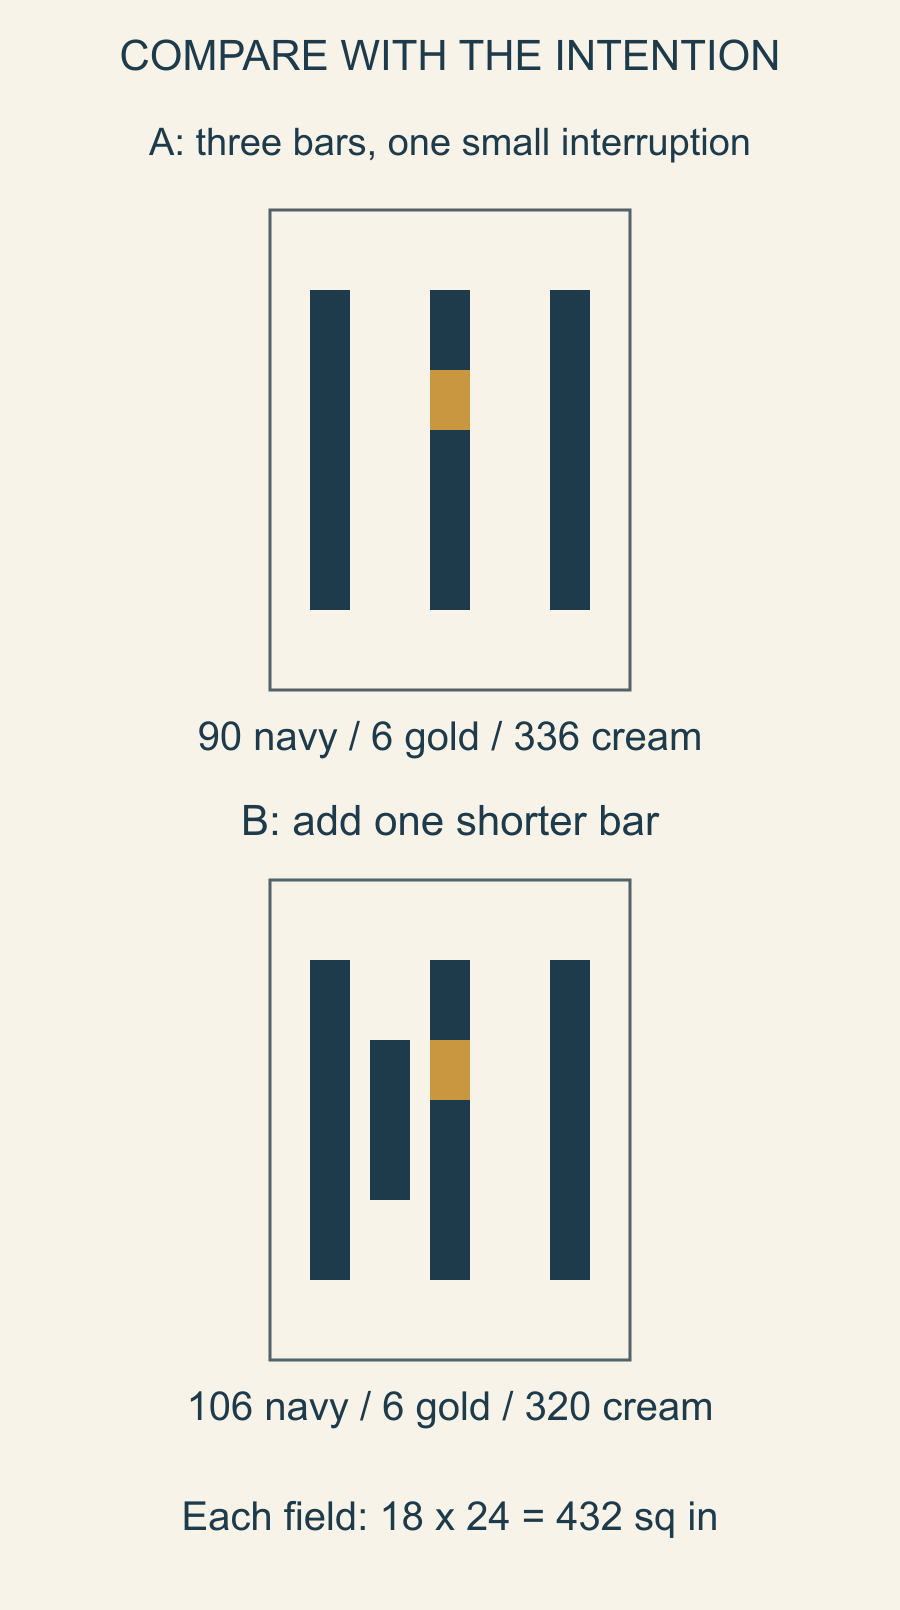
Our stated intention for A is three tall bars with one small interruption. Before changing it, ask which part of that intention is unfinished and what evidence makes you think so.
Compare an addition before committing to it
For version B, add a two-by-eight-inch navy bar at five inches across and eight inches down. It fits in the cream gap between the first and middle bars without overlapping them.
The addition covers sixteen square inches. Version B contains 106 navy, 6 gold and 320 cream square inches, still totaling 432. The original three bars and gold inset keep their positions.
Look beside the short bar. A had four inches of open cream between the first two long bars. B leaves one inch of cream on either side of the short bar for its eight-inch height. The left gap now has a rhythm of its own.
Keep A for the three-bar study. Its two open gaps leave the gold inset as the one break in the long bars. If you want to explore what happens when long and short bars share the field, write that as a new intention and keep B for that study.
Pause before making the next revision
Look at the arrangement at its intended proportions, then give yourself a break from it. On returning, write the first specific relationship you notice before rearranging anything.
In her written Art of Improv interview with Jen Broemel, Shaw describes putting work aside or taking photos when she feels stuck. A changed view can help you ask a clearer question about the arrangement.
If you take a photograph, keep its orientation and proportions consistent between versions. A closer crop or a different camera angle can change the comparison before the quilt itself changes.
Review the actual fabrics as well. A flat-color drawing can help with placement, while a busy print or different value relationship may change which edge is visible in cloth.
Close the decisions that belong to this design
Record these four decisions for the 18-by-24-inch study.
- Keep A. Three long bars remain distinct, with the gold interrupting the middle one.
- Check the gold in cloth. Lay out a two-by-three-inch area of gold between the planned navy fabrics. Step back to the distance from which you'll usually see the quilt. If the gold is hard to distinguish there, try a different pairing before cutting.
- Plan the joins. Sketch three two-inch-wide finished sections for the middle bar. From top to bottom, draw four inches of navy, three inches of gold and nine inches of navy. Carry the 18-by-24-inch outside size into the construction plan.
- Set B aside. Keep the shorter bar in a separate sketch for a study of uneven spacing and lengths.
Write down which result would send you back to the drawing. A cloth check that changes the gold pairing only reopens that choice. If a join requires you to move a bar or change the outside size, check that part of the layout again.
Mary-Ann of MA Quilts describes her improvisational process as forming blocks and sections, rearranging or removing parts when needed, then joining the sections when she is happy with the layout. Her account is a useful example of moving from choices toward a finished top.
Before that move in your own work, confirm the intended outside size, orientation and construction approach. Keep a sample question on the making list if the fabric or join needs a physical check.
Keep the later ideas without reopening the whole quilt
Save the before-and-after drawings with a short keep/change note. When a new idea occurs, decide whether it solves a current required item or deserves its own page.
Our improv-constraints exercise helps define a manageable question at the beginning. After the quilt is actually made, the project-reflection guide helps record what you learned from the real process.
Write down what you're keeping, what you'll check in cloth and what you'll save for another quilt. Once the remaining checks support the layout, move it into a making plan.
Free patterns to try
Printable PDF patterns with cutting charts and diagrams, free to download.
Plan your next quilt
Lay out blocks and try colors in QuiltLab's grid editor before you cut.
Free forever, no card needed.
Explore freeform quilt designGet quilting tips by email
QuiltLab updates, tips and quilting inspiration. Unsubscribe anytime.
Related posts

Build an Abstract Quilt Design from Three Shapes
Turn a sketch you own into a clear patchwork plan. Three colored rectangles show how to preserve a composition while extending a few straight seams.

Start a Damaged Quilt Assessment Before Repair
Record what you see, what you were told and what remains unknown before changing a damaged quilt. A simple condition map organizes the questions.
Plan an Improv Quilt with Two Curve Sizes
Compare two quarter-circle sizes in a twenty-four-inch composition, check where their edges meet and choose a sewing method that fits the shapes.