Plan an Improv Quilt with Two Curve Sizes
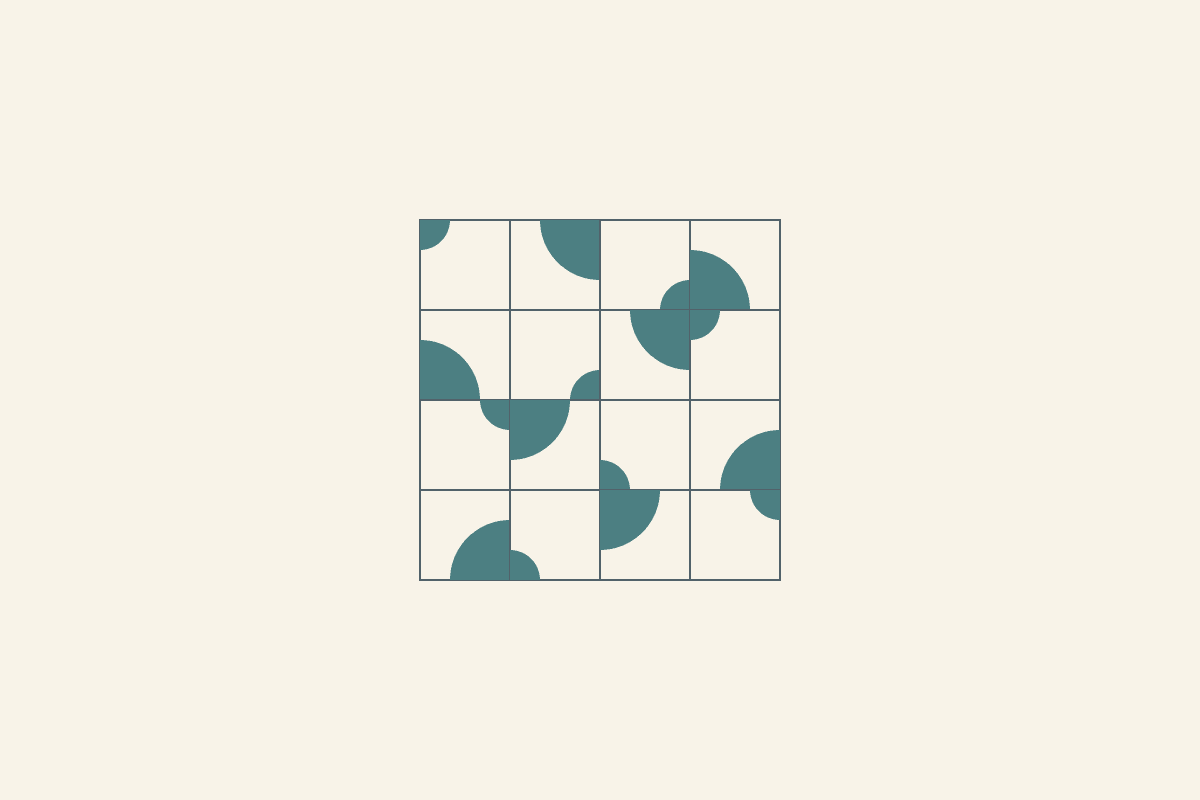
Choose two sizes of one curved form for an improv quilt, then compare their direction and spacing before you piece the units. Start with one field, one curved shape and two fabrics so you can see what each turn changes.
This is a composition exercise. We will place sixteen quarter circles in a twenty-four-inch square, check one actual meeting point and then choose a curved-piecing method for a real sample.
Name the composition question before the sewing method
Ask a specific question: do you want the larger curves spread through the field, grouped near one area or interrupted by smaller forms? Pick one relationship to explore first.
In her written Slice and Stitch curve tutorial, Sarah Goer describes starting planned improv with a palette, tool or technique. Here, the fixed choices are the field and two sizes; the placement remains yours to explore.
Write what you want to compare before moving the cells. For example: "Do I prefer the larger curves scattered or grouped?" Save a copy before each change so you can see which arrangement answers that question.
Write the sewing method you intend to learn or use beside the sketch. That keeps an attractive drawing from becoming an unexplained cutting plan later.
Start with two sizes of one curved form
Our field is 24 by 24 inches, divided into sixteen six-inch-square cells. Use eight quarter circles with a two-inch radius and eight with a four-inch radius.
Both forms fit within a cell. A quarter circle with a two-inch radius occupies a two-by-two-inch bounding square; the four-inch version occupies four by four.
We drew this composition study and haven't sewn it. Its dimensions describe finished space; use a real pattern's templates, allowances and matching marks when preparing the fabric.
Keeping one form makes size and direction easier to compare. You can introduce a different curve later if it answers a new question rather than making the first sketch harder to read.
Turn the form with the whole cell in mind
A quarter circle can sit at any of a square cell's four corners. Turning its placement changes which outer edges the curve approaches and where the open cream area remains.
Label the corners or keep a small reference sketch. A phrase like "turn the curve" is unclear if you don't know whether you mean rotating the whole unit or changing the shape inside it.
Carole Lyles-Shaw's written Art of Improv interview describes exploring curved blocks and continuing to ask what might change. Her account is about her process; the arrangement here is our separate drawing exercise.
Try several cells together. Decide whether you want related turns, a repeated interruption or open areas that stay separate. The choice should follow your aim rather than an assumed rule that every curve must connect.
Count the curved area in the study
The area of a quarter circle is one quarter of pi times the radius squared. A two-inch-radius form therefore covers pi square inches, about 3.14.
A four-inch-radius form covers four times pi, about 12.57 square inches. Doubling the radius multiplies this area by four, rather than two.
With eight of each size, the colored area is:
8 times pi + 8 times 4 pi = 40 pi, about 125.66 square inches.
The full square has 576 square inches. About 450.34 square inches remain cream in this idealized drawing, with no seam allowances counted.
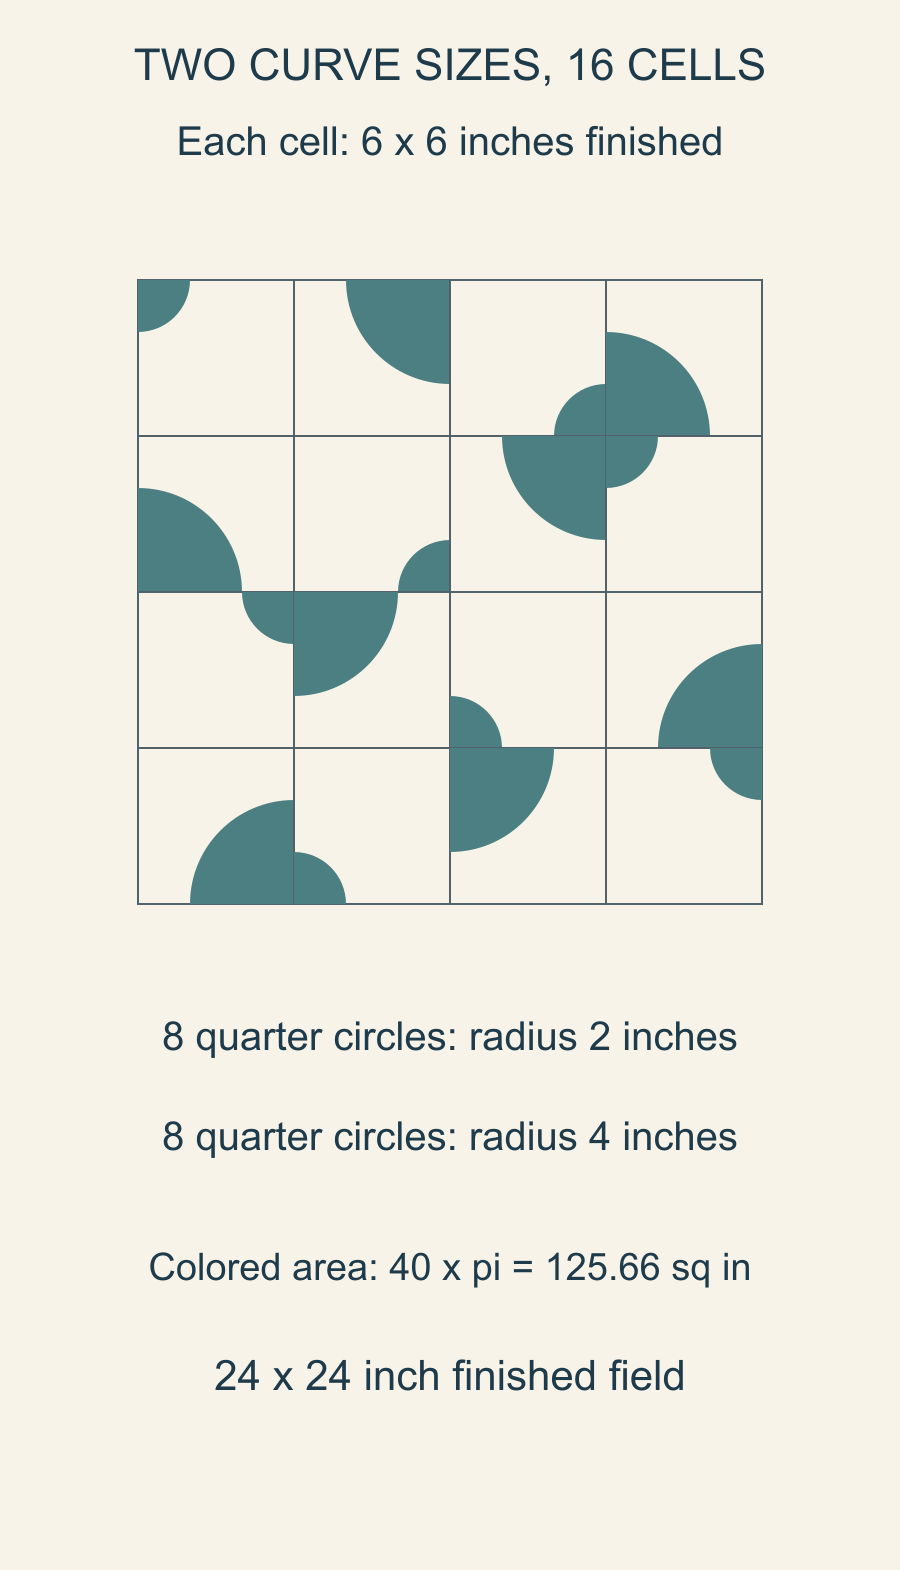
The area check tells you how much colored space the drawing contains. It doesn't establish fabric yardage, seam behavior or the visual weight of your actual prints.
Check the places where cells meet
Look at the ends of each curved colored edge where it approaches a cell boundary. Equal cell sizes don't guarantee that two arcs will meet at the same point.
Use the third and fourth cells in the top row of our drawing. Their shared edge is 18 inches across the whole field. The small arc on the left reaches that edge four inches down; the large arc on the right reaches it two inches down. Their curved endpoints are two inches apart.
That is a step between the curve endpoints, not a two-inch-wide empty gap between the cells. Some teal touches across the boundary, but the two arcs do not continue smoothly into each other.
If you want a continuous curve there, change the size or corner orientation on the drawing and check the endpoints again. If you want the interruption, record it before turning other cells.
The Canadian Quilters' Association's design guide discusses line and rhythm as relationships to observe. Use that language to explain why you keep an interruption or repeat a turn. The decision depends on the relationship you wanted to explore.
Compare fabric roles before adding more shapes
Choose a field and curve fabric with a difference you can see at the intended viewing size. A large print may interrupt the apparent curve even when the drawn outline is smooth.
Audition the actual fabrics over a small area rather than assuming the screen colors will match the cloth. If the curve's edge disappears, consider the value relationship before introducing another shape to compensate.
Our improv-constraints exercise helps keep shape and color decisions manageable. For a curve-like effect made from straight logs instead, see curved Log Cabin planning; that is a different construction approach.
Move from the chosen drawing to a real sample
Keep the sketch, size labels and corner references with the project. For these quarter-circle forms, choose a matched quarter-circle pattern or template set with its own seam allowances and registration marks. Our curved-piecing guide explains why the concave and convex raw edges differ and how their matching marks relate.
A gentle freehand curve is a different option. Goer's written tutorial cuts overlapping fabrics together, but expressly separates that method from a true Drunkard's Path quarter circle, which needs different templates for the two pieces. Choose the method for the shape you intend to sew; don't cut these drawn quarter circles by treating a shared outline as both raw edges.
Make one small sample before multiplying the design. Measure the pressed unit, inspect how the curve sits and record the construction choices that need adjustment. Those observations belong beside the drawing once they exist.
If the sample finishes smaller than six inches, investigate that before repeating it. Trimming every other unit to match would change the twenty-four-inch field and the area comparison you planned.
Start with two curve sizes now and sketch sixteen simple cells. Check the endpoints that matter, choose a relationship you want to develop and carry that one clear question into the sample.
Free patterns to try
Printable PDF patterns with cutting charts and diagrams, free to download.
Plan your next quilt
Lay out blocks and try colors in QuiltLab's grid editor before you cut.
Free forever, no card needed.
Explore freeform quilt designGet quilting tips by email
QuiltLab updates, tips and quilting inspiration. Unsubscribe anytime.
Related posts

When Is an Improv Quilt Finished?
Stop changing a composition when it answers your current design question. A before-and-after study helps separate necessary fixes from new ideas.

Build an Abstract Quilt Design from Three Shapes
Turn a sketch you own into a clear patchwork plan. Three colored rectangles show how to preserve a composition while extending a few straight seams.

Start a Damaged Quilt Assessment Before Repair
Record what you see, what you were told and what remains unknown before changing a damaged quilt. A simple condition map organizes the questions.