Repeat Improv Quilt Blocks Inside One Shared Size
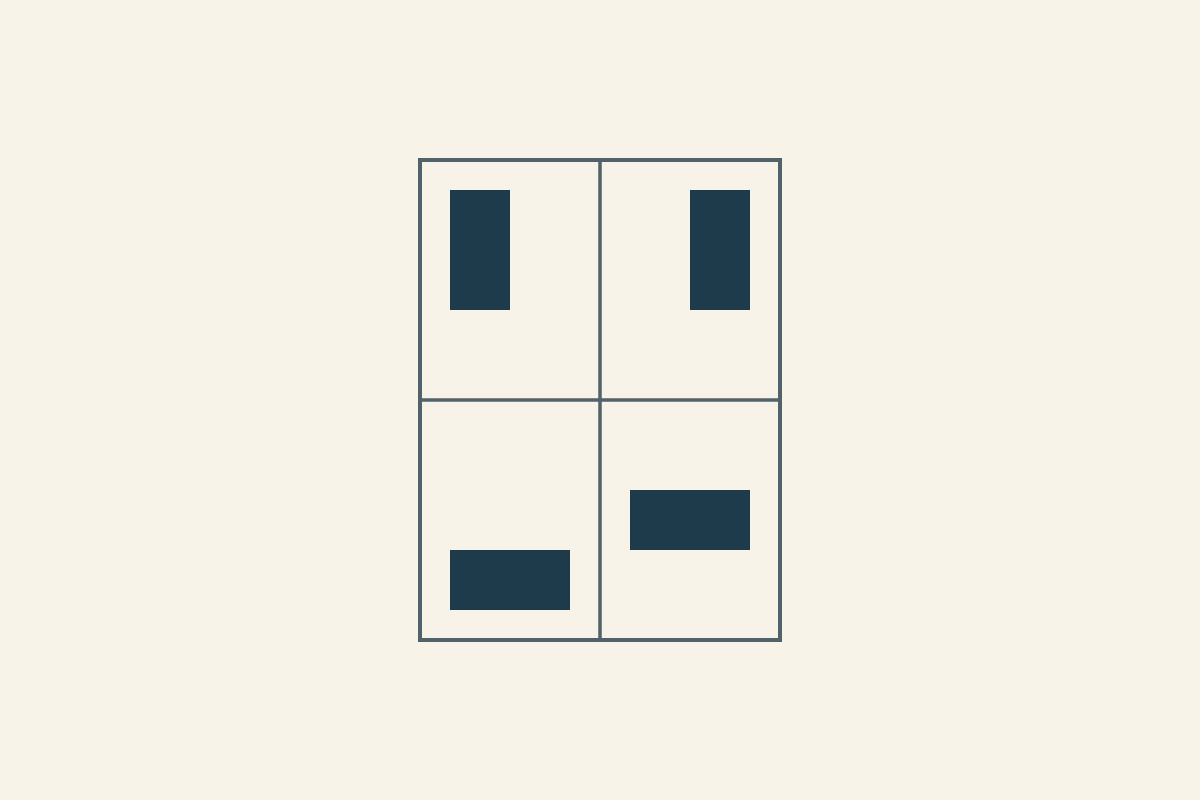
When you're repeating improv quilt blocks, keep one outside envelope and a few clear shape or color jobs, while letting the arrangement vary inside. That gives the units something in common without requiring every block to look identical. Start with a rule card small enough to keep beside the work.
For our study, each unit finishes at six by eight inches, with a cream field and one navy rectangle. The shared size makes placement predictable; the rectangle's position and direction remain open.
Choose what must stay the same
Set the unit's finished width and height, the shape vocabulary and the fabric roles. Leave enough undecided to respond to the pieces as you work.
Carole Lyles-Shaw describes beginning with a shape or color idea and changing it through cutting and piecing in her Art of Improv interview with Jen Broemel. Her distinction between an intended process and a fixed outcome is useful here.
Our card says: six-by-eight finished envelope, cream field, one navy rectangle of eight square inches. That rectangle can stand vertically or horizontally and can move within the field.
Keep the card beside the drawing so you can tell a planned variation from a changed brief. For this exercise:
| Keep fixed | Leave open | Check together |
|---|---|---|
| Six-by-eight finished frame | Rectangle position | Does each form stay inside the frame? |
| One eight-square-inch navy rectangle | Vertical or horizontal direction | Does the same shape remain recognizable? |
| Cream as the surrounding field | Which units become neighbors | Do the four units answer the same brief? |
Keep the rectangle simple enough to inspect
A two-by-four rectangle and a four-by-two rectangle each cover eight square inches. Turning that form changes its direction while keeping its area.
The historical Blue Repetition Challenge from Quilt Improv Studio encouraged variation of a recurring form. Its old event rules are a useful prompt, not a currently open invitation or permission to copy submitted designs.
Try position and direction before adding more shape types. You can create useful differences by moving one form nearer an edge or leaving more open space on one side.
If a second shape becomes necessary for the design you want, change the rule deliberately and note it. A rule card should make the choice visible rather than turn it into a mistake to hide.
Work four units within the same envelope
For our drawing, use a top-left origin within each six-by-eight unit. The numbers below locate the rectangle in finished space.
| Unit | Rectangle's upper-left corner | Rectangle size |
|---|---|---|
| A | 1 inch across, 1 down | 2 by 4 inches |
| B | 3 inches across, 1 down | 2 by 4 inches |
| C | 1 inch across, 5 down | 4 by 2 inches |
| D | 1 inch across, 3 down | 4 by 2 inches |
Every rectangle stays within its unit. A and B each end five inches down; C ends seven down; D ends five down. Each still has a cream margin around the shape.
We drew these unit studies and haven't sewn them. They describe finished-space relationships, with a separate construction and seam plan still needed.
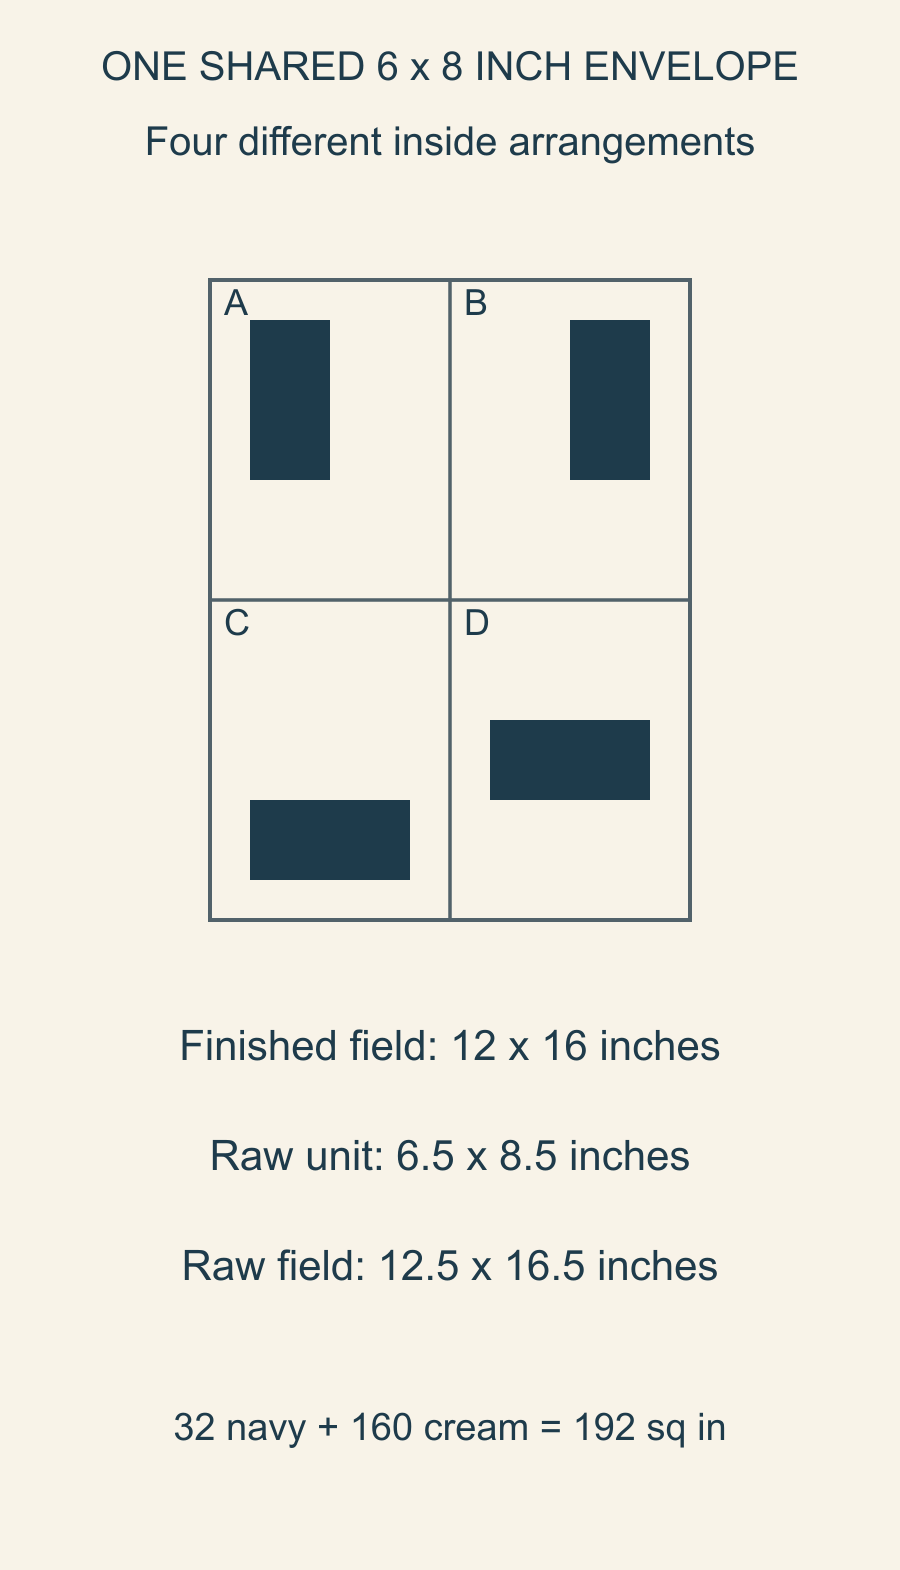
Each unit contains 48 square inches, with eight navy and 40 cream. Four units give 32 navy square inches and 160 cream, a total of 192.
Arrange the units as a single composition
Place A and B across the upper row, with C and D below. Two six-inch widths give 12 inches across; two eight-inch heights give 16 inches down. Twelve times sixteen confirms the 192-square-inch total.
Look at the units together before deciding which variation to make again. Two individually appealing units may create an awkward cluster when their strongest shapes sit beside each other.
The Canadian Quilters' Association's design-elements guide discusses line, repetition and rhythm as relationships within a composition. Use those terms to describe what you notice rather than assigning the arrangement an objective balance score.
Try swapping the lower units or turning the entire layout on paper. Record what changed in the relationship, not just whether you liked the new picture more.
Keep the raw envelope separate from the drawing
With nominal quarter-inch outside seams, a unit finishing at six by eight inches measures 6.5 by 8.5 inches raw before it joins neighboring units.
Two raw widths give 13 inches; their joining seam consumes half an inch, leaving 12.5 inches raw across. Two raw heights give 17 inches; their joining seam leaves 16.5 inches raw down.
Those outside measurements don't tell you the cutting dimensions of every internal piece. Each internal seam and the chosen construction method need their own allowance and sample check.
Measure each pressed unit across the top, middle and bottom, then down the left, middle and right. Write the measurements beside its letter. A unit with one six-and-a-half-inch edge but a narrower middle has not met the intended raw envelope.
If one is short, decide whether to add a planned background piece, revise its position or set it aside. Recheck the color relationship after any repair. Stretching it to the expected measurement will not resolve the missing width, and trimming all the other units changes the outside plan.
Distinguish an inside turn from a whole-unit turn
Turning the two-by-four rectangle inside the drawing leaves the outside six-by-eight envelope available. Turning a whole rectangular unit by a quarter turn changes its outside footprint to eight by six inches. It will no longer fit the same six-by-eight position without another design decision.
A half turn keeps a rectangular unit six by eight inches, although the inside shape moves. Mark the top edge before comparing that option. This separates an allowed outside size from a position you actually want in the composition.
You can turn the entire quilt drawing if you prefer a wider arrangement. The twelve-by-sixteen field then becomes sixteen by twelve, with every unit turned together. Keep that overall choice separate from casually rotating one unit inside an unchanged slot.
Use the card to decide what comes next
Keep a short note with each unit: what you tried, its actual measured state and whether you want to use it. A drawing, a partly sewn unit and a pressed raw block are different stages.
Our improv-constraints article explores a broader first-study brief. This exercise adds a repeatable outside size so varied units can become neighbors in one quilt.
If you are comparing very different motifs at a common size, the sampler-layout guide offers another view of arranging a group. Keep the improv choices open within the envelope you selected.
Write one rule card now and sketch four arrangements inside it. Compare them as a group, choose a real construction approach and make one measured unit before extending the set. The shared size gives the work a place to meet while leaving room for the inside to change.
Free patterns to try
Printable PDF patterns with cutting charts and diagrams, free to download.
Plan your next quilt
Lay out blocks and try colors in QuiltLab's grid editor before you cut.
Free forever, no card needed.
Explore freeform quilt designGet quilting tips by email
QuiltLab updates, tips and quilting inspiration. Unsubscribe anytime.
Related posts

When Is an Improv Quilt Finished?
Stop changing a composition when it answers your current design question. A before-and-after study helps separate necessary fixes from new ideas.

Build an Abstract Quilt Design from Three Shapes
Turn a sketch you own into a clear patchwork plan. Three colored rectangles show how to preserve a composition while extending a few straight seams.

Start a Damaged Quilt Assessment Before Repair
Record what you see, what you were told and what remains unknown before changing a damaged quilt. A simple condition map organizes the questions.