Match Curved Quilt Piecing Before You Sew

For curved quilt piecing, match the ends, center and quarter marks from your pattern before sewing. The concave and convex cut edges can have different lengths because their seam allowances sit on opposite sides of the same seam. Use the matching marks to bring the pieces together without stretching either curve.
For a first curved block, start with a large Drunkard's Path unit and a pattern or ruler that includes the allowances. Sharon McConnell's guest lesson at Diary of a Quilter recommends a block of 6 inches or larger for beginners.
Identify the two shapes and the shared seam
A basic Drunkard's Path unit has a convex quarter-circle piece and a concave background shaped like a rounded L. The quarter-circle edge bulges outward; the L-shaped opening curves inward.
The seam is the line where those two pieces will join. Each raw edge sits one seam allowance away from it. On the quarter-circle piece, the raw arc extends beyond the seam; the background's cut opening reaches inward past it.
Carli Marsico's Curved Piecing 101 explains why those raw arcs have different radii. Laid in their finished positions, the cut pieces overlap to provide the allowances.
Think of two tracks around a bend: the outer track travels farther between the same angles. The mismatch you see on the table can be part of the correct pattern geometry.
Our curved Log Cabin article covers an apparent curve made with straight strips. Here, the two pieces actually join along a curved seam.
See what a quarter-inch allowance changes
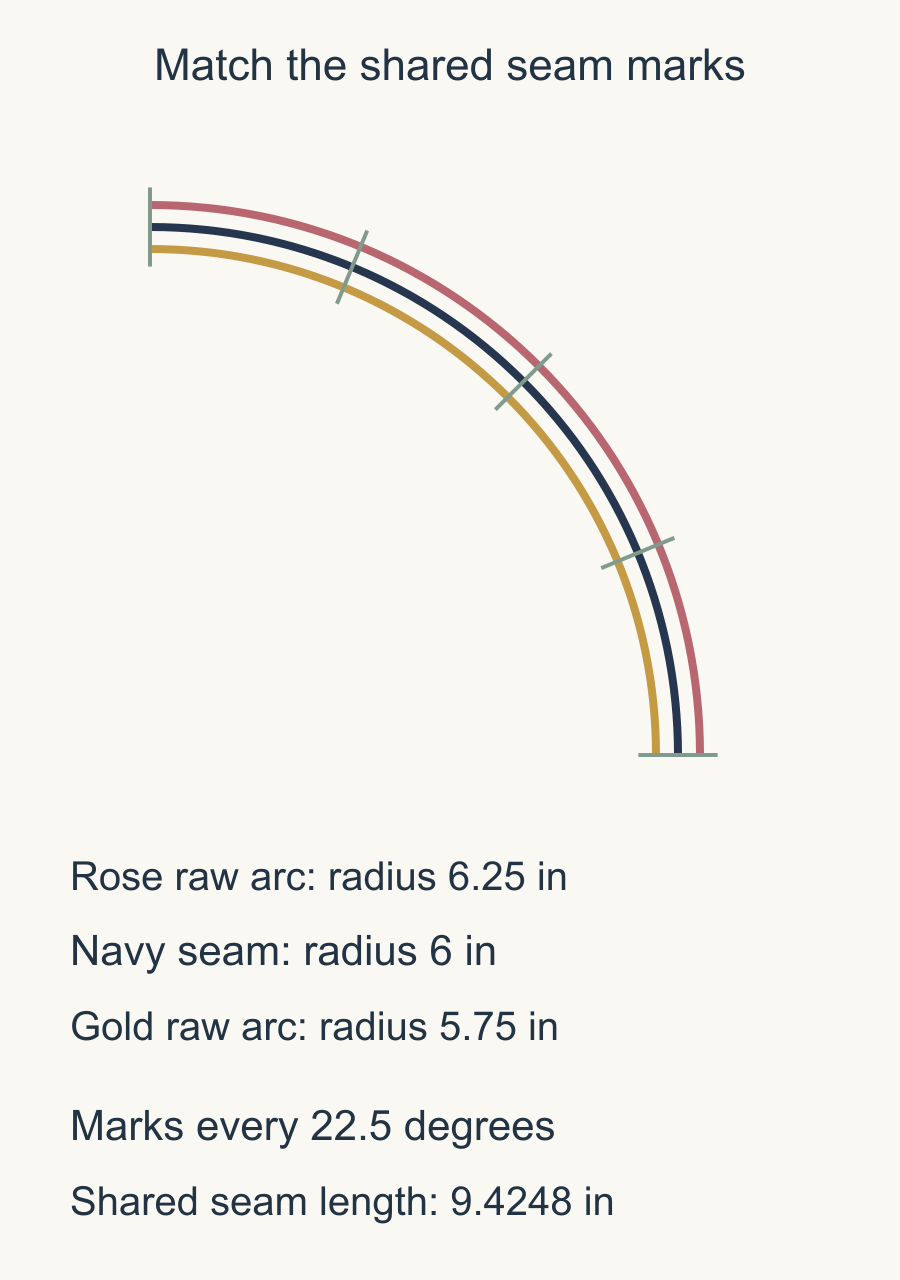
Take a quarter-circle seam with a 6-inch radius. This is the radius of the seam in our drawing, rather than a finished-block measurement.
A full circle runs through 360 degrees. This seam covers 90 degrees, so its length is one quarter of the circumference: 3 times pi, or about 9.4248 inches.
For quarter-inch offsets, the quarter-circle piece's raw arc has a radius of 6.25 inches. The background's raw arc has a radius of 5.75 inches.
| Arc | Radius | Quarter-arc length |
|---|---|---|
| Outer raw boundary | 6.25 in | 9.8175 in |
| Shared seam | 6 in | 9.4248 in |
| Inner raw boundary | 5.75 in | 9.0321 in |
The two raw arcs differ by about 0.7854 inch. The intended seam length remains the same for both pieces.
Trying to stretch the shorter raw arc into the longer arc's flat shape changes the fabric. The useful question is whether the pattern's matching references come together with the pieces right sides together.
Mark the ends, center and quarters
In the drawing, the seam runs from 0 to 90 degrees. Its center is at 45 degrees; the two quarter marks are at 22.5 and 67.5 degrees.
Those five landmarks divide the seam into four equal sections. Each mark on one piece corresponds to the same place along the other piece's intended seam.
On actual fabric, use the pattern's notches, marked references or folding directions. Annie's curved-piecing guide finds the centers by folding and finger-pressing, then matches the centers, ends and quarter marks.
Keep the pieces identifiable as you turn them. If you have several similar curves, label each pair on the paper plan before cutting a large batch. That avoids trying to join a concave piece to a curve from a different unit.
Pin one pair before preparing the whole batch
Lay the pair in its intended finished arrangement first. Confirm which edges join, then bring the fabrics right sides together.
Using your chosen teacher's method, match the center, the two ends and the quarter marks. Add pins between those references as needed to control the fabric. Annie's guide warns against tugging curved bias edges during cutting and sewing.
For a first pinned sample, Sharon McConnell's method is a useful starting point: she puts the concave L-shaped piece on top. She also explains that she reverses that preference when sewing without pins. Keep the fabric orientation with the method you are following.
Check the fabric between the pins. It may rise or bunch away from the seam while the curves come together. Keep folds out of the area where the needle will sew.
If a reference cannot meet without substantial pulling, stop and check the pair. Is one piece reversed? Are the intended edges together? Do both pieces match their templates? A wrong pair will not improve through stretching.
Keep the allowance steady around the bend
Before sewing all the project's units, make one sample using the actual fabrics and seam allowance specified by the pattern. The sample checks both the machine setup and your handling of the curve.
Our scant quarter-inch seam test covers a straight-piecing setup. With a curve, you also need to keep the intended seam path steady as the fabric changes direction.
Sharon recommends beginning slowly and feeding the fabrics evenly. If your machine has needle-down, her lesson suggests using it so you can stop to adjust the fabric without losing its position. Remove pins before the needle reaches them.
Inspect the seam before pressing. Look for a caught fold, a missed reference or an allowance that narrows through one section. Fix a clear construction problem before repeating it across the batch.
Check both the curve and the block frame
Press as the pattern directs, then compare the unit with its stated measurement. Inspect the curve for puckers as well as checking the straight outer edges.
A smooth seam can sit inside a block that needs different trimming. A square outer frame can also hide a caught fold. One check does not replace the other.
Keep the useful sample with notes about the pattern, matching marks, seam setting and pressing method. If an earlier sample caught a fold, label the spot so you know what to watch on the next one.
Before cutting the full batch, identify one pair, find its five matching references and sew that sample. Check its curve and outer frame, then use what you learned for the remaining units.
Free patterns to try
Printable PDF patterns with cutting charts and diagrams, free to download.
Plan your next quilt
Lay out blocks and try colors in QuiltLab's grid editor before you cut.
Free forever, no card needed.
Get quilting tips by email
QuiltLab updates, tips and quilting inspiration. Unsubscribe anytime.
Related posts

When Is an Improv Quilt Finished?
Stop changing a composition when it answers your current design question. A before-and-after study helps separate necessary fixes from new ideas.

Build an Abstract Quilt Design from Three Shapes
Turn a sketch you own into a clear patchwork plan. Three colored rectangles show how to preserve a composition while extending a few straight seams.

Start a Damaged Quilt Assessment Before Repair
Record what you see, what you were told and what remains unknown before changing a damaged quilt. A simple condition map organizes the questions.